










No-Paint Paper Bowl Jellyfish Craft – Easy Ocean Summer Craft for Toddlers & Preschoolers
Why This Jellyfish Craft Is Perfect for Little Hands
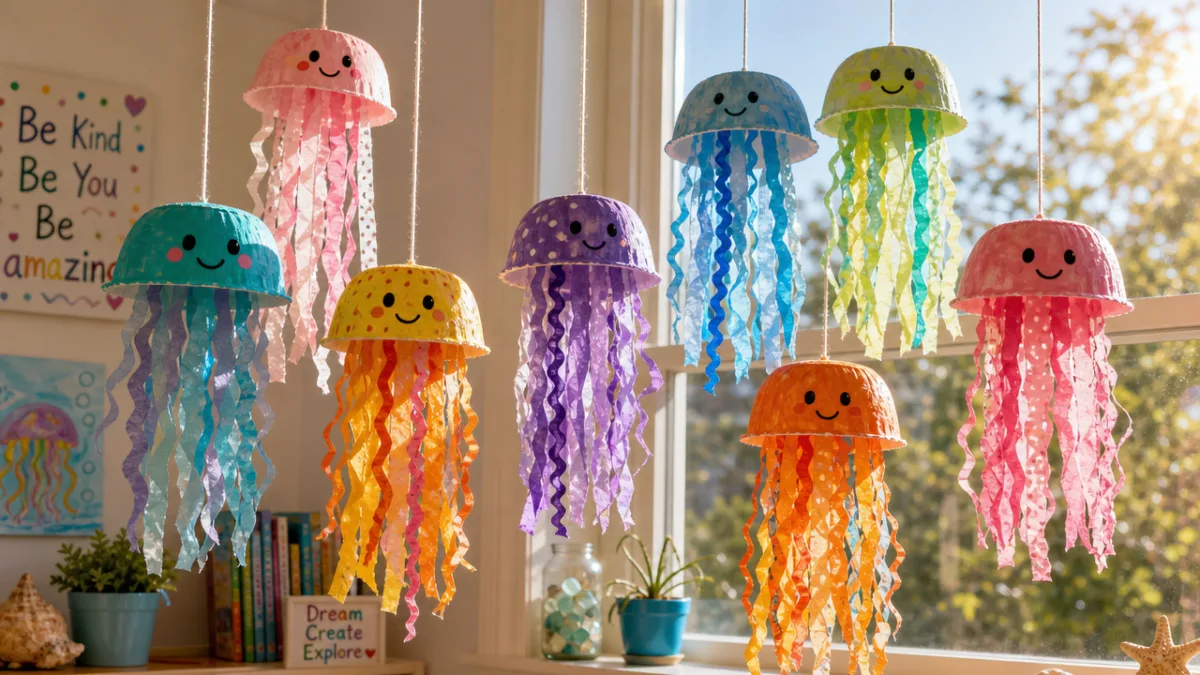
If you’ve ever tried to do a painting project with a toddler, you already know the chaos that can follow. So when I say this no-paint paper bowl jellyfish craft is a game-changer, I mean it. It’s low-mess, genuinely fun, and kids actually love what they make at the end. We’re talking refrigerator-worthy (or ceiling-worthy, if you want to hang it in their room). No panicking over paint on the carpet. No stained shirts. Just happy little crafters.
What I love most about this one is how little prep it takes. No specialty store run, no big budget. Most of what you need is probably already at home — paper bowls, tissue paper, some ribbon, googly eyes, glue. That’s basically it. If you’ve got a two-to-five-year-old and a long summer day stretching out in front of you, this craft can be set up in minutes and will actually hold their attention. And depending on how much independence your kid is ready for, you can dial their involvement up or down pretty easily.
There’s also something kind of wonderful about using a jellyfish as the subject. They’re these mesmerizing, floaty, otherworldly creatures — and kids are almost universally fascinated by them. Making one opens up all kinds of conversations about the ocean, sea life, what’s actually living down there in the deep. It turns into a whole little learning moment without anyone realizing they’re being taught anything. That’s the sweet spot, right?
Materials You Will Need for Your Paper Bowl Jellyfish
Okay, here’s the good news: the supply list is genuinely short. Nothing fancy, nothing hard to find. If you’re not already stocked up, a quick trip to the dollar store will cover basically everything, and you’ll likely have leftovers for future projects. My one big recommendation before you sit down with your kiddo: get everything laid out first. The second a toddler is ready to craft, you do not want to be hunting for scissors.
Lay your supplies out on a protected surface — a plastic tablecloth or some old newspaper works perfectly. Even without paint, glue and tissue paper have a way of creating their own cheerful little tornado, and having an easy-to-wipe surface just makes the whole thing so much more relaxed. The mess is part of the fun. You just don’t want it to be the part you’re still dealing with after bedtime.
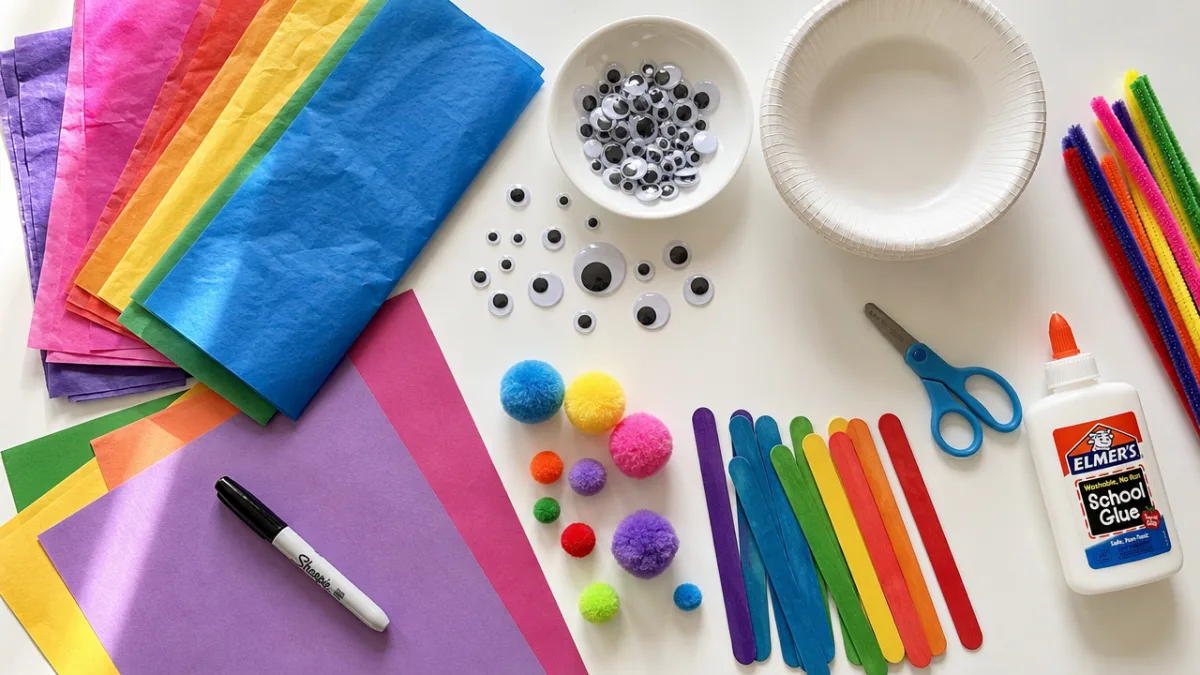
Here’s everything you’ll need to make one jellyfish. Multiply as needed for siblings, classrooms, or a rainy afternoon with a crowd:
- One medium-sized paper bowl (the dome shape is honestly perfect for a jellyfish bell)
- Strips of colorful tissue paper or crepe paper streamers for the tentacles
- A length of ribbon, yarn, or twine if you want to hang it
- Two large googly eyes or self-adhesive craft eyes
- White school glue or a glue stick
- Scissors (for adult use ahead of time)
- Stickers, foam shapes, or metallic dot stickers for optional decoration
- A hole punch if you’re planning to hang the finished jellyfish
A quick note on the tissue paper, because this is really where your jellyfish gets its personality. Bright pinks, purples, aqua, and coral give you a bold, vibrant look that kids tend to go absolutely wild for. If you want something a little more true-to-ocean, cooler blues, greens, and whites look stunning too. Honestly? Let your child pick. Watching them make those choices — and take ownership of what they’re creating — is half the magic of the whole activity.
Step-by-Step Instructions for Making Your Jellyfish
Alright, let’s actually make this thing! The pace of this project is one of my favorite things about it — it moves fast enough that kids stay genuinely engaged, but there are enough hands-on moments to keep even the wiggly ones interested. No long waiting periods, no complicated steps, just one fun bit after another until suddenly you’re holding a jellyfish.
Before your child sits down, go ahead and pre-cut the tissue paper or crepe paper into strips, roughly twelve to fifteen inches long. This is a grown-up job, and doing it ahead of time means the fun starts the second little ones are ready. That said, if your kiddo is on the older end of the preschool range, cutting strips with child-safe scissors can be a really great fine motor activity in itself. Wonky, uneven strips? Absolutely fine. Charmingly imperfect tentacles are part of the look.
Then just follow these steps together:
- Flip the paper bowl upside down so the rounded dome faces up — that’s your jellyfish’s body.
- Help your child apply glue around the rim of the bowl (the edge that’s now at the bottom).
- Press the ends of the tissue paper strips into the glue, layering them all the way around to create that full, flowing fringe of tentacles.
- While the tentacles dry, glue the two googly eyes onto the front of the dome.
- Decorate the top with stickers, dots, or foam shapes — whatever your child is feeling.
- Once everything’s dry, use a hole punch to make a small hole at the top of the dome, thread ribbon through, and it’s ready to hang!
Drying time is pretty minimal, especially with a glue stick. Within fifteen to twenty minutes, you’re mostly good to go. If you use liquid glue, that brief wait is a perfect opportunity to pull out an ocean picture book or make up a silly song about sea creatures. Keep the jellyfish energy going while the glue does its thing.
Developmental Benefits of This Craft for Young Children
It’s easy to look at this craft and just see a fun afternoon activity — but there’s actually a lot happening developmentally while those little hands are tearing tissue paper and pressing on googly eyes. Early childhood educators talk about this stuff all the time, and for good reason. A simple hands-on craft can hit multiple areas of development at once in a way that feels completely natural because, well, it just feels like playing.
Fine motor skills are probably the most obvious one. Tearing paper, pressing strips into glue, peeling sticker backs, placing those googly eyes just so — all of that is strengthening the small hand muscles kids will eventually need for writing, drawing, using scissors, buttoning clothes. It might look like simple fun, but at a neurological level, every little tear and press is doing real work. These are foundational skills, and building them through joyful play is about as good as it gets.
There’s also something important happening creatively. When a child gets to choose their own tentacle colors, decide where to put their stickers, and declare their jellyfish finished on their own terms, they’re exercising real creative autonomy. For kids who spend most of their day being told what to do, that kind of open-ended decision-making is genuinely empowering. The finished jellyfish is theirs in a way that a coloring page never quite is — it came from their choices, their hands, their ideas — and that builds real confidence and pride.
Language development sneaks in too, which I love. Talking about jellyfish naturally opens up conversations about the ocean, sea creatures, colors, textures, movement. “How do you think jellyfish swim?” or “What do you think they eat?” are questions that spark curiosity and real thinking, all in the context of something the child is already excited about. That kind of vocabulary-rich, wonder-driven conversation is one of the best things you can do for early literacy — and it happens completely naturally over a craft table.
Tips for Making This Craft a Success Every Time
Even a simple craft goes more smoothly when you’ve got a few tricks up your sleeve. After doing this one with a few different kids, some strategies have really stood out as genuine game-changers — small things that make a big difference in how relaxed and enjoyable the whole experience is. None of them require extra supplies or extra effort. They’re just shifts in how you approach it.
The biggest one: resist the urge to fix things. A jellyfish with lopsided eyes and stickers stuck in unexpected places is not a problem — it’s a perfectly successful project. The moment you start correcting a child’s creative choices, the joy kind of deflates out of the whole thing. Your job in this session is to encourage and celebrate, not to end up with something Pinterest-worthy. The process is always the point, especially at this age.
Here are a few more tips that genuinely help:
- Pre-tear a small pile of tissue paper strips before you begin so there’s always a ready supply within reach — no waiting, no interruptions.
- Use a glue stick rather than liquid glue for toddlers; it’s so much easier for small hands to control and skips the dripping-everywhere phase entirely.
- Work in small sections — glue a bit of the rim, add tentacles, move to the next bit — rather than trying to do the whole rim at once.
- Keep a damp cloth nearby for quick finger wipes, because glue on fingers makes peeling stickers incredibly frustrating.
- If you’re doing this with a group, set up individual trays for each child so materials stay personal and there’s no competition over the good colors.
- Put on some soft ocean-themed music in the background — it genuinely adds to the whole vibe.
And for the moments when frustration creeps in (totally normal, totally developmentally appropriate), having a few encouraging phrases ready really helps. “Look how many tentacles you’ve already added!” or “Your jellyfish is going to be so beautiful” can turn a wobble back into momentum. Focusing on effort rather than outcome — “You worked so hard on that!” — is one of those classic positive psychology moves that genuinely builds resilience over time. Little comments during a craft session can have a surprisingly lasting impact on how a child feels about creating.
Ways to Extend the Ocean Theme Beyond the Craft Table
Once your jellyfish is hanging from the ceiling and looking gorgeous, the ocean fun doesn’t have to stop there. This craft makes such a great jumping-off point for a whole week of ocean-themed activities. Young kids really thrive when a theme carries through across different kinds of play — it reinforces ideas, builds vocabulary, and keeps them excited and engaged in a way that one-off activities just don’t. And the ocean is such a rich theme to work with. There’s genuinely no shortage of directions to go.
One of my favorite follow-ups is a simple ocean sensory bin. Grab a plastic storage bin, fill it with blue-tinted water, add some smooth river stones, plastic sea creatures, and a few craft foam fish, and you’ve got an irresistible little world for your child to explore. Set the finished jellyfish nearby as a visual anchor and watch how quickly it gets incorporated into imaginative play. Sensory bins are great for vocabulary, cognitive development, and honestly just keeping kids happily occupied, and they pair beautifully with a craft like this one.
Books are another wonderful extension. The ocean is one of the most richly illustrated topics in children’s picture books, and there are great options for every age. Read one together, then come back to the hanging jellyfish and compare notes. Did you learn something surprising about real jellyfish? Does your paper one look anything like the ones in the illustrations? Making those connections between art, reading, and the real world is exactly the kind of integrated learning experience that sticks.
You could also just keep building on the craft itself over a few days. Once the jellyfish is done, encourage your child to make more ocean creatures using the same basic approach — a crab from a folded paper plate, a fish from a paper bag, a starfish from a painted handprint. Before long you’ve got a whole underwater world made entirely by little hands. String everything together along a piece of twine near a window and you have a genuinely beautiful display that your child will beam about every single time they see it. It’s creativity, learning, and summer magic all in one.








What do you think?
It is nice to know your opinion. Leave a comment.