










Easy Popsicle Stick Crafts for Kids: A Complete Guide to Creative Fun
Why Popsicle Stick Crafts Are Perfect for Kids
Popsicle sticks are one of the most versatile and accessible craft materials available to parents and educators today. They are inexpensive, widely available at dollar stores and craft shops, and come in both natural wood tones and vibrant colors. Best of all, they are safe for children of nearly all ages, with no sharp edges or toxic materials to worry about. Whether you have a rainy afternoon to fill or you are planning a structured art session, popsicle sticks can be the foundation of countless creative projects that keep kids engaged for hours.
Beyond simple entertainment, crafting with popsicle sticks offers children meaningful developmental benefits. When kids manipulate small sticks, arrange them into patterns, and glue them together, they are actively strengthening their fine motor skills. These are the same muscle movements they will rely on when learning to write, button a shirt, or tie their shoes. The act of planning a craft project also encourages early problem-solving skills, as children must figure out how to make their vision come to life using the materials in front of them.
There is also a powerful emotional component to creative crafting that should not be underestimated. Children feel a tremendous sense of pride and accomplishment when they finish a project they made entirely with their own hands. This boosts self-esteem and encourages a growth mindset — the idea that effort and practice lead to improvement. Popsicle stick crafts are particularly well suited to this because projects can range from extremely simple for toddlers to impressively complex for older kids, meaning every child can experience success at their own level.
Materials You Will Need to Get Started
Before diving into specific projects, it helps to have a basic craft kit ready to go. The essentials are straightforward and affordable. You will want a good supply of plain wooden popsicle sticks, which you can buy in bulk bags of 500 or more for just a few dollars. Colored craft sticks are also a wonderful addition, as they eliminate the need to paint some projects and naturally inspire more colorful creations. Having both sizes on hand — standard craft sticks and the smaller mini sticks — gives you even more flexibility.
Adhesives are equally important. A good non-toxic craft glue works well for most projects and is safe for young children to handle. For older kids working under supervision, a low-temperature hot glue gun significantly speeds up drying time and creates stronger bonds that hold up better in three-dimensional projects. You will also want paint in an assortment of colors, foam brushes for easy application, markers, glitter, googly eyes, pipe cleaners, felt scraps, ribbon, and yarn. Keeping these supplies organized in a dedicated craft box means you can jump into a project at a moment’s notice.
Setting up a proper crafting workspace makes the experience more enjoyable and less stressful for both kids and adults. Cover your table with a plastic tablecloth or a large sheet of craft paper to protect the surface from glue and paint spills. Have paper towels and a damp cloth nearby for quick cleanups. A tray or shallow box for each child helps keep their materials organized and creates a clear physical boundary for their workspace. When children feel comfortable and prepared, they tend to stay focused and creative for much longer stretches of time.

Simple Beginner Projects for Toddlers and Preschoolers
For the youngest crafters, the goal is less about producing a perfect finished product and more about the sensory and exploratory experience of working with materials. One of the easiest and most satisfying beginner projects is the simple popsicle stick picture frame. You need just four sticks, some glue, and whatever decorating materials the child enjoys. Lay four sticks in a square shape, glue them together at the corners, and then let the child go to town decorating with stickers, glitter glue, and markers. Once it dries, attach a photo and a loop of ribbon for hanging.
Rainbow stacking crafts are another excellent choice for toddlers. Give a child a pile of colored craft sticks and ask them to sort and arrange them by color into rainbow arcs on the table. You can glue cotton balls at one or both ends to represent clouds and then mount the whole thing on a piece of card stock with a blue or white background. This project teaches color recognition, pattern making, and sequencing — all important early learning concepts — while also producing a cheerful piece of artwork the child will be proud to display.
Simple stick people and animals are perennially popular with young children because they connect craft-making to storytelling and imaginative play. Using a handful of sticks arranged in the shape of a person or an animal and secured with glue, kids can create whole families of characters. Adding googly eyes immediately transforms a flat stick figure into something with personality and life. Encourage children to name their characters, describe what they do, and even build simple settings for them out of additional sticks, turning the craft session into an extended narrative play activity.
Step-by-Step: Making a Popsicle Stick Picture Frame
This project is so simple that even a three-year-old can participate with minimal adult assistance. Here is how to do it from start to finish in just a few easy steps that guarantee a satisfying result every time.
- Lay four popsicle sticks in a square shape on your work surface, with each stick overlapping the ends of the two adjacent sticks to form the corners of a frame.
- Apply a drop of craft glue to each of the four corner overlaps and press firmly, then allow the frame to dry completely for at least 20 to 30 minutes before moving it.
- Once dry, decorate the frame however you like using paint, markers, stickers, washi tape, glitter glue, or small craft gems and buttons for texture and sparkle.
- Cut a favorite photo to size so that it fits just behind the frame opening, then glue it in place on the back.
- Attach a loop of ribbon to the back of the top stick using hot glue or strong craft glue so the frame can be hung on a wall or from a doorknob.
The beauty of this project is that no two frames look alike, which makes it a wonderful group activity for birthday parties, classroom craft days, or holiday gift-making sessions. When children give a handmade frame containing a special photo as a gift to a grandparent or teacher, the emotional value far exceeds anything that could be purchased from a store. Adults treasure these handmade gifts for years, which reinforces for the child just how meaningful their creative work truly is.

Intermediate Projects for School-Age Kids
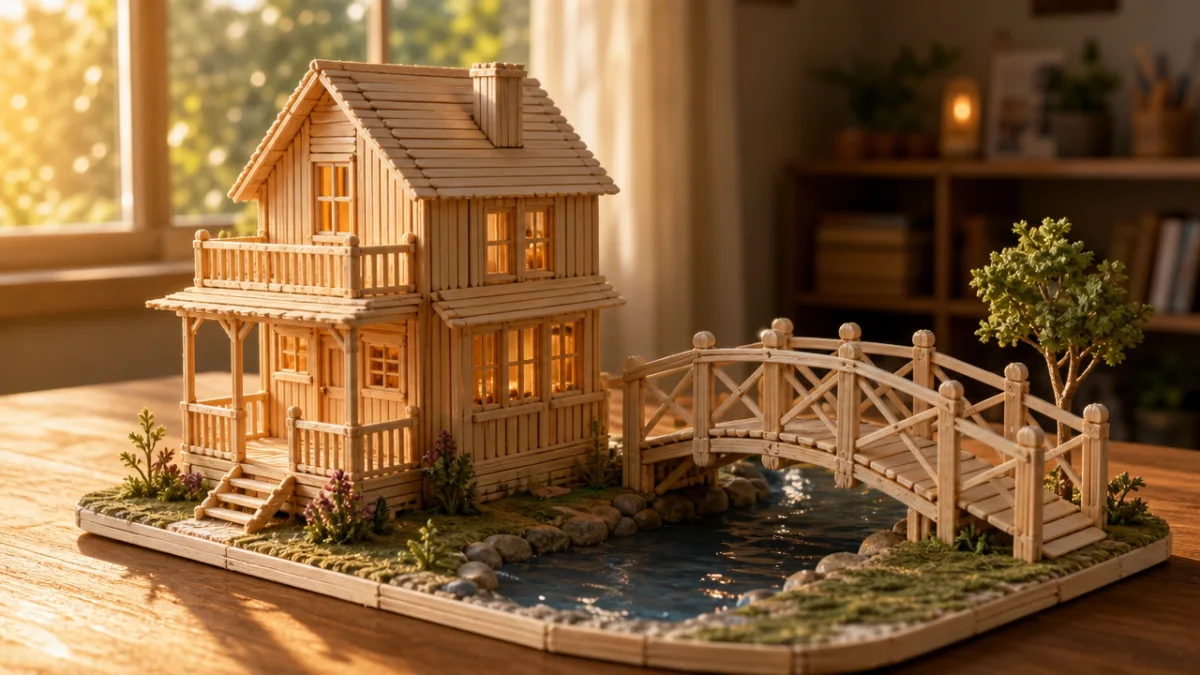
Once children are comfortable with basic gluing and have developed a bit more patience and dexterity, they are ready for more complex and satisfying popsicle stick projects. Building a miniature log cabin or tiny house is one of the most popular intermediate crafts, and for good reason. Children stack sticks in alternating layers, like real Lincoln Logs, gradually building up the walls of a structure. The process teaches them about architectural concepts like load-bearing walls and structural stability in a completely hands-on and intuitive way.
Popsicle stick bridges are a classic school project that combines crafting with engineering principles. Challenge your child to build the longest or the strongest bridge they can using only popsicle sticks and glue. Once the bridge has dried overnight, test its strength by gradually placing small weights — coins, blocks, or action figures — on the surface to see how much it can hold before buckling. This activity is endlessly engaging and naturally sparks conversations about engineering, design, and the scientific method in a way that never feels like schoolwork.
For children who love art over engineering, a mosaic-style popsicle stick wall hanging offers a beautiful and meditative creative challenge. Break or cut sticks into varying lengths and arrange them in geometric patterns, color gradients, or free-form designs on a flat backing board. The sticks can be painted first or left natural for a more rustic look. The finished piece resembles a piece of modern wooden art and looks genuinely impressive displayed in a bedroom or playroom. This project also develops patience and spatial reasoning as children plan their design before committing to gluing everything in place.
Building a Mini Popsicle Stick House
Building a miniature house from popsicle sticks is one of those projects that children return to again and again, getting more sophisticated with each attempt. The basic structure is straightforward: you build four flat wall panels, each made by gluing several sticks side by side across two horizontal sticks for support, then glue the four walls together at right angles to form a box shape. A roof can be constructed from two flat panels leaned together at an angle and secured with glue at the peak, or you can make a flat roof for a more modern aesthetic.
Once the basic structure is in place, the real fun begins with decoration. Children can paint the exterior, add a tiny popsicle stick door that swings open on small hinges made from folded tape, cut windows from card stock and glue them in place, or add a chimney from stacked mini sticks. Some kids go on to build entire neighborhoods of stick houses, complete with roads drawn on poster board, tiny trees made from pipe cleaners, and fences built from mini sticks pushed into clay. What starts as a single craft project can blossom into weeks of ongoing imaginative world-building.
There are a few practical tips that make the house-building process go more smoothly and produce more satisfying results. Allow each section to dry completely before moving on to the next stage — rushing this step leads to wobbly walls and frustrated kids. A rubber band wrapped around a freshly glued corner while it dries acts as a clamp and helps the joint set more strongly. If you are using regular craft glue, consider reinforcing critical joints with a touch of hot glue applied by an adult, as this dramatically improves structural integrity without requiring hours of wait time between each step.
Advanced Popsicle Stick Projects for Older Children
Older children and tweens who have mastered simpler projects may be ready for ambitious builds that challenge their planning, patience, and precision. A popsicle stick catapult is one of the most thrilling advanced projects because it actually works — you can use it to launch small soft objects like mini marshmallows across a room, which never fails to delight. The mechanism relies on the stored tension of compressed craft sticks, and learning how to build and adjust it teaches children fundamentals of mechanical physics including force, tension, and leverage in the most exciting possible way.
Constructing a functional popsicle stick basket or box using a weaving technique is another rewarding advanced project. Children weave sticks over and under each other in an alternating pattern, similar to basket weaving, to create rigid flat panels that can be assembled into a storage box. The weaving pattern creates a visually interesting texture, and the finished box is genuinely sturdy enough to hold small objects like jewelry, keepsakes, or art supplies. This project requires careful measurement and consistent spacing to come out well, which makes it excellent practice in precision and attention to detail.
For the truly ambitious young crafter, a popsicle stick suspension bridge modeled after famous real-world bridges like the Golden Gate is an extraordinary undertaking that can take several days to complete. Towers are built up from carefully layered sticks, cables are strung from wire or strong string, and a roadway deck is suspended below. The result is a genuinely impressive model that can serve as a school project or simply as a stunning display piece. Children who complete this project often talk about it for months afterward, and it gives them a lasting confidence in their own capability to take on difficult creative challenges.
Popsicle Stick Crafts for Special Occasions
Popsicle stick crafts adapt beautifully to holidays and special occasions, making them wonderful for themed parties, classroom celebrations, and handmade gift-giving. For Valentine’s Day, children can build heart-shaped frames or create bouquets of stick flowers with heart-shaped petals cut from red and pink felt. Christmas crafts might include miniature sleds, ornament frames, or stick Christmas trees decorated with mini pom-poms and tiny star stickers. Easter brings opportunities for stick picture frames shaped like Easter eggs or bunny-eared photo holders that make adorable seasonal decorations.
Mother’s Day and Father’s Day are particularly wonderful occasions for popsicle stick crafts because the handmade nature of the gift makes it uniquely personal and heartfelt. A custom photo frame, a monogrammed keepsake box, or a painted stick flower pot holder made with small hands carries a sentimental weight that no store-bought gift can match. Teachers especially appreciate these seasonal crafts because they integrate naturally into curriculum themes and produce gifts that parents genuinely treasure rather than discard after a week. The connection between craft-making and gift-giving teaches children from a very young age that creativity is a form of generosity.
Even birthdays offer excellent opportunities for popsicle stick craft projects. A custom birthday crown built from sticks, decorated with the birthday child’s name and age in glitter, becomes a wearable party hat unlike any other. Stick picture frames make perfect party favors that guests take home filled with a photo from the party. A group craft activity where all party guests build and decorate their own mini house or rocket ship together creates a memorable shared experience and sends children home with a unique souvenir of the celebration. Few activities keep a room full of excited children as happily engaged as a well-organized craft station.
Tips for Making Popsicle Stick Crafts a Positive Experience
The difference between a craft session that inspires creativity and one that ends in tears often comes down to preparation and expectations. One of the most important things adults can do is resist the urge to take over when a child’s project does not look the way they imagined. A wobbly frame or a lopsided house is not a failed project — it is exactly what a child’s first attempt should look like, and it is something they built entirely on their own. Praise the effort, the persistence, and the specific choices they made, rather than commenting on how the finished product looks compared to an ideal version.
Keeping the materials and tools appropriate for the child’s age and ability level makes a significant difference in how successful and enjoyable the experience is. Toddlers should work exclusively with non-toxic craft glue and pre-sorted materials, while school-age children can handle more tools and more complex instructions. Tweens and older children may be ready to use low-temperature hot glue guns under close adult supervision, which opens up significantly more structural possibilities and leads to more polished results. Matching the complexity of the project to the child’s developmental stage ensures that every craft session ends with a sense of achievement rather than frustration.
Finally, building in time for free exploration alongside structured projects keeps the creative experience fresh and prevents it from feeling like an obligation. Set out a pile of sticks, some glue, and a few decorating supplies with no instructions whatsoever and simply invite children to make whatever they want. You may be surprised by the inventiveness of what they create when given complete freedom. Children who regularly engage in open-ended creative play develop stronger imagination, better problem-solving skills, and greater confidence in their own ideas — qualities that serve them well far beyond the crafting table and throughout the rest of their lives.
Storing and Displaying Finished Crafts
Once children begin producing a steady stream of popsicle stick masterpieces, figuring out how to store and display them becomes a practical consideration. A dedicated display wall in a playroom or bedroom, fitted with small picture ledges or a string of clips, allows children to rotate their displayed work and feel proud of their creations without the house being overrun. Photographing each finished project before it is eventually recycled is a wonderful way to preserve the memory of what a child made at each age without keeping every single physical piece indefinitely.
For particularly special or structurally impressive pieces, a glass-fronted display cabinet or a dedicated shelf keeps dust off while allowing the work to be seen and appreciated. Labeling finished pieces with the child’s name and the date they were made turns a craft collection into a developmental record — looking back at pieces made a year or two earlier gives both the child and the parent a vivid sense of how much progress has been made. Some families even photograph their child holding their favorite finished craft and include these in family photo albums as a record of creative milestones alongside the more traditional holiday and event photographs.
Ultimately, popsicle stick crafting is about far more than the sticks themselves. It is a gateway to imagination, a vehicle for skill development, a source of pride and confidence, and a way for children and adults to connect over the shared pleasure of making something from nothing. Whether your child builds a simple picture frame in twenty minutes or spends three days constructing an elaborate stick bridge, the value of the experience lies in every moment of the process — the planning, the building, the problem-solving, and the quiet satisfaction of holding up something they made entirely with their own creative hands.








What do you think?
It is nice to know your opinion. Leave a comment.