










15+ Recommended Craft Supply Storage Ideas to Inspire Your Creative Space
Why Organized Craft Storage Transforms Your Creative Experience
If you’ve ever lost twenty minutes hunting for a specific shade of thread or the right size paintbrush, you know exactly how disorganization can quietly drain the fun out of crafting. A well-organized craft space does so much more than just look pretty in photos — it gets out of your way so your brain can actually focus on making things. When every supply has a home, you stop wasting energy managing the mess around you and start putting it into the project in front of you.
The psychological side of this is real, too. Research consistently shows that cluttered environments raise cortisol levels and make it harder to stay focused. For crafters who are already squeezing creative time between work, family, and everything else, a chaotic studio can be the thing that tips you from “let’s make something” to “I’ll just do it later.” A good storage system quietly removes that mental barrier before it ever has a chance to stop you.
And then there’s the practical side: your supplies are worth protecting. Quality yarn, specialty papers, fine-tipped markers, fabric by the yard — all of that adds up to real money accumulated over months and years. Good storage keeps those materials in usable condition. It keeps pigments from drying out, fibers safe from dust and pests, and tools sharp and ready to go. Taking care of your supplies through thoughtful organization isn’t just an aesthetic choice — it’s honestly just good financial sense.
Pegboards and Wall-Mounted Systems: Making Vertical Space Work for You
One of the biggest shifts you can make in a craft room is to stop thinking horizontally and start looking up. Your walls are hiding an enormous amount of usable space, and pegboards are one of the most flexible ways to actually use it. A single pegboard panel can hold dozens of hooks, bins, shelves, and holders — and the whole thing can be rearranged in minutes as your supplies or workflow change. That flexibility makes pegboards a smart investment, especially if your crafting interests shift between seasons or projects.
When you’re setting up your pegboard, resist the urge to fill every inch right away. Start with your most-reached-for tools — the scissors you use daily, your tape dispenser, your ruler — and put those at eye level where you can grab them without thinking. Less frequently used items can move higher up or toward the edges. Grouping things by type or project category means you can find what you need on instinct, which matters a lot during those energized bursts when inspiration is flowing and you really don’t want to slow down.
Beyond classic wood or metal pegboards, slatwall panels offer a cleaner, more polished look that works well if your craft room doubles as a photography space or studio. French cleat systems — interlocking beveled wood strips — are another option that serious makers love, since they can handle heavier gear like power cutters, die-cut machines, and drills. Whichever route you go, use quality anchors and make sure everything is secured into studs. A well-mounted system is both safer and more satisfying to use long-term.

Drawer Units and Rolling Carts: Portable Flexibility for Every Crafter
Not everyone gets a dedicated craft room that stays set up all the time. Plenty of people craft at the kitchen table, in a shared corner of the living room, or in a small apartment where everything needs to pack away when the session is done. For those makers, rolling carts and modular drawer units are a genuine game-changer. IKEA’s RASKOG cart became something of a cult favorite in the crafting world for exactly this reason — it’s affordable, compact, comes in multiple tiers, and rolls easily wherever you need it before tucking neatly into a closet.
Drawer units are especially great for supplies that are better off protected than displayed. Markers, pens, and fine-tipped tools stay capped and out of the air inside drawers, rather than drying out on an open shelf. Tiny embellishments like buttons, brads, and rhinestones are so much easier to manage in shallow divided drawers than they are in open bins where they inevitably spill and mix together into chaos. If you go with a clear-fronted unit, you get the best of both worlds — enclosed protection with the ability to spot what you need at a glance without opening every single drawer.
When you’re shopping for a rolling cart or drawer system, pay attention to the weight capacity, especially if you work with heavier materials like glass beads, ceramics, or bookbinding tools. Also think about height in relation to your work surface — a cart that sits too low will have you constantly bending to grab things mid-project, which gets old fast. A lot of crafters end up combining a taller cart for active-project supplies with a lower, flat-topped unit that doubles as extra counter space, creating a setup that can flex to fit whatever they’re working on.
Mason Jars, Canisters, and Clear Containers: The Beauty of Visible Storage
There’s a reason the image of neatly filled mason jars has basically become the icon of a well-organized craft room — visible storage just works, both practically and visually. When your supplies are in clear containers, you can take stock of your inventory in seconds, notice when something is running low, and stop buying duplicates of things you already have hiding somewhere. That simple principle of visibility can save crafters a surprising amount of money over the course of a year, just by making it obvious what you’ve already got before you head to the store.
Mason jars have a real edge beyond just being see-through: they come in a remarkable range of sizes. Tiny quarter-pint jars are perfect for seed beads or sequins; half-gallon wide-mouth jars can hold a generous bundle of yarn or a full collection of ink pads. They’re inexpensive, widely available, dishwasher-safe, and — let’s be real — genuinely beautiful when arranged together. A shelf of mason jars filled with colorful beads, threads, and buttons does double duty as storage and décor, turning organization into something you actually want to look at.
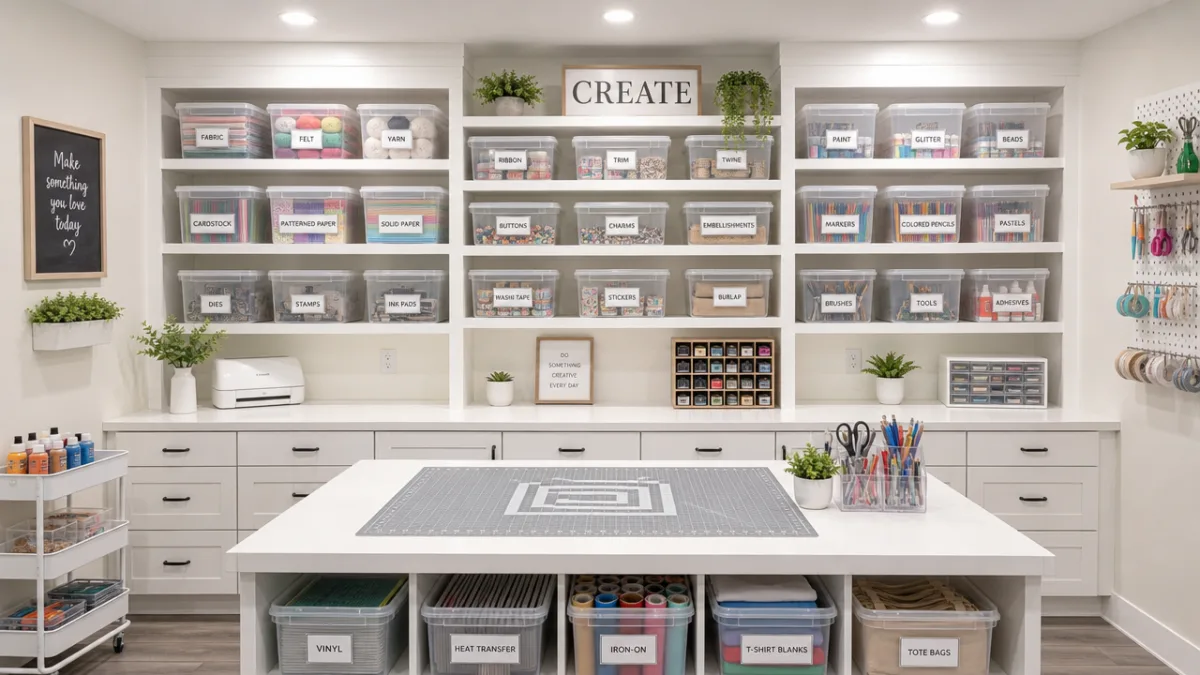
If you prefer a more uniform or modern look, acrylic canisters and square stackable containers are a sleeker alternative to the farmhouse charm of mason jars. Square and rectangular containers are also more space-efficient — they pack together without the gaps that round jars leave between them. Labeling becomes especially important with opaque or frosted containers, since you can’t just peek inside. A label maker, chalkboard labels, or even hand-lettered tags all work great. Whatever you choose, keeping your labeling consistent across the whole system pays off enormously as your collection grows.

Repurposed and Upcycled Storage Solutions: Creative Organization on a Budget
Some of the most impressive craft storage setups out there were built by people who spent almost nothing on new containers, choosing instead to repurpose things that would have otherwise been tossed. That approach fits naturally with the values of a lot of makers, who are drawn to crafting in the first place because of the creativity, resourcefulness, and joy of finding value in unexpected things. Before you buy a single new storage bin, it’s worth doing a slow walk through your home and looking at what you already own through fresh eyes — not for what something is, but for what it could hold.
The range of everyday objects that translate beautifully into craft storage is honestly pretty impressive. Vintage tins and old cookie boxes make charming homes for paper clips, binder rings, and small notions. Wooden toolboxes from the thrift store — often just a few dollars — have exactly the right depth and compartmentalization for markers, brushes, and hand tools. Ice cube trays are perfect for sorting tiny beads or jewelry findings. A shoe organizer hung on the back of a door can hold an entire collection of spray bottles, tape rolls, and folded fabric. Even egg cartons make surprisingly handy temporary sorting trays for mixed embellishments.
Repurposing also gives you the chance to bring objects with real meaning into your creative space. A mug from a grandparent can hold paintbrushes. A tin from your favorite tea can corral rubber stamps. A wooden crate from a local market becomes a rustic bin for rolled fabric or yarn. These personal touches turn a functional storage system into a space that actually feels like yours — one that reflects your history and personality rather than looking like a display at a home goods store. Crafters who build that kind of personal meaning into their organization tend to maintain it more consistently, too, because the space itself makes them happy to be there.
Labeling, Categorizing, and Maintaining Your System Over Time
Even the most beautiful storage setup will slide into chaos if it’s not backed by a clear organizational logic and a habit of actually keeping it up. This is where a lot of craft organization projects run out of steam — the initial setup goes great, but without a clear plan for where new things should live and a regular practice of putting things back, entropy quietly creeps back in. The good news is that a little intentionality at the start, plus a small ongoing time investment, can keep your space working well indefinitely.
Categorizing your supplies before you start any storage project is time genuinely well spent. Rather than organizing by container size or by where things happen to fit, think about how you actually work. Some crafters like to sort by medium — all paper crafting supplies together, all fiber arts together, all painting supplies in one area. Others prefer to organize by project type or frequency of use, keeping the everyday essentials within arm’s reach and specialty supplies tucked further away. There’s no single right answer; the best system is the one that matches how your brain already thinks about your work.
Labeling takes a good organizational system and makes it one that other people — and your future, hurried self — can navigate without thinking. Labels don’t have to be fancy or expensive to do their job. Some crafters love the clean uniform look of a label maker; others prefer handwritten tags on kraft paper for something warmer; some tape a small swatch or sample to the outside of a container so the contents are obvious at a glance. Whatever you choose, the key is consistency. A system where every container is labeled the same way, in the same spot, is so much easier to live with than one where labeling is random or sporadic.
Finally, building a short maintenance ritual into your crafting practice is probably the single most powerful thing you can do to protect your system over time. A lot of experienced crafters swear by a quick end-of-session reset — five to ten minutes of putting supplies back, wiping down surfaces, and noting anything that needs restocking before next time. This small habit stops the slow drift of displaced supplies that eventually turns a tidy space back into a cluttered one. Throwing in a monthly or seasonal review — where you check what’s working, toss dried-out or expired supplies, and adjust storage as your projects evolve — will keep your craft space feeling fresh, functional, and genuinely fun to spend time in for years to come.








What do you think?
It is nice to know your opinion. Leave a comment.