










The Art of Candle Sand: A Complete Guide to Handmade Sand Candles
What Is Candle Sand and Why It’s Taking the Craft World by Storm
If you haven’t heard of candle sand yet, you’re in for a treat. It’s one of the coolest materials to hit the handmade candle scene in years — basically granulated wax that looks and pours just like fine beach sand. The big deal? You don’t need to melt anything. Just pour, layer, and you’ve got a gorgeous candle. That alone makes it accessible to pretty much anyone, whether you’re eight years old or eighty.
But what really makes candle sand fun goes beyond the easy setup. Because the granules stay loose, you can layer colors, blend ombre effects, swirl patterns through a jar, and even press designs into the surface before you add the wick. That kind of spontaneous creativity just isn’t possible with poured wax — it’s almost more like painting than candle making. Artists and casual hobbyists alike have fallen for it, and honestly, it’s not hard to see why.
Here’s what makes it especially great: it’s beginner-friendly without being boring. A kid can pour a few colors into a jar and have something beautiful burning on their nightstand in under ten minutes. But an experienced crafter can spend an afternoon building intricate layered designs that look like abstract art. That range is rare in any craft. It’s turned up everywhere — craft rooms, classrooms, boutique gift shops, social media feeds — and the people who try it once usually can’t wait to try it again.
Gathering Your Supplies: Everything You Need to Get Started
Before you jump in, it helps to have everything laid out and ready. The star of the show is obviously the candle sand itself, which you can find at most craft stores or online in a huge range of colors — from soft creams and warm ambers to punchy pinks and deep ocean blues. Just make sure whatever you buy is specifically labeled for candle use, since those formulas are designed to burn cleanly and safely. If you’re just starting out, a starter kit with several coordinating shades is a smart move. It takes the guesswork out of color pairing and gives you enough variety to experiment right away.
Your choice of vessel matters more than you might think — it affects both how the candle looks and how well it burns. Glass containers are the go-to for most people because you can actually see those beautiful layers through the sides, which is half the point. Mason jars, apothecary bottles, hurricane vases, even old candle tins all work well. Whatever you use, just make sure it’s heat-safe and free of any cracks or chips. Thicker glass tends to hold up better during longer burns, so keep that in mind if you’re shopping for containers.
Beyond the sand and vessel, there are a few small tools that make the whole process smoother. You’ll want pre-tabbed wicks sized for your container, something to keep the wick centered while you fill the jar (a proper wick tool works great, or just lay two pencils across the rim), and a small funnel or pouring spoon for placing the sand exactly where you want it. A skewer or toothpick is handy for swirling patterns or nudging layers into place. A few optional extras that are genuinely useful: a small scale for measuring, some newspaper to protect your work surface, and little cups or bowls for sorting your colors beforehand.
- Candle sand in multiple colors of your choice
- Heat-safe glass containers or vessels
- Pre-tabbed candle wicks sized for your container
- Wick centering tool or two pencils to hold the wick upright
- Small funnel or pouring spoon for precision placement
- Skewer or toothpick for creating patterns and swirls
- Protective covering for your work surface
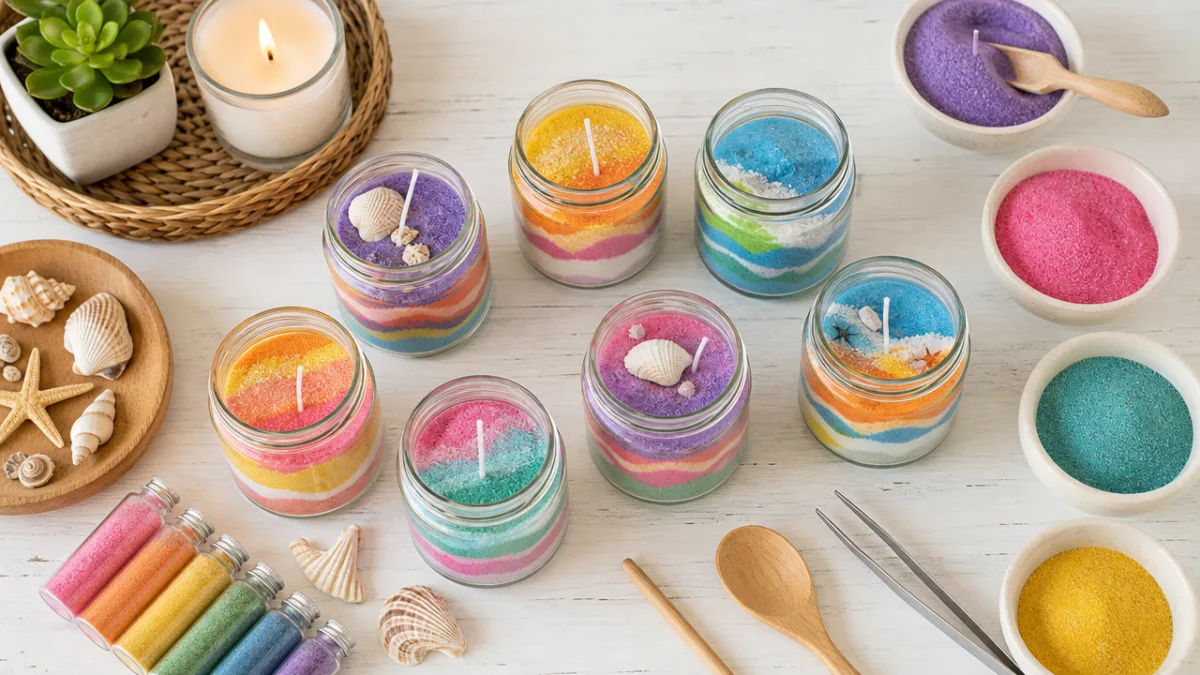
Step-by-Step Guide to Making Your First Candle Sand Creation
Your first candle sand candle is genuinely a joy to make, and it’s simpler than it probably sounds. Start by getting your workspace organized — everything within reach, surfaces protected. Set your jar on a flat, stable surface, then anchor your wick by threading it through the wick tab and pressing the tab firmly to the center of the jar’s bottom. A tiny dab of hot glue or a wick sticker will keep it from shifting as you work. Once the base is secured, rest your centering tool across the rim — or just lay two pencils across the top of the jar — to hold the wick straight and centered while you fill it.
Now for the fun part. Start pouring your first color slowly into the jar, using a funnel or spoon to keep things tidy. How deep each layer goes is completely up to you — thin strips of contrasting colors give you a bold striped look, while thicker pours feel more dramatic and painterly. If you want an ombre effect, try tilting the jar slightly as you pour the second color so it blends softly into the first at the transition point. There’s no rush here. The more care you take with each layer, the more satisfying the end result. You’ll see every decision you made reflected in the finished design.
Keep building until the sand sits about half an inch below the rim — you want a little breathing room for when the candle burns. When you’re happy with the design, press the surface gently with a fingertip or the back of a spoon to compact it slightly and keep that top layer looking neat. Then trim the wick down to about a quarter inch above the sand surface with sharp scissors, and you’re done. No curing time, no waiting — the candle is ready to light, give away, or just set on a shelf and admire. That instant gratification is honestly one of the best things about working with candle sand.
Creative Design Ideas and Techniques for Stunning Results
Once the basic layering clicks, things get really interesting. One of the most visually impressive styles is the geological or geode look, where you alternate thin and thick bands of earthy colors — think beige, terracotta, rust, and cream — to mimic natural stone strata. It looks especially striking in clear cylindrical or square containers where the layers are visible from every angle. Slipping a little metallic or glitter sand between layers kicks it up another notch, catching the light in a way that genuinely looks like mineral flecks in rock.
Seasonal designs are another direction worth exploring. For a coastal summer vibe, layer ocean blues, aqua, and white on top, then transition down into sandy beige and pale gold — it immediately reads as sea and shore. For fall, try deep oranges, burgundy, mustard, and warm brown for that cozy harvest feeling. Winter candles look magical with alternating red and white layers dusted in silver, or go more elegant with forest green and gold. These themed candles aren’t just fun to make; they’re also some of the most well-received handmade gifts you can give throughout the year.
If you want to push things further, start experimenting with shaped vessels, embedded objects, and surface details. Small shells, dried flowers, or crystals pressed gently into the top layer add a beautiful textural element. You can also press a thin skewer against the inside of the glass and drag it slowly upward or sideways to draw waves, petals, or even words through the visible sand layers — the effect is subtle but genuinely beautiful. Carving small channels or dips into the surface with a spoon creates a topographic look that’s surprisingly striking. The best mindset for this kind of work is to treat each candle less like a household item and more like a small piece of art.
- Geological layers using earth tones with metallic accents for a natural stone effect
- Ombre gradients by blending adjacent colors at the transition point between layers
- Coastal themes using blues, aqua, and sandy neutrals to evoke the sea
- Seasonal designs tailored to autumn, winter, spring, or summer palettes
- Surface art using a skewer pressed through the glass to create wave or petal patterns
- Embedded decorations like dried flowers, crystals, or shells pressed into the top layer

Safety, Burning Tips, and Getting the Most from Your Candle
Candle sand candles are on the safer end of the homemade candle spectrum, but the basics still apply every single time you light one. Keep your candle on a heat-resistant surface, away from anything flammable, away from drafts, and well out of reach of kids and pets. Never leave it burning unattended, and always make sure it’s fully out before you leave the room or go to bed. These aren’t groundbreaking rules, but it’s worth saying — candle sand creations can look so decorative and low-key that it’s easy to mentally file them as “just decor” rather than an open flame.
Something that catches a lot of first-timers off guard is how the sand behaves as the candle burns. It doesn’t melt evenly the way wax does. Instead, it burns down around the wick, forming a small pool of fused granules right at the center while the surrounding sand stays loose. Over time, that loose sand can drift in and partially bury the wick. If that happens, just use a toothpick or skewer to gently clear the area around the base of the wick before you relight it. Some people also like to smooth the surface around the wick between burns to keep things even — it’s a small habit that makes a real difference over the life of the candle.
To get the longest, most even burn, always trim your wick to a quarter inch before each lighting session. A too-long wick produces a bigger, flickery flame that eats through the sand faster and can leave soot behind. Keep the candle away from vents and open windows too — moving air pushes the heat sideways and leads to uneven burning over time. And here’s a nice bonus: when your candle is all burned down, the remaining sand doesn’t have to go to waste. Collect it, sort it back by color, and fold it into your next project. It’s one of the more genuinely sustainable craft materials out there.
Sharing, Gifting, and Building a Candle Sand Community
One of the nicest things about candle sand — beyond the craft itself — is the community that’s grown up around it. Pinterest, Instagram, and TikTok are full of beautiful photos and tutorials from makers all over the world sharing their color combinations, techniques, and creative experiments. Whether you’re a total beginner scrolling for ideas or someone sharing your own latest design, the community is genuinely warm and encouraging. Leaving a comment, saving a pin, or posting your own work-in-progress are all small ways to stay connected and keep the inspiration flowing.
These candles also happen to make some of the most personal, meaningful gifts you can give someone. Because no two are exactly alike, each one carries a sense of real thought and care that a store-bought item just can’t match. Personalize one with a friend’s favorite colors, their birth month’s palette, or a design tied to a shared memory, and it becomes something truly special. Wrap it up nicely — a ribbon around the jar, a hand-lettered tag with a note on how to burn it, maybe some tissue paper and a couple of dried flowers — and you’ve got a gift that people actually remember.
And if candle sand genuinely captures your heart, turning it into a small business is more realistic than it might sound. Startup costs are low, the product photographs beautifully, and the market for handmade home goods isn’t slowing down. Craft markets, Etsy, and Instagram shops are all solid starting points. What tends to make the difference is developing a consistent look, putting real care into your product photography, and showing up authentically with your audience rather than just broadcasting at them. But honestly, even if a business is never part of the plan, candle sand is the kind of craft that keeps giving — there’s always a new color combination to try, a new technique to experiment with, and a new reason to sit down and make something beautiful.








What do you think?
It is nice to know your opinion. Leave a comment.