










How to Carve Candles Step by Step – Beginner Guide for Stunning Handmade Designs
Introduction to Candle Carving: A Timeless Craft Worth Learning
Candle carving is one of those rare crafts that sits at the intersection of patience, artistry, and sensory pleasure. Unlike painting or drawing, carving transforms a three-dimensional object into something entirely new, revealing hidden layers of color and texture that give each finished piece a luminous, jewel-like quality. Whether you are completely new to handmade crafts or an experienced maker looking for your next creative obsession, candle carving offers a deeply satisfying experience that rewards every hour you invest in learning its techniques.
The history of decorative candle carving stretches back centuries, with particularly strong traditions in Germany, Eastern Europe, and parts of Asia. Artisans would stack layers of colored wax, then cut, fold, and pull the outer layers to reveal intricate geometric patterns and floral designs beneath. Today, those same principles are accessible to anyone willing to gather a few basic materials and spend an afternoon learning the fundamentals. Modern tutorials, better wax formulations, and widely available tools have made the craft more approachable than ever before.
What makes candle carving especially appealing as a beginner craft is that even your very first attempts will produce something beautiful and usable. Because you are working with a forgiving medium that responds intuitively to heat and pressure, small mistakes often become happy accidents rather than disasters. The material itself guides your hand in ways that paint or clay do not, meaning you can achieve professional-looking results far faster than you might expect. This guide will walk you through everything you need to know to carve your first candle with confidence and creative freedom.
Why Handmade Carved Candles Make Exceptional Gifts
Few handmade gifts carry the same immediate visual impact as a carefully carved candle. The combination of flickering candlelight, intricate surface detail, and the warm scent of quality wax creates a multi-sensory experience that mass-produced items simply cannot replicate. When you give someone a candle you carved yourself, you are giving them dozens of hours of ambient atmosphere, packaged in a unique object that reflects real creative effort and personal thoughtfulness.
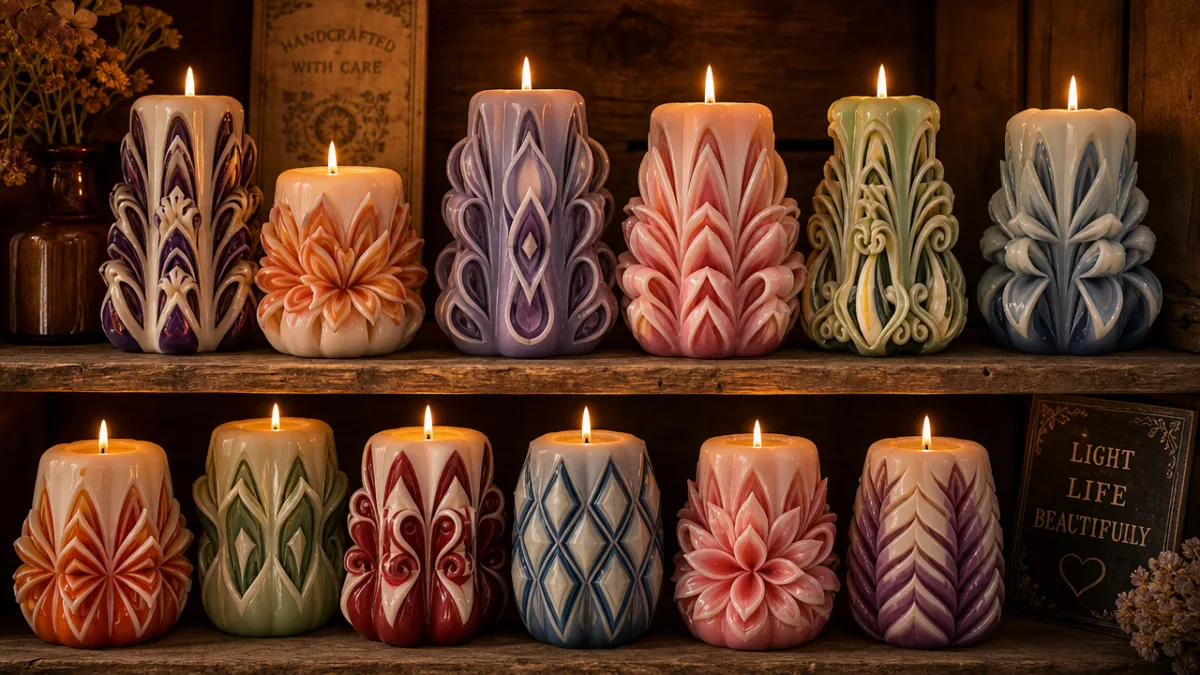
Carved candles are also remarkably versatile as gifts. A tall pillar candle with geometric lattice cuts suits a contemporary home with clean, modern decor. A shorter, rounded candle carved with sweeping petal shapes and finished in soft blush and cream tones feels perfectly at home in a more romantic or vintage-inspired space. Because you control every element of the finished product — the colors, the scent if any, the design style, and the overall size — you can tailor each candle precisely to the recipient’s personality and aesthetic preferences, making it feel genuinely bespoke.
Beyond gifting, carved candles have become increasingly popular as items to sell at craft markets, on platforms like Etsy, and through local boutiques. As the handmade economy has grown, consumers have shown a clear willingness to pay premium prices for objects with visible craft and individuality. A beautifully carved candle photographed well and priced fairly can become the foundation of a small creative business, turning a relaxing hobby into a meaningful source of supplemental income. The low startup cost of the craft makes this financial upside particularly attractive for new makers.
Essential Tools and Materials for Candle Carving
Before you carve a single groove, you need to assemble the right toolkit. The good news is that candle carving does not require expensive or hard-to-find equipment. Most beginners can get everything they need for well under fifty dollars, and many of the tools are items you may already own. Investing a little time in sourcing quality materials upfront will save you significant frustration later, so it is worth being thoughtful about what you choose before your first session begins.
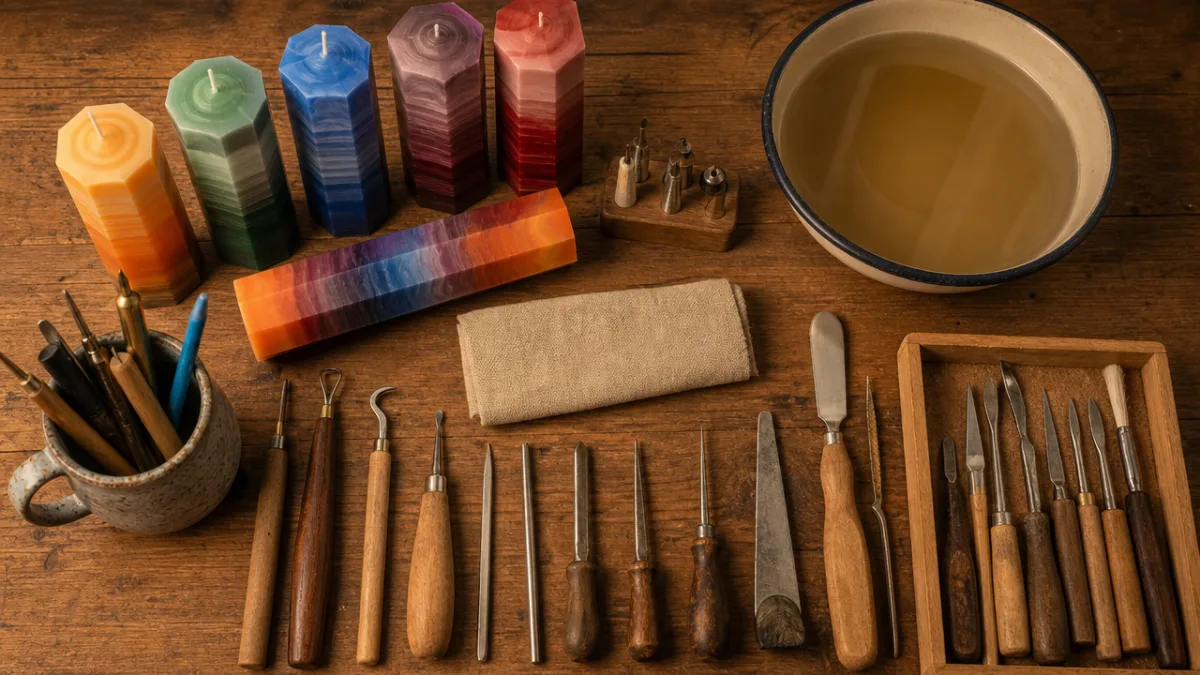
The most important material is obviously the candle itself. For carving purposes, you want a dipped layered candle — sometimes called a carved candle blank — rather than a standard pillar or container candle. These blanks are made by repeatedly dipping a wick into baths of differently colored wax, building up distinct layers that will be revealed when you cut into the surface. You can purchase pre-made blanks from craft suppliers, or you can make your own with a bit of additional effort. As a beginner, buying ready-made blanks is strongly recommended so you can focus entirely on learning the carving process itself.
In addition to the candle blank, you will need a small collection of carving tools and a reliable heat source. A craft knife or linoleum cutting tool works well for precise incisions, while a set of modeling tools helps with pulling and folding the wax. A pot of hot water or a heat gun allows you to keep the outer wax layer warm and pliable as you work. A smooth, heat-resistant work surface — a silicone mat or a sheet of parchment paper on a cutting board — protects your table and makes cleanup much easier at the end of your session.
Choosing the Right Wax Temperature for Carving
Temperature is arguably the single most important variable in candle carving, and understanding it will dramatically improve your results even before you develop significant technique. Wax that is too cool becomes brittle and will crack or crumble when you try to cut or fold it. Wax that is too warm becomes floppy and loses its ability to hold the shapes you create. The ideal working temperature produces wax with the consistency of very soft leather — firm enough to hold a cut edge cleanly, but supple enough to bend without breaking.
When you first receive or make your candle blank, it will likely be at room temperature and somewhat stiffer than ideal for carving. The most common method for warming it to the correct working temperature is to submerge it briefly in a bowl of hot water — around 140 to 160 degrees Fahrenheit works well for most wax formulations. You should feel the outer layer become noticeably softer within thirty to sixty seconds. Remove the candle, pat it dry with a paper towel, and begin carving immediately while the warmth remains in the wax. You will likely need to return it to the hot water several times during a carving session as the wax cools and stiffens again.
A heat gun can also be used to warm specific areas of the candle rather than the whole surface, which is particularly useful when you are working on detailed sections and want to maintain stiffness in the parts you have already carved. However, heat guns require a careful touch — holding one too close or for too long can melt the wax surface rather than simply soften it. Practicing with hot water first is strongly recommended until you have a confident feel for how your particular wax responds to heat.
Core Candle Carving Techniques Every Beginner Should Master
Candle carving involves a surprisingly small number of fundamental techniques, and once you have those in your hands, almost any design becomes achievable through combination and repetition. The three core moves are the cut, the peel, and the fold. Everything else — spirals, petals, lattices, geometric panels, fringe effects — is essentially a variation or elaboration on these three basic actions. Spending your first session practicing each move slowly and deliberately, even on a practice piece, will pay enormous dividends in the quality of everything you make afterward.
The cut is made with your craft knife or carving tool and should always be executed with smooth, consistent pressure and a single continuous motion whenever possible. Hesitant, multiple-pass cuts tend to produce ragged edges that are difficult to fold cleanly. Think of the way a skilled baker scores bread dough — deliberate, confident, unhurried. The depth of your cut determines how many layers of color you will expose, so experimenting with different depths early on helps you understand the color palette hidden inside your particular candle blank before committing to a full design.
The peel involves lifting the cut wax away from the body of the candle, either to reveal the contrasting color layer beneath or to fold the peeled strip back on itself to create dimensional effects. The key to a clean peel is maintaining consistent pressure and keeping your fingers warm by dipping them briefly in warm water before handling the wax. Cold fingers chill the wax quickly and can cause it to snap rather than peel. As you become more comfortable with the material, you will develop an instinct for exactly how much pressure to apply and at what angle to lift for the best results.
Creating Petal and Floral Designs
Floral patterns are among the most popular candle carving designs, and for good reason — they translate beautifully to the rounded surface of a candle and benefit enormously from the natural translucency of wax when lit. To create a basic petal design, begin by making a series of curved cuts around the lower third of your candle, spacing them evenly like the petals of a flower seen from above. Each cut should arc from a central point downward and outward, roughly resembling a teardrop or half-moon shape. Make the cuts slightly deeper at the center of each petal and shallower at the edges.
Once your cuts are made, use your fingers or a modeling tool to gently lift the tip of each petal away from the candle body and curl it slightly backward. The goal is a gentle, natural curve that mimics the way actual flower petals unfurl from a bud. If the wax resists curling without cracking, dip your fingers in warm water and work the wax gently for thirty seconds before trying again. Once you have completed one row of petals, you can add a second row above the first, staggering the positions so that the upper petals fall in the gaps between the lower ones, creating a fuller, more realistic floral appearance.
Coloring and layering choices dramatically affect the final look of a floral design. A candle with a deep red exterior layer, a cream middle layer, and a white core will produce petals that transition from rich red at the tip through blush pink at the midpoint to near-white at the base — an effect that closely resembles an actual rose. Planning your color layers intentionally before you begin carving transforms the process from guesswork into deliberate design, and is one of the hallmarks that separates thoughtful candle artists from casual hobbyists. Even as a beginner, thinking about your color story before you pick up a tool will elevate your results considerably.
Step-by-Step Guide to Carving Your First Candle
Now that you understand the tools, materials, and core techniques, it is time to walk through the complete process of carving your very first candle from start to finish. This step-by-step sequence is designed for absolute beginners working on a standard layered pillar candle blank. Read through the entire sequence once before you begin so that you have a clear mental picture of where each step leads. Candle carving is a time-sensitive process because of the temperature window you have to work in, so knowing what comes next prevents hesitation at critical moments.
Begin by preparing your workspace. Lay down your silicone mat or parchment-covered cutting board. Fill a large bowl with hot water at around 150 degrees Fahrenheit — a kitchen thermometer is helpful here. Arrange all your tools within easy reach so you never need to step away from your candle once you start working. Place a folded paper towel nearby for patting the candle dry after each water dip. Good preparation is not fussiness; it is the professional habit that keeps your process smooth and your finished piece clean.
The complete carving sequence involves the following stages, each building on the last to create a coherent finished design:
- Warm the candle by submerging it in hot water for 45 to 60 seconds, then pat dry.
- Plan your design by lightly scoring guide lines with a blunt tool before committing to deep cuts.
- Make your primary cuts using smooth, confident strokes, working from the bottom of the candle upward.
- Peel and fold each cut section carefully, returning the candle to warm water whenever the wax stiffens.
- Refine and detail by adding secondary cuts, texture lines, or accent patterns within the peeled sections.
- Final shaping involves gently pressing and smoothing any rough edges with warm fingertips.
- Allow the candle to cool completely at room temperature for at least two hours before handling or displaying it.
Common Beginner Mistakes and How to Avoid Them
The single most common mistake beginners make is rushing. Candle carving rewards a calm, methodical approach, and the desire to see the finished design quickly often leads people to skip the warming step, push cuts too fast, or attempt folds before the wax is at the right temperature. If you catch yourself feeling impatient, take it as a signal to dip the candle in warm water and pause for a moment. The wax will tell you when it is ready — you will feel the difference between compliant warmth and resistant stiffness the moment you touch it.
Another frequent error is making cuts that are too shallow. Shallow cuts fail to reach the contrasting color layers beneath the surface, resulting in monochrome peeled sections that lack visual interest. Before you begin your main design, make a few test cuts in an inconspicuous area — the very bottom of the candle, for instance — to gauge how deep you need to go to expose the first color layer and the second. Knowing this depth in advance lets you cut with intention rather than guesswork throughout the rest of the process.
Finally, many beginners underestimate the importance of keeping the candle clean and dry while working. Water droplets left on the surface before cuts are made can cause the wax to split unevenly along the moisture line. Fingerprints and oils from your hands can dull the natural luster of the wax surface and make finished areas look smudgy rather than sleek. Getting into the habit of patting the candle fully dry after each warm water dip, and handling carved sections only by the wick or the uncarved base, will keep your finished piece looking crisp and professional from every angle.
Finishing, Displaying, and Caring for Your Carved Candles
Once you have completed your carving and allowed the candle to cool fully, a few finishing steps will significantly enhance the final presentation. The most impactful of these is polishing the uncarved portions of the candle surface with a soft cloth to bring out the natural sheen of the wax. Many candle artists use a piece of nylon stocking or a lint-free microfiber cloth, rubbing the surface in small circular motions until it develops a gentle gloss. This step takes only two or three minutes but transforms the overall appearance from handmade-looking to genuinely artisanal.
Some carvers also apply a very thin coat of clear carnauba wax or candle-specific gloss spray to the finished piece, which deepens the colors slightly and adds a protective layer that slows surface dust accumulation. This is entirely optional and largely a matter of personal preference — some makers love the enhanced depth that a gloss finish provides, while others prefer the more natural, matte appearance of uncoated wax. If you do use a spray finish, apply it in a well-ventilated area and hold the can at least twelve inches from the candle surface to avoid drips or uneven coating.
Displaying your carved candles requires a little thought, because they are more delicate than standard pillar candles. Place them on a stable, flat surface well away from heat sources, direct sunlight, and drafts. Sunlight in particular will fade the outer wax layer over time and can cause the carved sections to soften and lose their crisp definition. A cool, shaded shelf or mantelpiece is ideal. If you are displaying multiple carved candles together, leave a few inches between them so that the heat from one burning candle does not soften its neighbor.
Burning Your Carved Candle Safely
One question every new candle carver eventually asks is whether carved candles are actually safe to burn, given how much of the outer wax has been cut away. The answer is yes, with appropriate precautions. The wick runs through the solid inner core of the candle, and as long as that core remains intact, the candle burns as safely as any standard pillar candle. The carved outer petals and panels will not be consumed by the flame directly — instead, the wax pool from the burning core will gradually illuminate the carved sections from within, creating the stunning stained-glass effect that makes lit carved candles so breathtakingly beautiful.
Always place your carved candle in a suitable holder or on a heat-resistant plate that is large enough to catch any wax drips. Never leave a burning candle unattended, and keep it away from flammable materials, children, and pets. Trim the wick to approximately a quarter inch before each burn to prevent excessive flame height and uneven burning. A well-maintained carved candle will burn cleanly for many hours, rewarding your carving investment with dozens of beautiful evenings of warm, textured candlelight.
If you decide you want to preserve your carved candle as a decorative object rather than burning it, that is a perfectly valid choice. A beautifully carved candle displayed unlit on a bookshelf or centerpiece tray is a legitimate piece of decorative art that will retain its visual impact indefinitely as long as it is kept away from heat and sunlight. Many candle artists make one version to burn and one version to display, which is a wonderful way to enjoy the craft fully. As you gain skill and speed, making multiples of a design becomes a natural part of your creative practice.
Expanding Your Skills: Advanced Designs and Inspirations
Once you have successfully completed your first candle carving and developed a feel for the material, a whole world of increasingly complex techniques opens up before you. Advanced candle carvers work with designs that involve multiple distinct carving zones — a lattice pattern on the upper third, flowing ribbon cuts in the middle, and a dense petal cluster at the base, for example — that together create a single cohesive visual narrative across the entire surface of the candle. Planning and executing designs of this complexity requires practice, but the progression from simple single-technique pieces to elaborate multi-zone compositions is both natural and deeply satisfying.
Geometric patterns represent another rich area of exploration for intermediate and advanced carvers. Rather than organic floral forms, geometric carving involves precise, repeating cuts that create optical illusions of depth, movement, and symmetry. Diamond lattices, chevron patterns, herringbone textures, and starburst radiations all translate beautifully to candle surfaces and photograph spectacularly for social media or product listings. Geometric designs tend to be more forgiving of slight irregularities than floral designs, because the eye reads a repeating pattern as intentional even when individual elements vary slightly — making them an excellent bridge between beginner and intermediate skill levels.
The candle carving community online is extraordinarily generous with knowledge, inspiration, and encouragement. Platforms like Pinterest, Instagram, and YouTube are full of tutorials ranging from five-minute beginner introductions to hour-long deep dives into advanced German-style carved candle techniques. Seeking out other carvers whose work you admire, engaging with their content, and participating in craft challenges or online communities will accelerate your learning dramatically. Creativity is always nourished by community, and the candle carving world is particularly welcoming to newcomers who arrive with enthusiasm and curiosity.
Incorporating Scent and Color for a Fully Personalized Candle
If you progress to making your own candle blanks rather than purchasing pre-made ones, you gain complete control over the scent profile and color palette of your finished pieces. Adding fragrance oil or essential oil to your wax at the appropriate temperature — typically between 160 and 180 degrees Fahrenheit for most wax types — allows you to create candles that engage both the visual and olfactory senses simultaneously. Pairing scent with design intentionally is an art form in itself: a candle carved with rose petals and infused with a soft rose and jasmine fragrance creates a fully immersive sensory object that is greater than the sum of its parts.
Color selection for multi-layer candles involves planning the dipping sequence carefully before you begin, since each new layer must be added over the cooled previous one. Popular combinations include jewel-tone gradients — sapphire blue through teal to mint green — for a cool, contemporary feel, warm sunset progressions from deep burgundy through orange to golden yellow for autumnal designs, and soft pastel transitions in pinks, lavenders, and creams for romantic or springtime aesthetics. The more layers you build, the more color reveal options you have when carving, but very thick outer layers require longer warm-up times and more confident cutting strokes.
Ultimately, candle carving is a craft that grows with you. The skills you develop in your first session — reading wax temperature by touch, controlling cut depth intuitively, folding without cracking — become second nature within just a few practice pieces. From that foundation, every new design challenge becomes a creative conversation between you and the material, and the results become progressively more personal, more refined, and more genuinely your own. Whether you carve one candle a month as a meditative weekend ritual or build it into a thriving small business, this ancient craft has a way of staying with you long after the wax has cooled.








What do you think?
It is nice to know your opinion. Leave a comment.