










Candle Wax Color Dye Chips: The Complete Guide to Vibrant, Professional Candle Making
What Are Candle Wax Color Dye Chips?
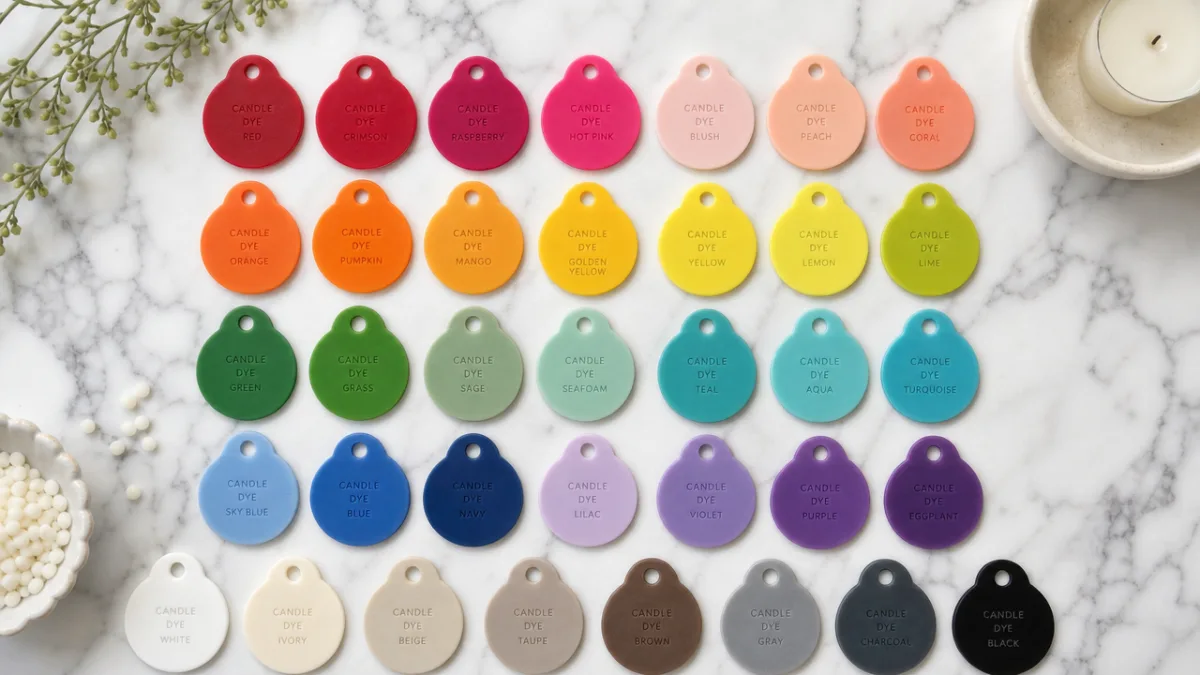
Candle wax color dye chips are small, concentrated blocks of pigment made specifically to blend into melted wax and give your finished candles rich, consistent color all the way through. Unlike liquid dyes or powder pigments, dye chips are a clean, low-fuss option that works well whether you’re making candles at home or running a small studio. Each chip delivers a predictable amount of color, which makes it much easier to recreate the same shade from one batch to the next.
Most dye chips are built on a paraffin or similar wax base infused with cosmetic-grade dyes that are heat-stable and designed to stay vibrant through the candle’s entire burn. Because the dye is fully soluble in wax, it spreads evenly instead of settling or clumping. That even distribution isn’t just about looks — uneven pigment can actually interfere with how the wick draws fuel up through the wax, so it matters more than you might think.
What really makes dye chips stand out is how well they work across different wax types. Whether you’re using paraffin, soy, beeswax, coconut wax, or some kind of blend, there’s likely a chip formulation that plays nicely with your wax. Some are labeled as universal, others are tailored to specific bases. Either way, it’s worth checking the product specs before you buy — especially if you’re making candles in larger quantities and don’t want to discover a mismatch mid-batch.
Why Choose Dye Chips Over Other Coloring Methods?
Candle makers have a few ways to add color — liquid dyes, powdered pigments, natural options like mica or spice-based tints — and each has its place. But dye chips tend to win people over because they’re easy to use, hold up well in storage, and give reliable results. Liquid dyes can be tricky to measure accurately and have a way of ending up on your work surface. Powdered pigments can clump if any moisture sneaks into the pot, and some don’t fully blend into the wax, leaving you with a frosted or streaky finish.
Dye chips skip most of those headaches because they’re already bound in a wax carrier that melts right along with your candle wax. Drop one in, give it a gentle stir for a few minutes, and it dissolves cleanly into the batch. No extra measuring cups, no dropper to rinse out, no risk of accidentally overdoing it with a liquid colorant. That simplicity is a real plus if you’re making candles in volume or if you’re newer to the craft and want tools that are a little more forgiving.
Storage is another big win. Dye chips are solid at room temperature, so they won’t leak, separate, or go bad sitting on a shelf. Buy a bag today and it’ll still produce the same vivid colors a year or two from now, as long as you keep them somewhere cool and out of direct sunlight. That kind of shelf life makes them a practical, cost-effective staple — you’re not restocking every few months, and your colors stay consistent from one season to the next.
How to Use Dye Chips Correctly in Your Candle-Making Process
Getting good results with dye chips starts with understanding the ratio. A common starting point is about one chip per pound of wax for a medium depth of color, but how much you actually need depends on the shade you’re going for, the brand you’re using, and your wax type. Soy wax, for example, has a naturally milky, opaque quality that makes colors look lighter than they would in paraffin at the same chip concentration — so you may need to add a bit more to hit the same visual intensity.
Timing matters too. Most experienced candle makers add dye chips once the wax is fully melted and sitting at working temperature, usually somewhere between 160°F and 185°F depending on the wax. Add them too early — before the wax has properly melted — and the chips can scorch against the bottom of a hot pot before they have a chance to disperse. Add them too late, right before you pour, and they may not fully dissolve, leaving small flecks of undissolved color in your finished candle.
When it comes to stirring, slow and steady really does make a difference. Using a dedicated candle spoon or stainless steel spatula, stir gently but consistently for at least two to three minutes after the chips have visibly melted. Then do a quick pour test — drip a little of the colored wax onto white paper and let it cool. That small swatch will show you what the finished color will actually look like and gives you a chance to adjust the chip amount before you commit to pouring the whole batch.
Color Mixing and Custom Shade Creation
One of the most fun parts of working with dye chips is that you can mix them to create colors that aren’t available off the shelf. It works just like mixing paint: red and yellow chips together produce warm orange tones, blue and yellow give you green, and adding a small amount of black or white can dramatically deepen or soften any base color. The principles of color theory translate directly, which makes experimenting surprisingly intuitive once you get the hang of it.
That said, custom shades only stay custom if you can recreate them — which means keeping good records is essential. Write down the exact weight of each chip color you used, the weight of your wax batch, the wax type, and your pouring temperature. Even small variations in any of those factors can shift the finished color. A lot of makers keep a dedicated notebook or spreadsheet for this, with cooled wax swatches taped next to each entry. It turns color mixing from an art into a repeatable process, which matters a lot if you’re selling your candles and customers expect consistency.
Custom blending also opens the door to building seasonal color collections — pastels for spring, deep burgundy and amber for fall, icy whites and forest greens for winter. Having a signature palette gives your candle line a more cohesive, intentional feel, and dye chips make it easy to transition between those palettes since you’re working with small, easy-to-handle pieces rather than big bottles of liquid or bags of powder. A solid set of primary and secondary chip colors will get you surprisingly far in terms of the range of shades you can produce.

Choosing the Right Dye Chips for Different Candle Types
Different candle formats have different coloring needs, and picking the right chip for the job makes a real difference in the final result. Container candles — the kind poured into jars or tins — can handle a higher chip concentration since you’re not relying on light to pass through the wax. Pillar candles and tapers, on the other hand, often look their best with a slightly lower concentration paired with a translucent-style dye, which lets the warm glow of the flame radiate beautifully through the outer wax shell.
Soy container candles come with their own set of quirks when it comes to color. Soy wax has a tendency to frost over time — that white, crystalline coating that develops on the surface — and certain chip colors can either hide it or make it more obvious. Earthy, muted tones like terracotta, sage green, and dusty rose tend to mask frosting better than bright, saturated shades. If frosting is something you’re trying to avoid, it’s worth testing chip concentrations alongside wax additives like vybar or stearic acid to find the combination that gives you the most stable, clean-looking finish.
Wax melts, tarts, and clamshells are a bit of a different story since they don’t have a wick and aren’t burned in the traditional sense. The color is purely decorative — it’s there to make the product look appealing on a shelf or in a gift set. That actually gives you more creative freedom, since you don’t have to worry about combustion. You can go bolder with high-saturation colors and even play around with layered or marbled effects that would be much trickier to pull off in a standard burning candle.
Safety, Quality, and Sourcing Considerations
If your candles are going to be burned by real people — whether you’re selling them or giving them as gifts — quality and safety aren’t optional. Look for chips that are clearly labeled as cosmetic-grade or candle-safe, meaning they’ve been tested to confirm they don’t release harmful compounds when burned. Using craft dyes or low-quality pigments not intended for candles can cause problems ranging from toxic fumes to clogged wicks to unpredictable burning behavior like excessive sooting or flare-ups. Reputable candle supply companies will provide safety data sheets on request, and it’s worth reading through those before adding any new colorant to your process.
Where you source your chips also affects color accuracy over time. Established candle supply brands invest in quality control, which means the red chip you order today should match the one you order six months from now. Cheaper options from unverified suppliers can vary a lot between production runs, making it hard to maintain the color standards your customers are counting on. Building a relationship with a supplier you trust — and buying in quantities large enough to cover a full product season — is one of the simplest ways to keep your colors consistent.
The candle-making industry has been paying more attention to sustainability lately, and colorants are part of that conversation. Some manufacturers now offer dye chips made with plant-derived or naturally sourced colorants as an alternative to petroleum-based synthetic dyes. These can be a beautiful choice and align well with eco-conscious branding, but they do behave a little differently — natural options sometimes produce slightly more muted tones and can be more vulnerable to fading when exposed to UV light. Whatever colorant you’re considering, natural or synthetic, it’s always worth running thorough tests before you launch a full product line with it.
Tips for Troubleshooting Common Dye Chip Problems
Even makers who’ve been doing this for years run into the occasional hiccup with dye chips, so it’s good to know how to troubleshoot quickly. Uneven color distribution — streaks, blotches, or patches that look noticeably lighter or darker — is one of the most common complaints. It almost always comes down to either not stirring long enough or adding chips before the wax reached the right working temperature. The fix is straightforward: make sure the chips are completely dissolved before you pour, and stir the wax slowly but thoroughly for at least three minutes.
Color fading is another issue that comes up, especially for candles displayed near windows or under bright retail lighting. UV light breaks down synthetic dyes over time, and what started as a vibrant jewel tone can gradually drift toward a pale, washed-out version of itself. The best prevention is choosing chips specifically formulated with UV-resistant colorants, and it also helps to let customers know they should keep candles out of direct sunlight when they’re not burning them. For retail displays, UV-filtering cases or keeping candles away from windows can go a long way toward preserving your color inventory.
Sometimes you’ll notice that chips are producing a darker or lighter color than you expected, even though you used the same quantity as before. Temperature fluctuations during the melt can affect how dyes behave, and so can lot-to-lot variation in your wax itself. If this happens, start tracking your melting temperature more closely and compare it against your notes from previous batches that came out right. Sticking with the same wax supplier also helps minimize that kind of raw material variability. And whenever you open a new bag of either wax or dye chips, it’s worth doing a small test pour before diving into a full production run — it only takes a few minutes and can save you from a frustrating surprise.








What do you think?
It is nice to know your opinion. Leave a comment.