










Easy Fancy Tassel: A Complete Guide to the Free Crochet Pattern by KHD
Introduction to Crochet Tassels and Why They Matter
Crochet tassels have long been a beloved embellishment in the fiber arts world, bringing a touch of handmade elegance to everything from home décor to fashion accessories. Whether you are a seasoned crocheter or someone just beginning to explore the craft, tassels offer a wonderfully accessible entry point into decorative finishing techniques. The Easy Fancy Tassel pattern by KHD (Kirsten Holloway Designs) stands out as a particularly well-crafted resource that makes it possible to create something truly beautiful without needing advanced skills or expensive materials.
What makes this particular tassel pattern so appealing is its thoughtful balance between simplicity and sophistication. The word “fancy” in the title is not misleading — the finished product genuinely looks like something you might find in a boutique or artisan market. Yet the instructions are clear and approachable enough that beginners can follow along without frustration. This combination of accessibility and attractive results is what has made the pattern so popular among the Pinterest crafting community and beyond.
Beyond aesthetics, crochet tassels also serve a deeply practical purpose. They can be used to finish off a wide variety of projects, including bookmarks, keychains, bag charms, wall hangings, blanket corners, and holiday ornaments. By learning a single tassel pattern, you essentially unlock a versatile finishing technique that can be applied across dozens of different projects throughout the year. The KHD Easy Fancy Tassel pattern is the kind of foundational skill that pays dividends far beyond the initial time investment of learning it.
Materials and Tools You Will Need
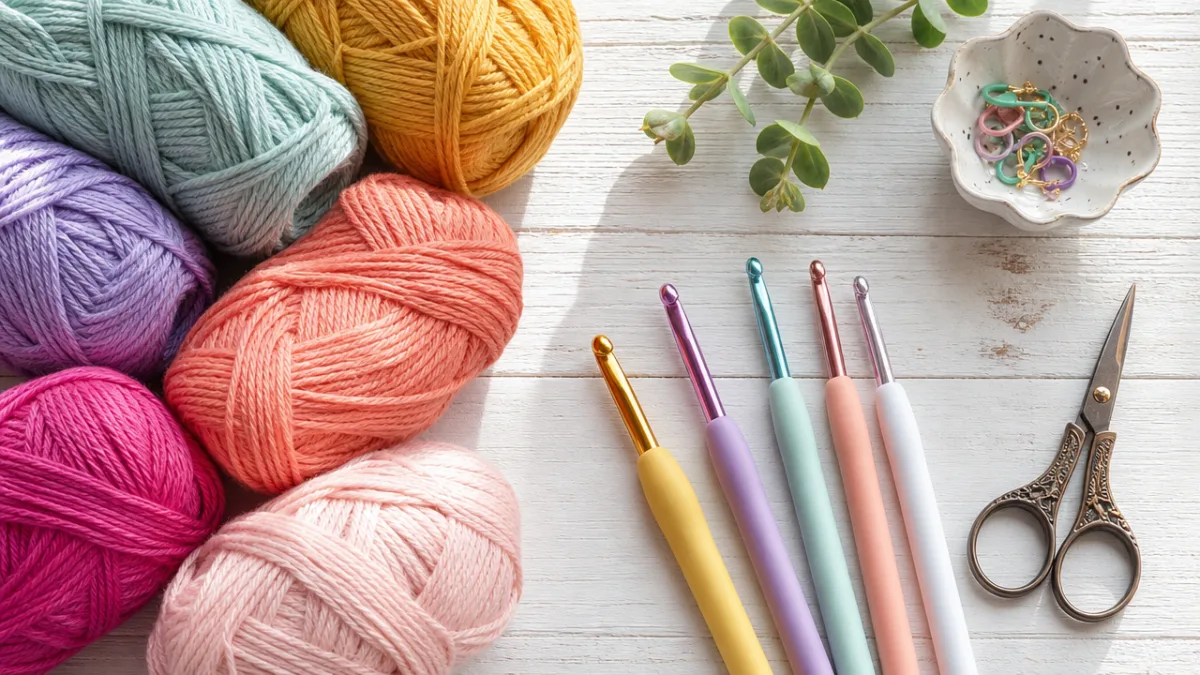
One of the most appealing aspects of the Easy Fancy Tassel pattern is how minimal the supply list is. You do not need to make a special trip to a craft store or place a large online order to get started. In most cases, a crocheter with even a modest yarn stash will already have everything necessary on hand. The primary material is yarn, and the pattern works beautifully with a wide range of weights and fiber types, giving you considerable creative freedom from the very beginning.
For the yarn itself, worsted weight is a reliable starting choice because it produces a tassel with good body and visible stitch definition without being too bulky or too fine. However, the pattern is quite adaptable — using a thinner yarn will create a more delicate, wispy tassel ideal for jewelry or delicate accessories, while a bulkier yarn produces a dramatic, statement-making piece perfect for home décor. Cotton, acrylic, and wool all work well, though cotton tends to give the crispest finish and holds its shape especially well over time.
In terms of tools, the list is refreshingly short. You will need a crochet hook sized appropriately for your chosen yarn — typically a size G (4.0mm) or H (5.0mm) hook for worsted weight yarn. A pair of scissors, a yarn needle for weaving in ends, and optionally a small ring or loop at the top for hanging complete the toolkit. Some crocheters also like to have stitch markers on hand to keep track of rounds, particularly if they are new to working in the round, which is a technique this pattern employs.
- Yarn in your preferred weight and fiber (worsted weight recommended for beginners)
- Crochet hook sized to match your yarn (typically G/4.0mm to H/5.0mm)
- Scissors for cutting yarn ends cleanly
- Yarn needle for weaving in ends and finishing
- Stitch markers (optional but helpful for tracking rounds)
- A small metal ring or loop if you plan to hang or attach the tassel
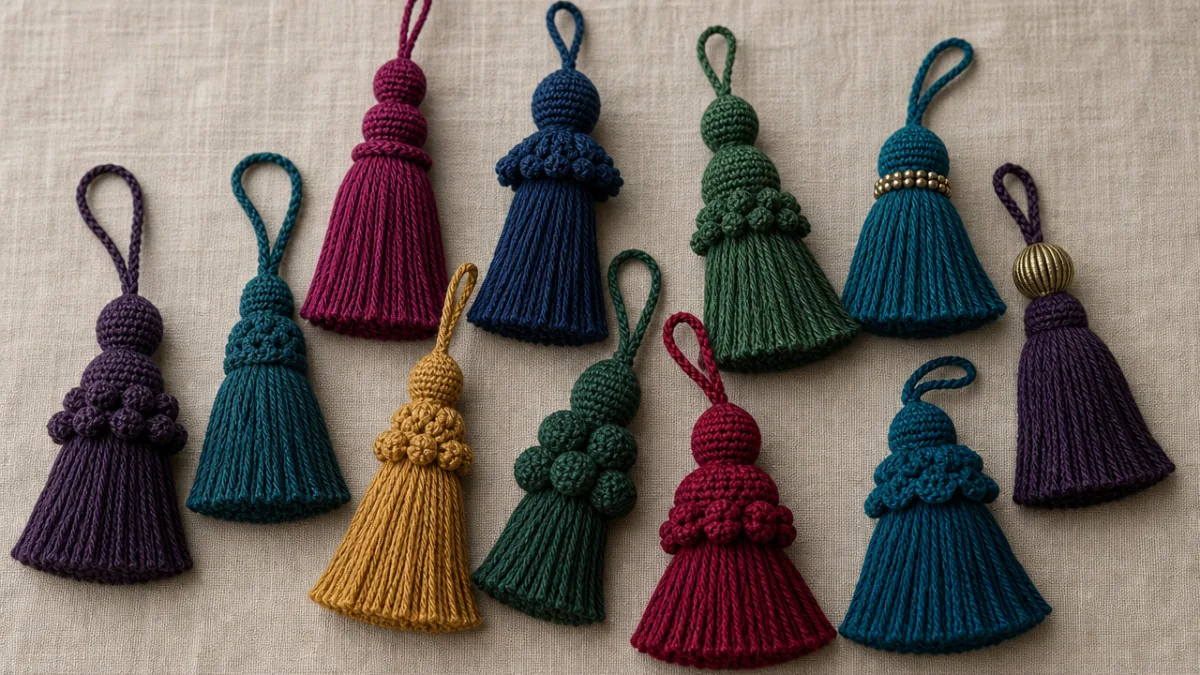
Color choice is another exciting dimension of this project. Because tassels are small and relatively quick to make, they are an ideal opportunity to experiment with colors you might not feel confident committing to in a larger project. Monochromatic tassels in rich jewel tones like emerald, sapphire, or burgundy are always striking. Two-tone combinations — using one color for the decorative crocheted top and another for the hanging strands — can create a sophisticated layered look. Variegated or self-striping yarns add visual interest with no extra effort at all.
Understanding the Pattern Structure and Stitches
Before diving into the step-by-step instructions, it helps to understand the overall structure of the Easy Fancy Tassel pattern. The tassel is essentially composed of two distinct components that work together to create the finished piece. The first is a decorative crocheted cap or top, which gives the tassel its “fancy” character and distinguishes it from a simple wrap-and-cut yarn tassel. The second component is the hanging yarn strands that flow beneath the cap, giving the tassel its classic flowing silhouette.
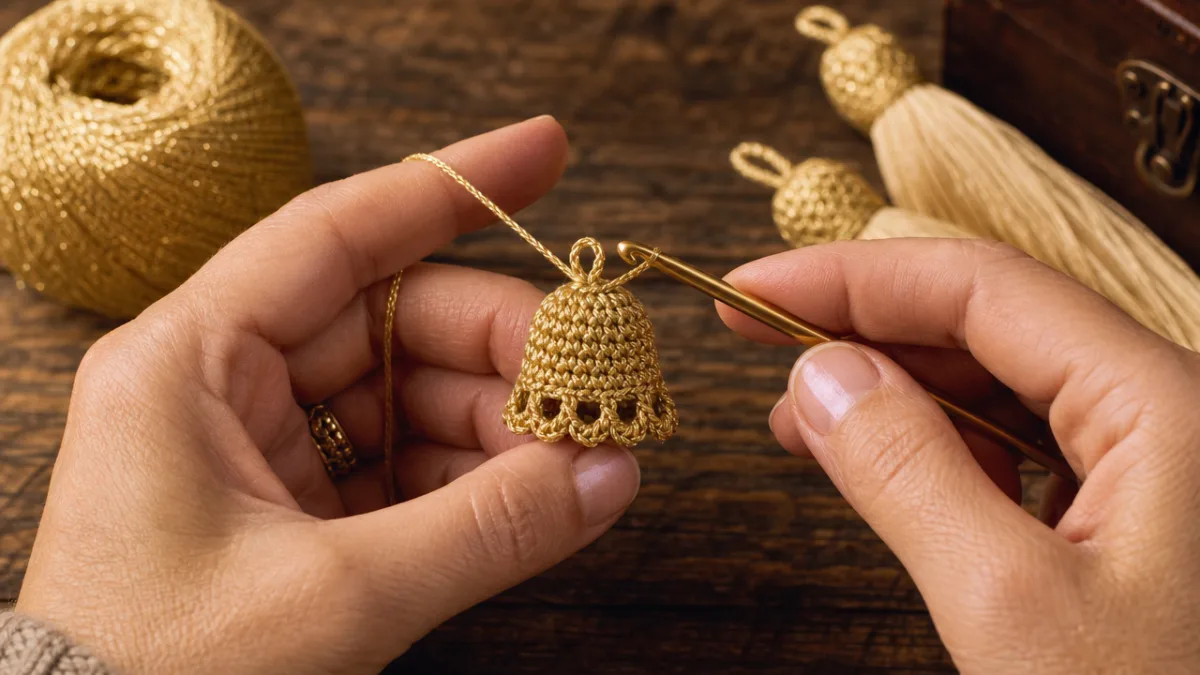
The crocheted cap is typically worked in the round, beginning with a magic ring or a small foundation chain joined into a circle. From this starting point, you work outward using standard stitches — primarily single crochet, half double crochet, and double crochet — building up a textured, dimensional cap that sits neatly at the top of the tassel. The beauty of working the cap in crochet rather than simply wrapping yarn is that it creates a polished, professional look that elevates the finished tassel considerably. Depending on the specific version of the pattern, the cap may also incorporate picots, shells, or other decorative elements.
The hanging strands are added after the cap is complete, threaded through the bottom edge of the crocheted piece and allowed to fall freely. The number and length of strands you add determines how full and long the finished tassel will be. For a lush, voluminous look, more strands are better. For a more minimalist, refined tassel, fewer longer strands can be equally effective. Once all strands are attached, they are typically trimmed to an even length at the bottom for a clean, professional finish that makes the tassel look polished and intentional.
Key Stitches Used in This Pattern
Even though this is described as an easy pattern, it does make use of several fundamental crochet stitches that beginners should become comfortable with before starting. The good news is that these are all among the most basic and widely taught stitches in crochet, meaning there is an abundance of tutorial resources available if you need a refresher. Mastering these stitches opens the door not only to this tassel pattern but to a huge range of other crochet projects as well.
- Magic Ring (or Magic Circle): This technique creates a tight, adjustable starting loop that is ideal for projects worked in the round. It eliminates the small hole that can sometimes appear at the center of a chain-based start.
- Single Crochet (sc): The most foundational of all crochet stitches, used here primarily to build the sides and edges of the tassel cap.
- Half Double Crochet (hdc): Slightly taller than single crochet, this stitch adds subtle height and texture to the cap without the openness of a full double crochet.
- Double Crochet (dc): Used in portions of the cap where more height or a more open, lacy texture is desired, adding visual interest to the finished piece.
- Slip Stitch (sl st): Used to join rounds seamlessly and to move the working yarn to new positions without adding height.
If you are new to working in the round, this pattern is actually an excellent place to practice. The tassel cap is small enough that any mistakes are quickly identified and easily corrected, and the finished item is not so large or time-consuming that a do-over feels discouraging. Many crocheters find that making a few tassels in quick succession is a wonderfully efficient way to build confidence with circular crochet before moving on to larger projects like hats, amigurumi figures, or circular shawls.
Step-by-Step Instructions for Making the Tassel
To begin your Easy Fancy Tassel, start by creating your magic ring with the yarn color of your choice. If you are not yet comfortable with the magic ring technique, you can substitute a chain-4 joined with a slip stitch into the first chain to form a small foundation ring — the result will be nearly identical. Pull the ring moderately tight before proceeding, as a snug starting ring prevents an unsightly gap at the center of your tassel cap and contributes to a cleaner finished look overall.
Round one typically involves working a set number of single crochets directly into the magic ring — often six to eight stitches, depending on the specific pattern version you are following. After completing the stitches of round one, join with a slip stitch to the first stitch of the round. In round two, you will usually increase by working two stitches into each stitch of the previous round, doubling the stitch count and expanding the diameter of the cap. Continue working rounds, increasing as directed, until the cap reaches the desired size — typically about an inch to an inch and a half in diameter for a standard-sized tassel.
Once the flat top of the cap is complete, subsequent rounds begin to shape the sides and decorative band of the tassel cap. Depending on the design, you may switch to half double or double crochet stitches to create a taller band, or work into the back loops only of certain rounds to create a neat ridge line. Any decorative elements such as picots or shell stitches are worked during this phase. When the cap is finished, fasten off and weave in the end at the top securely. Then cut your tassel strands to the desired length and use a crochet hook or yarn needle to thread them through the bottom opening of the cap in groups.
Finishing and Trimming Your Tassel
Finishing the tassel properly is what separates a homemade-looking result from a truly polished, professional-quality piece. Once all your hanging strands have been attached through the bottom edge of the crocheted cap, gather them together and hold them firmly so they hang in a uniform direction. Using a sharp pair of scissors, trim the very bottom ends of the strands in a single clean cut to ensure all the strands are exactly the same length. Even a small variation in strand length can make the tassel look uneven, so taking a moment to get this right is well worth the effort.
Some crocheters like to give the finished tassel a gentle steam with an iron or a brief exposure to steam from a kettle to help the strands relax and hang beautifully. This is especially effective with cotton or wool yarns, which respond well to steam finishing. Acrylic yarns, on the other hand, are typically heat-sensitive and should not be steamed; simply hanging them for a day or two will allow gravity to naturally encourage the strands to fall evenly. A very light misting with water followed by gentle finger-combing can also help acrylic strands look their best.
Finally, if you plan to attach the tassel to a larger project — such as a corner of a blanket, the zipper pull of a bag, or the end of a bookmark — this is the moment to secure the attachment point carefully. Thread the tail end left at the top of the tassel cap through your attachment point multiple times and knot it securely before weaving in the end. For tassels that will experience regular handling or movement, consider adding a small drop of clear fabric glue to the knot for extra security, ensuring your beautiful tassel stays in place for years to come.
Creative Uses and Project Ideas for Your Crochet Tassels
Once you have mastered the Easy Fancy Tassel pattern, the possibilities for incorporating tassels into your crafting life are genuinely endless. One of the most popular uses is as a decorative accent on handmade bags and purses. A tassel attached to a bag’s zipper pull or strap transforms a simple functional item into something that looks thoughtfully styled and handcrafted. This is a particularly popular choice for market bags, clutch purses, and small project bags, where the tassel adds a pop of color and personality.
Tassels also make wonderful additions to home décor projects. A wall hanging studded with tassels in a coordinating color palette becomes a striking piece of fiber art that adds warmth and texture to any room. Tassel garlands, made by connecting multiple tassels along a length of twine or ribbon, are especially popular for seasonal decorating — hung above a fireplace mantel for the holidays or strung across a window for a boho-inspired celebration. Individual tassels attached to the corners of a hand-crocheted or hand-knitted throw blanket add a finishing flourish that makes the piece feel truly complete and intentional.
For those who enjoy making gifts by hand, tassels are a fantastic addition to a wide range of handmade presents. A crocheted bookmark topped with a colorful tassel is a quick, thoughtful gift for book lovers. A set of matching tassels gifted alongside a plain journal or notebook instantly elevates the presentation. Holiday ornaments made from tassels in red, green, gold, or silver are quick to produce in multiples and can be personalized with initials or charms for a truly special touch. The versatility of this small embellishment is one of its greatest strengths.
- Bag and purse zipper pulls or strap accents
- Corners of blankets, throws, and afghans
- Wall hangings and fiber art installations
- Tassel garlands for seasonal or party décor
- Bookmarks paired with journals or books as gifts
- Holiday ornaments in festive color combinations
- Keychains and bag charms for everyday carry items
- Hat and beanie embellishments in place of a traditional pompom
Tips for Success and Customizing Your Tassel
One of the joys of working with a free crochet pattern like the KHD Easy Fancy Tassel is that it serves as a starting point rather than a rigid prescription. Once you understand the basic structure, there are numerous ways to customize the pattern to suit your personal aesthetic and the specific project you have in mind. Changing the yarn weight is the most dramatic modification you can make — moving from worsted to fingering weight yarn, for example, transforms the tassel from a bold statement piece to a delicate, refined adornment suitable for fine jewelry or baby accessories.
Adding beads is another popular way to personalize your tassels. Wooden beads, metal beads, or even vintage buttons can be threaded onto individual hanging strands before trimming, creating movement and a soft jingling quality that makes the tassel extra special. Alternatively, a single large bead can be threaded over the gathered strands just below the crocheted cap, acting as a decorative separator between the cap and the hanging portion. This technique is particularly striking with contrasting materials — a smooth wooden bead with natural fiber yarn, or a faceted crystal bead with silky thread, for example.
Color blocking within the tassel cap itself is a technique that more experienced crocheters might enjoy exploring. By changing yarn colors at specific round transitions in the cap, you can create bold color-blocked stripes or gradient effects that add significant visual complexity to what is otherwise a small and simple design. Ombre effects, achieved by using two strands of yarn in progressively lighter or darker shades held together and gradually substituting one for the other, are especially fashionable right now and translate beautifully to tassel making.
Troubleshooting Common Issues
Even with a well-written pattern, new crafters sometimes encounter challenges that can feel discouraging. One of the most common issues is a tassel cap that curls or warps rather than lying flat. This is almost always a tension issue — if your stitches are too tight, the cap will cup upward like a bowl, and if they are too loose, the edges may ruffle outward. The solution is to adjust your hook size up or down by one size and swatch a small sample before committing to a full tassel. Crochet tension is highly individual, and finding the right hook-to-yarn combination for your personal tension is a worthwhile investment of time.
Another common challenge is difficulty attaching the hanging strands evenly. If the strands are grouped too close together or pulled through at uneven intervals around the bottom edge of the cap, the tassel may look lopsided or bunched to one side. To avoid this, work methodically around the entire bottom edge of the cap, distributing strand groups as evenly as possible. Counting the stitches around the bottom edge and dividing by the number of strand groups you want to attach gives you a precise guide for where to place each group, resulting in a beautifully balanced finished tassel.
Finally, if you find that your finished tassel does not have quite enough volume or fullness, resist the temptation to start over from scratch. Instead, simply add more strands through the same openings in the bottom of the cap. Because the strands are not sewn or permanently attached, it is very easy to add more until you achieve the level of fullness you are looking for. This flexibility is one of the great advantages of the KHD pattern’s construction approach, and it means that even an initially disappointing result can usually be rescued with a few extra minutes of work and a bit more yarn.
Why the KHD Easy Fancy Tassel Pattern Deserves a Permanent Place in Your Collection
The crochet community is fortunate to have generous designers like Kirsten Holloway Designs who share high-quality patterns freely with the public. The Easy Fancy Tassel pattern exemplifies what makes a truly great free pattern: it is well-written, visually rewarding, technically sound, and genuinely useful across a wide range of applications. Patterns that check all of these boxes are rarer than one might expect, which is precisely why this one has earned such enthusiastic attention and sharing across Pinterest and other crafting platforms.
From a skill-building perspective, this pattern is an ideal project for crocheters at many different stages of their craft journey. Absolute beginners will find it a manageable and rewarding first finished object that builds confidence and reinforces foundational skills. Intermediate crocheters will appreciate the pattern as a quick and satisfying make that can be completed in a single sitting and adapted in numerous creative directions. Even advanced crocheters return to simple, elegant patterns like this one for the pleasure of making something beautiful quickly and efficiently without the cognitive demand of a complex project.
Perhaps most importantly, the Easy Fancy Tassel pattern reminds us of one of the most delightful truths about the fiber arts: sometimes the smallest projects bring the greatest joy. There is a particular satisfaction in holding a finished tassel in your hand — something you created from scratch with nothing more than a bit of yarn and a hook — and seeing how the crocheted cap catches the light and the strands flow freely. That satisfaction does not diminish with repetition; if anything, it deepens as your technique improves and your collection of beautiful handmade tassels grows. This pattern is well worth bookmarking, saving, and returning to again and again throughout your crafting life.








What do you think?
It is nice to know your opinion. Leave a comment.