










Why a DIY Pegboard Is the Ultimate Craft Room Organizer
If you’ve ever wasted twenty minutes hunting for a specific pair of scissors, a particular shade of paint, or that one tool you know is around here somewhere — you already know how exhausting a messy craft room can be. A cluttered workspace doesn’t just slow you down; it chips away at your creative energy before you’ve even started. That’s why so many crafters, artists, and makers keep coming back to the same surprisingly simple solution: the pegboard. Hung on a wall, a pegboard turns wasted vertical space into a fully visible, endlessly customizable system that keeps every tool exactly where you can see and grab it.
What makes a pegboard so great is how flexible it is. Fixed shelves and drawers lock your supplies into one arrangement, basically forever. A pegboard doesn’t do that. Hooks, bins, shelves, and holders can all be moved around in minutes — no tools, no patching holes, no regret. Whether you’ve got mountains of scrapbook paper, dozens of paint brushes, or spools of thread in every color imaginable, the pegboard bends to fit how you actually work instead of the other way around.
And honestly? A well-put-together pegboard is just really nice to look at. Color-coordinated tools arranged on a freshly painted board can make your workspace feel like that dreamy studio you keep saving photos of. A lot of crafters say that having a clean, organized pegboard actually changes how motivated they feel to sit down and create. When everything has a spot and every spot is visible, you stop wasting mental energy on “where did I put that?” and just get to making things. This article covers everything you need to plan, build, and style your own DIY pegboard craft room organizer.
Planning Your Pegboard Setup: Size, Placement, and Layout
Before you buy a single hook or drill a single hole, take some real time to plan things out. The most common mistake first-timers make is underestimating how much wall space they’ll want. A two-foot-square board might look like plenty at first, but once you start hanging tools and supplies, it fills up shockingly fast. Measure your available wall space carefully, think about the height that feels most comfortable for you to work at, and decide whether you want one big continuous board or a few smaller ones arranged in a grid or staggered pattern.
Where you put the board matters a lot — for both convenience and your body. Ideally, the center of the board should sit right around eye level or a bit above, so you can see and reach most of your tools without stretching or bending awkwardly. Mount it as close as possible to your main work surface — your cutting table, your sewing machine, your art desk — so grabbing a tool takes seconds rather than steps. If your craft room gets good natural light, think about which wall is brightest during the hours you tend to craft most, and prioritize that one.
Sketching out a rough layout before you start drilling is genuinely worth doing. Go through your most-used tools and supplies and sort them into logical groups: cutting tools, adhesives, measuring stuff, embellishments, paint brushes sorted by size, and so on. The things you reach for all the time should live right in the center of the board where they’re easiest to grab. Less frequently used items can go toward the edges or higher up. This planning step also helps you figure out exactly what hooks, bins, and accessories you’ll need, which saves you from making three separate hardware store trips.
Materials and Tools You’ll Need for the Build
One of the best things about a DIY pegboard project is that it doesn’t require much in the way of specialized materials, and most people can knock it out in a single afternoon with basic tools. The pegboard itself is obviously the main event — you’ll find it at most home improvement stores in standard four-by-eight-foot sheets that can be cut down to whatever size you need. Standard pegboard comes in a quarter-inch thickness, which works perfectly fine for lighter craft supplies. If you’re planning to hang heavier things like big jars of hardware, chunky scissors, or rolls of fabric, go with the thicker three-eighths-inch version for better stability.
Besides the board itself, you’ll need furring strips or wooden spacers to mount behind it — and this is the step a lot of beginners skip and then kick themselves over. Pegboard hooks need clearance behind the board to insert and lock properly, usually about three-quarters of an inch to one inch. Without spacers, the hooks simply don’t work. Cut your furring strips to run along the perimeter of the board, and add a center support strip for any board wider than two feet. You’ll also need wood screws long enough to pass through the pegboard, through the spacers, and into your wall studs, plus a stud finder so you’re actually hitting solid wood rather than hoping for the best.
Here’s a complete materials checklist to bring to the hardware store:
- Pegboard panel in your desired size (quarter-inch or three-eighths-inch thickness)
- Furring strips or one-by-two lumber for spacers, cut to fit the perimeter and center of your board
- Wood screws, approximately two to two-and-a-half inches in length
- Wall anchors or toggle bolts if you can’t hit studs at every mounting point
- A stud finder for locating wall studs
- A level to make sure the board hangs straight
- Sandpaper in medium and fine grits to smooth out the edges of the board
- Primer and paint in your chosen color, plus painter’s tape and drop cloths
- A pegboard hook and accessory kit with a good variety of hook styles, bins, and shelf brackets
- A drill with the right bits for wood and, if needed, masonry
Beyond the basics, a few optional extras can really take your finished pegboard to the next level. Pegboard baskets and bins with lips that hook directly into the holes are great for wrangling small loose items like rubber stamps, washi tape rolls, or crafting embellishments. Small ledge shelves made specifically for pegboard can hold jars, spray bottles, or even a little potted succulent. Dowel rod holders are perfect for hanging spools of ribbon or twine. Magnetic strips can be woven into the layout to hold metal scissors and other metal tools. The pegboard accessory market has genuinely expanded a lot in recent years, so it’s worth spending some time browsing options online or in store before you start — you might be surprised by what’s out there.
Step-by-Step Installation Guide
Start by prepping your pegboard panel. If you bought a full four-by-eight sheet and need to cut it down, use a circular saw or jigsaw and follow a pencil line you’ve marked with a straightedge. After cutting, sand all the edges with medium-grit sandpaper, then follow up with fine-grit to get rid of any splinters or rough spots. If you’re planning to paint the board — and honestly, painting it a crisp white, a fun color, or a nice neutral is highly recommended for both looks and durability — do that before you mount it. Spray on a coat of primer first, let it dry fully, then apply two light coats of your chosen paint, letting each one dry completely before putting on the next.
Once your board is painted and dry, cut your furring strips to build the spacer frame. You want strips running along all four edges of the board, plus at least one running down the center if the board is wider than two feet. Use wood glue and finish nails or short screws to attach the furring strips to the back of the pegboard, creating a frame that holds the board away from the wall surface once it’s hung. Have a helper hold the board against the wall while you use your level to confirm it’s straight, mark the stud locations through the board with a pencil, then carefully drill pilot holes and drive your screws through the pegboard and spacers and into the studs. Check the level again after each screw to make sure the board hasn’t shifted on you.
Once the board is up, the truly satisfying part starts: filling it with hooks and accessories. Insert hooks at the spots where you know specific tools will live, then step back and take a look before adding more. It’s really tempting to fill every hole, but leaving some empty space actually makes the whole thing more functional and better looking. Group related items together — all scissors in one zone, adhesives in another, brushes sorted by size — and put the things you grab most often right in the center sweet spot of the board. Use a fine-tip marker or a small piece of tape to mark each hook’s position so that if hooks get knocked out, you can put everything back without having to guess.
Here’s a tip that people who’ve built a lot of pegboards swear by: once you’ve landed on a layout you love, put a small dot of hot glue at the base of each hook where it touches the board. This stops hooks from slipping out every time you grab a tool, which is genuinely one of the most annoying things about pegboard systems. The hot glue holds firmly enough for everyday use but peels away cleanly if you ever want to rearrange things. It’s such a small step, but it makes an enormous difference in how well the whole system works day to day.
Styling and Personalizing Your Craft Room Pegboard
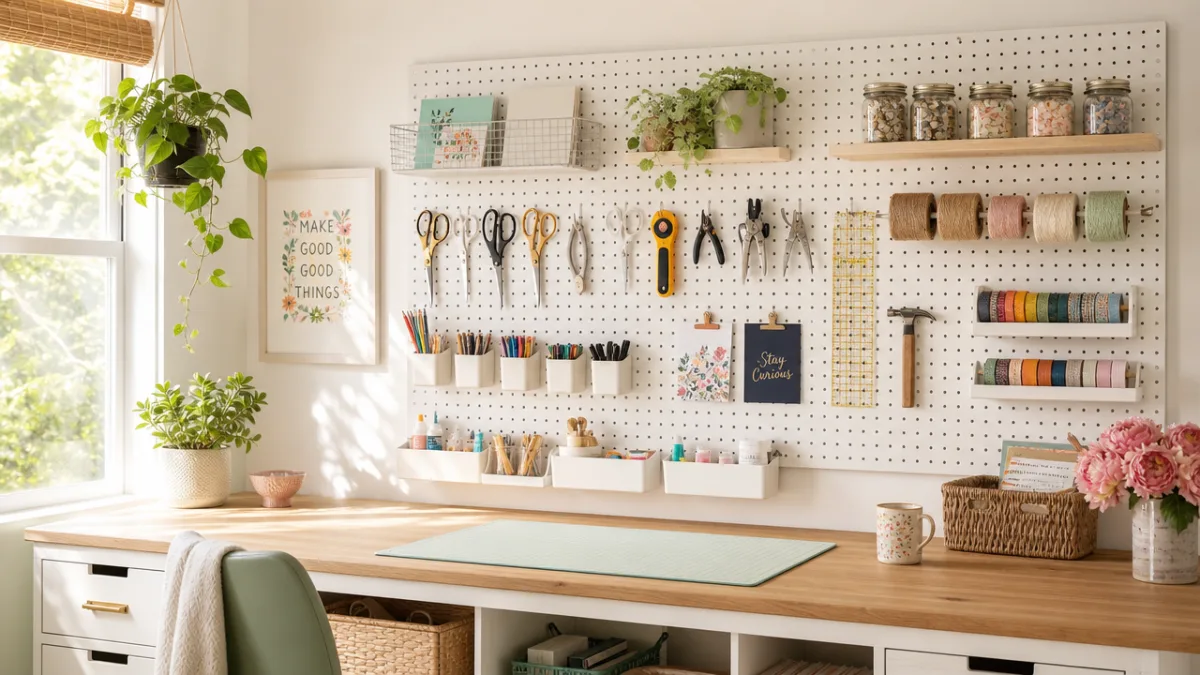
A functional pegboard is great, but a beautifully styled one is something else entirely. Once the installation is done, it’s worth thinking about how your board looks and how it fits in with the rest of your craft room. The board’s color sets the whole tone: bright white creates a clean, gallery-like backdrop that makes colorful tools pop; a soft sage green or dusty blue brings in a calming, nature-inspired vibe; deep charcoal or black makes bold metallic tools and bright supplies stand out with real contrast. Whatever color you go with, make sure it plays nicely with your room’s existing palette rather than fighting it.
Beyond color, think about how you style the accessories themselves. Matching containers make a bigger visual difference than you’d expect — a row of identical small glass jars filled with buttons, brads, and gems looks curated and intentional rather than chaotic. Small potted plants or air plants tucked into corner shelves add life and a bit of softness. Washi tape on the rims of bins or the edges of shelf brackets adds pattern and color without any real commitment. String lights woven along the perimeter of the board give the whole setup a warm, cozy glow that makes it feel like a little creative sanctuary rather than just a wall of storage. A small framed print or an inspirational quote propped on a pegboard shelf adds a gallery-wall touch right in your workspace.
Labeling pulls double duty as both a style choice and a practical tool. Adhesive chalkboard labels, printed labels from a label maker, or hand-lettered tags tied with twine can mark zones on your pegboard so everything always ends up back where it belongs — especially helpful if you share your craft space with kids, a partner, or anyone else who helps tidy up. Color-coding your zones is another nice touch: warm tones for cutting and measuring tools, cool tones for adhesives and tapes, neutrals for brushes and mark-making tools. It creates an at-a-glance logic that makes the whole system intuitive for anyone who uses the space.
Maintaining and Evolving Your Pegboard Over Time
One of the most underrated things about a pegboard system is how naturally it grows and changes with you. Unlike a fixed shelving unit that’s a whole project to reconfigure, a pegboard can be updated in minutes as your supplies change, as you pick up new crafting disciplines, or as you simply get a clearer sense of how you actually work. Try to make a habit every few months of stepping back and honestly looking at your layout: Are you reaching past certain tools to get to the ones you really want? Are there things you thought you’d use all the time that haven’t moved in ages? Has a new category of supplies gotten big enough to deserve its own dedicated zone?
Dust and residue from craft materials — spray adhesive, paint mist, glitter — can build up on the board over time and make it look dull even when the tools themselves are clean. Wipe down the surface every now and then with a lightly damp cloth, and use a small brush or a can of compressed air to clear debris out of the pegboard holes. If the paint gets scuffed or chipped in high-traffic areas, a quick touch-up with a small brush keeps everything looking sharp. These little maintenance sessions are also a natural opportunity to tweak your layout and fix any small things that have been bothering you.
As your craft room grows and your creative ambitions expand, don’t hesitate to grow your pegboard system along with them. A second panel mounted right next to the first instantly doubles your capacity. A small floating shelf installed just below the pegboard gives you a landing spot for works in progress or supplies you swap out often. A rolling cart parked directly under the board can hold things that are too bulky or heavy to hang while still keeping them visually connected to the organized system above. The pegboard becomes an anchor point around which a genuinely comprehensive, personalized organizational setup can develop over months and years, growing right alongside your creativity and your collection.
When it comes down to it, a DIY pegboard is more than just storage — it’s a declaration that you take your creative practice seriously. Giving your tools and supplies a visible, intentional home says that you value your crafting time and don’t want to waste it on disorganization. Every minute you’re not hunting for a tool is a minute you’re actually making something. And that’s really the whole point. Whether you’re putting together your first board on a tight budget with a small square of pegboard and a handful of hooks, or designing an elaborate floor-to-ceiling setup with custom painted accessories and coordinated bins, the investment pays off in better creative flow, less daily stress, and a little burst of joy every single time you walk into your craft space.








What do you think?
It is nice to know your opinion. Leave a comment.