










Air Dry Clay Seed Mosaics: A Complete Guide to Creating Stunning Nature-Inspired Art
What Are Air Dry Clay Seed Mosaics?
Air dry clay seed mosaics are a captivating form of handmade art that combines the tactile pleasure of working with clay with the natural beauty of seeds, grains, and botanical materials. The concept is elegantly simple: you press an assortment of seeds, lentils, dried flowers, and other organic matter into a flat or shaped piece of air dry clay before it hardens, creating intricate patterns and designs that celebrate the textures and colors found in nature. The result is a piece that is simultaneously earthy, artistic, and deeply satisfying to make.
Unlike traditional mosaic work that relies on tiles, glass, or ceramic fragments, seed mosaics are entirely natural and biodegradable at their core. This makes them an especially appealing craft for environmentally conscious makers, educators looking for sustainable classroom projects, and anyone who loves the idea of turning everyday pantry staples into something beautiful. A handful of lentils, a few pumpkin seeds, and some dried peppercorns can become an elaborate geometric design or a representational image of a flower, animal, or landscape.
The craft requires no kiln, no firing, and no specialized equipment. Air dry clay is widely available at craft stores and online, and the seeds and natural materials can often be sourced right from your kitchen cupboard or a quick trip to the grocery store. This accessibility makes seed mosaics one of the most approachable art forms for beginners while still offering enough creative depth to engage experienced crafters for hours. Whether you are making a small decorative tile or a large wall hanging, the process rewards patience, creativity, and a love of natural materials.
Materials You Will Need
Gathering your materials before you begin is one of the most enjoyable parts of starting a seed mosaic project. The sheer variety of seeds, grains, and dried botanicals available means that your palette is surprisingly rich and diverse. Walking through a grocery store or health food shop with a mosaic in mind transforms even the most mundane shopping trip into a creative expedition. Different seeds offer different colors, sizes, shapes, and textures, and learning to see them as artistic elements rather than food is the first step toward making beautiful work.
Air dry clay is your primary medium and the foundation of the entire project. There are several brands on the market, and they vary in terms of drying time, flexibility, and how well they hold fine detail. Look for a clay that rolls out smoothly and dries to a reasonably hard finish, as this will give your seeds something sturdy to grip. Some crafters prefer a white clay base so that the seeds stand out more clearly, while others enjoy the warm terracotta tones of natural clay. You will also need a smooth rolling pin, a flat work surface, and clay tools or simple household items like toothpicks and skewers for making patterns and guiding small seeds into precise positions.
When it comes to seeds and natural materials, the options are wonderfully abundant. Consider gathering some of the following for a well-stocked mosaic palette:
- Pumpkin seeds and sunflower seeds for large, flat shapes and bold outlines
- Lentils in green, red, and black for fine detail work and dense fill areas
- Dried peppercorns, both black and pink, for round accent dots
- Sesame seeds in white and black for ultra-fine texture and shading effects
- Dried corn kernels and chickpeas for bold, structural elements
- Dried flower petals, lavender buds, and rose hips for color and botanical interest
- Fennel seeds, caraway, and cumin for elongated, graceful shapes
Beyond seeds, you will want a few practical supplies on hand to ensure the project goes smoothly from start to finish. A small bowl of water is essential for keeping your fingers and tools slightly damp, which prevents clay from cracking as you work and helps embed seeds more securely. A piece of parchment paper or a silicone mat makes an ideal work surface because it prevents sticking without requiring the use of oils or powders that could affect the clay’s finish. If you plan to hang your finished piece, press a small loop of wire or a hanging hook into the back of the clay before it dries, as attempting to add these after the fact is difficult and risks damaging your work.

Planning Your Design
Before pressing a single seed into clay, it is worth spending some time thinking about your design. This planning stage is where the creative process truly begins, and the decisions you make here will shape everything that follows. Seed mosaics lend themselves beautifully to geometric patterns, mandala-style designs, botanical illustrations, and abstract compositions. Because seeds come in a limited range of natural colors — creams, browns, greens, blacks, oranges, and reds — working within a natural palette encourages a kind of creative discipline that often produces stunning results.
Sketching your design on paper first is highly recommended, especially if you are new to the craft. You do not need to be a skilled draftsperson; even a simple pencil outline gives you a roadmap to follow once your clay is rolled out and the clock on drying time has started. Think about which seeds will fill which areas, and consider the contrast between light and dark materials. A design that looks great on paper will translate even more beautifully into seeds if you have planned for tonal variety — alternating light sesame seeds with dark lentils, for example, creates a visual rhythm that draws the eye across the surface.
Scale is another important consideration. Larger pieces give you more room to develop complex designs but require significantly more seeds and more working time before the clay begins to dry. For your first project, a tile or panel roughly the size of a postcard is an ideal starting point. This gives you enough space to create a satisfying design without overwhelming yourself. You can always work your way up to larger, more ambitious pieces once you have developed a feel for how the clay behaves and how different seeds sit within it. Many experienced mosaic makers keep a scrapbook of design ideas and seed combinations, building a personal library of inspiration to draw from over time.
Color planning deserves special attention, particularly if you want to create a sense of depth or movement in your piece. The natural tones of seeds may seem limited at first glance, but careful arrangement can produce remarkable variety. Grouping warm-toned seeds — sunflower, pumpkin, dried corn — in one area while clustering cooler greens and blacks in another creates a dynamic tension that gives a mosaic its visual energy. You can also think about texture contrast: smooth, flat lentils next to the ridged surface of a dried corn kernel create a tactile interest that photographs beautifully and feels wonderful to touch.
Step-by-Step Instructions
Once your materials are gathered and your design is sketched, you are ready to begin making your seed mosaic. Start by kneading your air dry clay thoroughly to warm it up and remove any air bubbles. Cold or stiff clay is harder to work with and more prone to cracking, so spend a few minutes working it between your palms until it becomes soft and pliable. If the clay feels too sticky, allow it to rest for a few minutes uncovered; if it feels too dry, add the tiniest amount of water and knead it in gradually. The clay should feel smooth and cooperative, like soft bread dough.
Roll your clay out onto your parchment or silicone mat to your desired thickness. For seed mosaics, a thickness of about half a centimeter is ideal — thin enough to be lightweight and elegant, but thick enough to securely hold even larger seeds like chickpeas or pumpkin seeds without them pulling away from the surface. Use a straight edge or the rim of a bowl to cut your clay into your desired shape. Squares, rectangles, and circles are all classic choices, but you might also enjoy cutting free-form shapes like leaves, hearts, or irregular organic forms that echo the natural materials you will be pressing into them.
Now comes the most meditative and enjoyable part of the process: pressing in your seeds. Work from the center outward, or follow the outline of your design, pressing each seed gently but firmly into the surface of the clay. You want each seed to be embedded about halfway into the clay — deep enough to be held securely once the clay dries, but not so deep that the seed disappears entirely beneath the surface. Use a toothpick or skewer to nudge small seeds like sesame or poppy into precise positions, and use your fingertip to press larger seeds flat.
- Roll your clay to approximately half a centimeter thickness on a non-stick surface.
- Cut your desired shape using a template, cookie cutter, or freehand knife cut.
- Lightly score your design outline onto the clay surface using a toothpick.
- Begin placing seeds starting with your largest, most structural elements first.
- Fill in background areas with smaller seeds, working methodically section by section.
- Press each seed firmly to embed it, using a smooth tool to avoid fingerprints.
- Insert any hanging hardware into the back of the piece at this stage.
- Allow the piece to dry fully on a flat, level surface for 24 to 72 hours.
- Once dry, optionally seal the surface with a thin coat of clear matte varnish.
Drying time is one of the most important variables to manage in this project. Air dry clay contracts slightly as it dries, which can cause cracking if the piece dries too quickly or unevenly. Keep your finished mosaic away from direct sunlight, radiators, and air conditioning vents during the drying period. Flipping the piece over carefully after the first 12 hours can help it dry more evenly and prevent warping. Patience at this stage pays dividends: a piece that is allowed to dry slowly and evenly will be significantly stronger and less prone to cracking than one that is rushed.

Design Inspiration and Creative Variations
One of the greatest joys of air dry clay seed mosaics is the sheer range of directions you can take the craft. The basic technique — pressing natural materials into clay — remains constant, but the creative possibilities branch out endlessly from that simple premise. Geometric designs inspired by Islamic tilework, Celtic knotwork, or Scandinavian folk patterns all translate magnificently into seed mosaics. The repetitive, ordered nature of geometric work also makes it particularly forgiving for beginners, since the structured pattern provides clear guidance on where each type of seed should go.
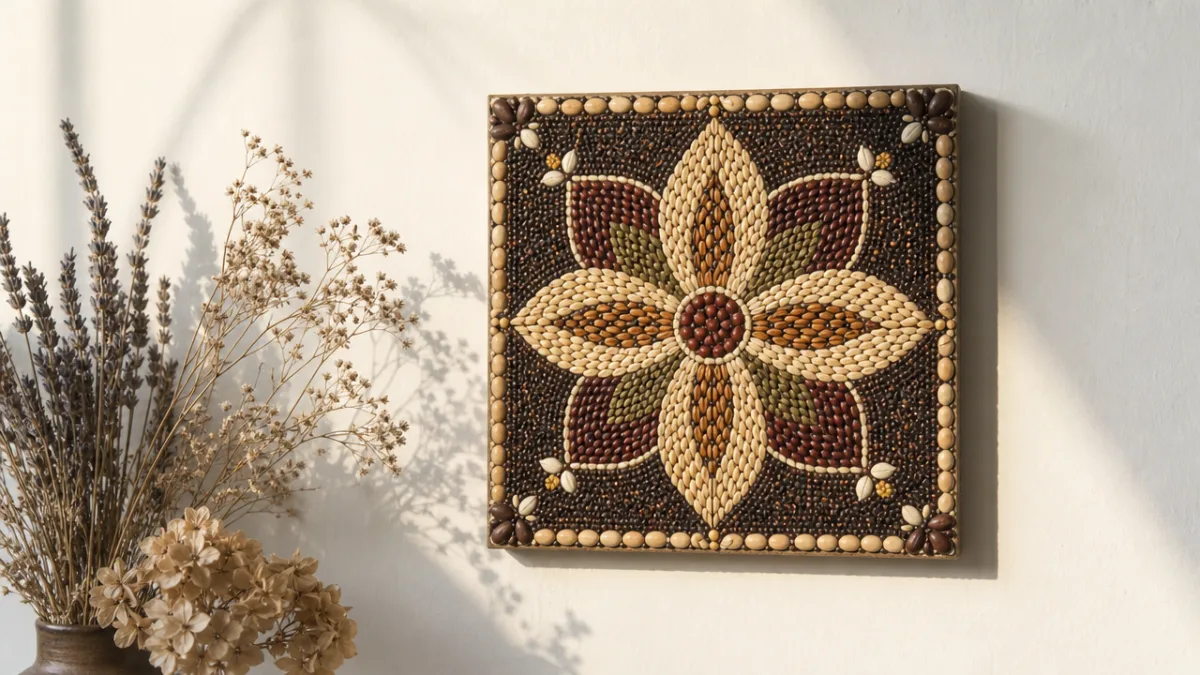
Botanical themes are another perennially popular choice and feel especially appropriate given the organic nature of the materials. A stylized sunflower, a simple leaf, a branching tree silhouette, or a wreath of wildflowers all lend themselves beautifully to seed mosaic interpretation. The natural origin of the seeds means they carry an inherent connection to the plant world, and a mosaic depicting a flower made from actual seeds carries a layer of poetic meaning that tiles or glass simply cannot replicate. Pressed flowers and dried botanicals can be incorporated alongside seeds for additional texture and botanical authenticity.
For those who want to push the craft in a more contemporary direction, abstract compositions offer exciting territory. Think about designing your mosaic like a color field painting — broad areas of different seed types creating tonal zones that interact across the surface. Or experiment with radial designs that spread outward from a central point, varying the seed types as you move toward the edges to create a gradient effect. Some makers incorporate text or simple symbols, using fine seeds to write words, initials, or short phrases within the clay surface, creating personalized pieces that make deeply meaningful gifts.
Functional variations of the basic seed mosaic concept are also worth exploring. Coasters, trivets, wall clock faces, house number plaques, and decorative bookends can all be made using the same fundamental technique. Framing a finished mosaic tile behind glass adds a polished, gallery-ready look and protects the surface from dust and moisture. You might also try making a series of small matching tiles that can be arranged together on a wall to create a larger composite image — each tile complete in itself but contributing to a bigger, more complex design when viewed together. The modular approach is particularly satisfying and allows you to build a collection gradually over time.
Tips for Success and Troubleshooting Common Problems
Like any craft, air dry clay seed mosaics come with a learning curve, and even experienced makers occasionally encounter challenges. The most common issue is seeds falling out of the clay after it dries. This almost always happens because the seeds were not pressed deeply enough during the making process or because the clay was already beginning to dry out and harden before the seeds were embedded. The solution is to work quickly and confidently, keeping your clay covered with a damp cloth when you are not actively working on a section, and pressing each seed firmly and deliberately rather than simply resting it on the surface.
Cracking is another frequent frustration, particularly for those making larger pieces. Clay cracks when it dries unevenly, contracts under stress, or when the piece is too thin relative to its size. If you notice small cracks appearing as your piece dries, you can sometimes repair them by dampening the crack with a tiny amount of water and gently pressing it closed with your fingertip. For larger cracks, a small amount of fresh clay worked into the crack and allowed to dry again can restore structural integrity, though the repair line may remain faintly visible. Prevention is always better than repair, so take care to roll your clay to a consistent thickness and dry your pieces slowly in a stable environment.
Sealing your finished mosaic is a step that many beginners overlook but which makes a significant difference to the longevity and appearance of the finished piece. A thin coat of clear matte or satin varnish applied with a soft brush protects the surface from moisture, prevents seeds from loosening over time, and gives the entire piece a subtle unified finish. Apply varnish in thin layers, allowing each layer to dry completely before adding the next. Avoid thick applications that can cloud over seeds or fill in the textural gaps between them — the goal is protection, not a thick plastic coating.
Working with children on seed mosaic projects is one of the most rewarding applications of this craft. The technique is tactile, engaging, and requires no sharp tools or toxic materials, making it genuinely safe for young crafters. Children tend to love the sorting and selecting of seeds as much as the pressing, and the project naturally incorporates conversations about plants, food, ecosystems, and the natural world. For classroom use or group workshops, pre-rolling clay into portions and cutting them into identical shapes saves time and ensures every participant starts with the same foundation to build their individual creative vision upon.
Storage and display of finished seed mosaics deserves thoughtful attention. Because these pieces are made from organic materials, they should be kept away from excessive humidity, direct sunlight for extended periods, and environments where pests might be attracted to the organic content. Hanging them indoors in a dry, stable environment is ideal. If you live in a particularly humid climate, an extra coat or two of sealant applied thoroughly to all surfaces — including the back and edges of the clay — provides meaningful additional protection. Properly made and sealed seed mosaics can last for many years, maintaining their beauty and integrity as a cherished piece of handmade art.
The Meditative and Wellbeing Benefits of Making Seed Mosaics
Beyond their aesthetic appeal, air dry clay seed mosaics offer genuine psychological and emotional benefits to the people who make them. The act of working with clay engages the hands and the mind simultaneously in a way that many people describe as deeply grounding and calming. There is something about the pressure of pressing seeds into soft clay, the quiet sorting through different varieties, and the gradual emergence of a pattern that slows the pace of thought and brings a welcome sense of present-moment focus. Many makers find that a session of seed mosaic work leaves them feeling refreshed and centered in a way that other creative activities do not always achieve.
This connection to natural materials adds an additional dimension to the wellbeing benefits of the craft. Handling seeds — objects that contain within them the entire potential of a living plant — carries a quiet significance that synthetic craft materials simply do not possess. There is an ancient human tradition of working with seeds, of counting them, sorting them, and understanding their value, that the act of seed mosaics subtly invokes. Whether or not you are consciously aware of this history as you work, the handling of natural materials seems to activate a sense of connection and meaning that many people find deeply nourishing.
The craft also offers a wonderful balance between structure and freedom that many people find psychologically satisfying. A geometric design provides enough structure to prevent the anxiety of a completely blank slate, while the choice of seeds, the arrangement of colors, and the personal touches each maker brings ensure that no two pieces are ever identical. This sweet spot between order and creative expression is one of the reasons so many people describe making seed mosaics as genuinely joyful rather than merely pleasant. It asks just enough of you to keep your attention fully engaged without ever feeling overwhelming or technically demanding, making it one of the most accessible and genuinely restorative craft practices you can take up.








What do you think?
It is nice to know your opinion. Leave a comment.