










How to Make a Risseu: A Complete Guide to Cobbled Path Construction
A risseu is a traditional decorative cobbled pathway that originated in the Ligurian coastal towns of Italy, especially around Genoa and the surrounding villages. These gorgeous pebble mosaics have been adorning courtyards, gardens, and public squares across the Mediterranean for centuries, turning ordinary stones into breathtaking works of functional art. These days, homeowners and garden designers all over the world are rediscovering this ancient craft and bringing its timeless charm to patios, garden paths, and entryways.
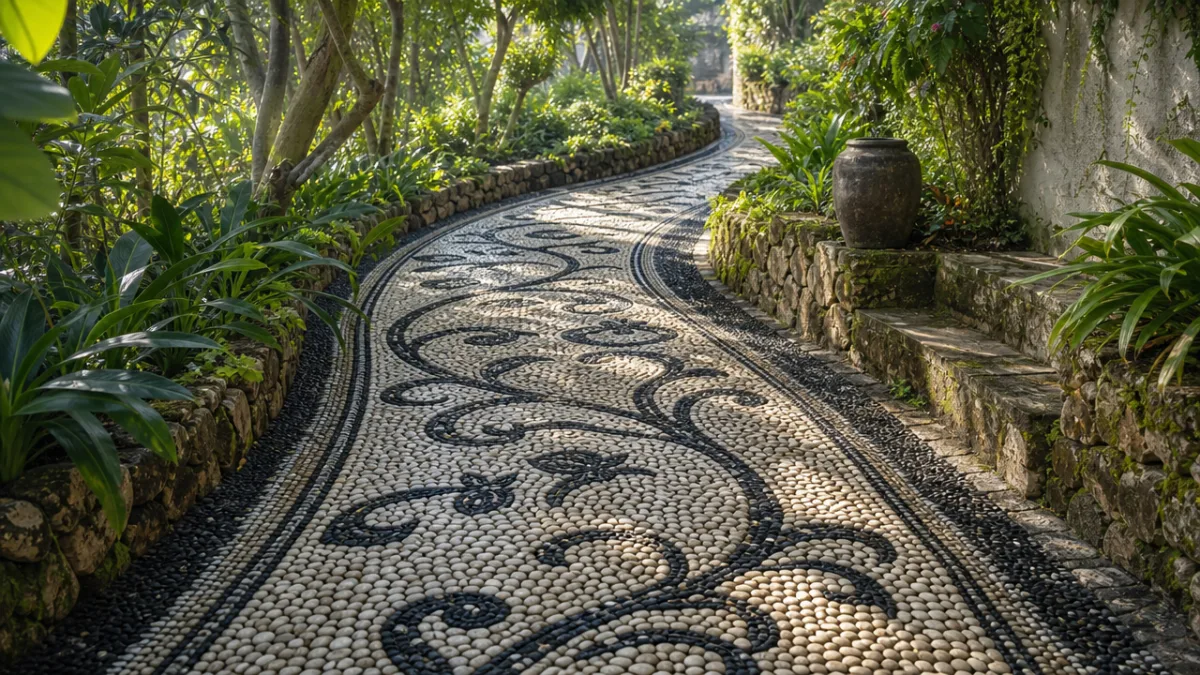
The word risseu comes from the Genoese dialect and refers specifically to the art of creating patterns and pictures using small, carefully chosen pebbles set into a mortar or sand base. What sets a risseu apart from an ordinary cobblestone path is the intentional decorative design — think geometric motifs, floral patterns, animals, or heraldic symbols. The contrast between light and dark stones gives it a visual depth and personality that no mass-produced paving can come close to matching.
What makes the risseu such a compelling DIY project is that you don’t need specialist machinery, expensive materials, or any formal training. What you do need is patience, a decent eye for design, and a genuine willingness to spend some quality time close to the ground. In return, you’ll end up with one of the most rewarding and permanent features you can ever add to a garden — entirely made with your own hands.
Understanding the History and Tradition of Risseu Paving
The risseu tradition goes back at least to the medieval period in Liguria, though some scholars think its roots stretch even further into Roman and Byzantine mosaic-making. The Ligurian craftsmen who practiced this art were known as rissellatori, and they passed their skills down through generations — not just the technical know-how, but a whole library of traditional motifs and patterns. You can still see their work today in the historic centres of Rapallo, Portofino, Camogli, and dozens of other coastal towns where the craft remains very much alive.
Originally, risseu paths were built from whatever stones happened to be locally available — in Liguria, that meant the smooth river pebbles and sea-worn stones that were everywhere along the coastline. Craftsmen would sort these by size and colour, then set them on their edge rather than laying them flat into a compacted sand or lime mortar base. This on-edge technique (related to what’s called opus spicatum or herringbone in other traditions) dramatically increases both the density and the durability of the surface, while also giving it that wonderfully rich, textured look.
The imagery in traditional risseu designs was never chosen at random — it carried real symbolic weight. Wealthy families commissioned elaborate courtyard panels showing their family crests, religious institutions favoured saints, crosses, and scenes from scripture, and more modest homes made do with simple geometric borders and repeating floral forms. Knowing this history can give your own design process a different kind of intention; it’s worth choosing imagery that actually means something to you, rather than just copying a pattern because it looks nice.
Gathering Your Materials and Tools
Before you place a single stone, you need to get your materials sorted. The quality and variety of your pebbles will shape both the final look and the long-term durability of your path. Ideally, you want smooth, uniformly shaped pebbles in at least two strongly contrasting colours — typically black or dark grey paired with white or cream. River pebbles, beach pebbles, and quarried cobbles all work well, as long as they’re clean, frost-resistant, and reasonably consistent in size (usually somewhere between two and five centimetres across).
For the base and setting materials, you’ll need sharp sand, cement, and water for a traditional mortar mix — or if you’d prefer something more forgiving, a proprietary dry-mix jointing compound works well too. You’ll also need gravel or crushed stone for the sub-base layer, which keeps drainage healthy and stops frost from heaving your finished surface over time. Skimping on the sub-base is one of the most common beginner mistakes, and it almost always leads to cracking and settling within a few seasons.
The tools you need are refreshingly simple and you may already own most of them. Round up a spade, a tamper or plate compactor, a spirit level, a rubber mallet, a trowel, a bucket, a mixing paddle (or a concrete mixer for larger projects), and a stiff brush for finishing. A piece of stiff card or hardboard is incredibly useful for transferring your design pattern to the ground. And knee pads — these are absolutely not optional. After your first hour working at ground level, you’ll know exactly why every experienced rissellatore swears by them.
- Pebbles in at least two contrasting colours, sorted by size
- Sharp sand and Portland cement (or dry-mix jointing compound)
- Hardcore, gravel, or crushed stone for the sub-base
- Edging material such as timber shuttering or steel lawn edging
- Spirit level, rubber mallet, and trowel
- Stiff brush, garden hose, and spray bottle
- Design template drawn on paper or card
- Knee pads and sturdy waterproof gloves
Planning and Designing Your Cobbled Path
The design phase is arguably the most important step in the whole project, and it’s also where many first-timers either rush through it or get too ambitious too soon. If you’re new to this, the smartest move is to start with a simple geometric pattern — a running border of light and dark triangles, a central star or sun motif, or a clean chevron field. These traditional designs look genuinely striking even at small scales, they’re fairly forgiving of minor irregularities, and they let you get comfortable with your technique before you tackle something more complex.
Start by drawing your design to scale on graph paper. Measure your path dimensions carefully and plot the pattern within those boundaries, marking clearly where each colour or size of stone will sit. Pay particular attention to the border — a clean, well-executed edge can elevate even the simplest central field dramatically. Many traditional risseu designs use a double or triple border of alternating stones to frame the central motif, and it’s well worth including this detail even on your first attempt.
Once your paper design is finished, transfer the key lines and reference points to your prepared base using a chalk line, wooden pegs and string, or by cutting a cardboard template and pressing it gently into dampened mortar to leave an impression. Think about the direction of foot traffic, and make sure any figurative or directional elements in your design face the right way for someone approaching or entering the space. A beautifully made risseu that faces the wrong direction is a disappointment you’ll live with for a very long time.
Colour balance is worth thinking through carefully at this stage. The eye naturally gravitates to contrast, and the most visually successful risseu designs use their two or three stone colours in a ratio that creates clear definition rather than muddying together. A good rule of thumb: let one colour dominate the background at around sixty to seventy percent of the surface area, with the contrasting colour reserved for outlines and motif details. From standing height, the design will read cleanly and boldly.
Preparing the Ground and Laying the Foundation
Good ground preparation is the structural backbone of any successful risseu, and no amount of skill in stone-setting will rescue a poorly prepared foundation. Start by excavating your path area to a depth of at least twenty centimetres — more if your soil is particularly soft, clay-heavy, or prone to waterlogging. Your finished risseu surface should sit just slightly above the surrounding ground level so that rainwater drains away naturally rather than pooling on the pebbles and working its way underneath.
Once you’ve dug to the right depth, lay a compacted sub-base of hardcore or crushed stone to about ten centimetres deep. Tamp it down thoroughly with a plate compactor or hand tamper until it’s firm and level, checking with a spirit level regularly and correcting any high or low spots before you move on. Over this compacted layer, spread a blinded layer of sharp sand roughly two to three centimetres deep, again compacting and levelling carefully. This sand layer gives the mortar bed a stable, slightly yielding surface to grip onto.
Get your edging in before you mix any mortar. Pressure-treated or naturally rot-resistant timber shuttering is the most flexible option for curved paths. Steel lawn edging works beautifully for geometric designs with straight edges. Whatever you use, make sure it’s fixed firmly enough to resist the outward pressure of the mortar and stones — even a modest risseu panel generates a surprising amount of lateral force once the stones are tightly packed in. Any movement in the edging during construction will introduce inconsistencies that are extremely difficult to put right later.
Mix your mortar to a stiff but workable consistency — it should hold its shape when squeezed in a gloved hand without being so dry it crumbles, or so wet it slumps. Work in sections of no more than half a square metre at a time, spreading the mortar over the prepared sand base to about four centimetres deep. This section-by-section approach really matters, because mortar starts to skin over fairly quickly — especially in warm or breezy conditions — and setting stones into skinned mortar leads to poor adhesion and eventual loosening down the line.
Setting the Stones and Executing the Design
With your mortar freshly laid and your design clearly marked, the actual stone-setting can begin. The defining move in risseu work is setting stones on their edge rather than flat. Pick up each pebble and press it into the mortar so its longest dimension runs vertically, with only a narrow edge showing from above. This packs far more stone into each square centimetre of surface, creating a denser, more durable, and more visually intricate result than flat-set pebbles could ever achieve.
Always start from the centre of your design — or the most complex focal motif — and work outward toward the border. This way, your most important visual elements get positioned first and most accurately, with the background field built around them rather than the other way round. As you place each stone, press it firmly into the mortar and use your rubber mallet to tap it to the right height, checking frequently with a small spirit level or straightedge to keep an even surface plane across the panel.
Keep the spacing between stones consistent and tight — ideally no more than three to five millimetres. Wider gaps let the jointing material take over visually and soften the crispness of your design lines. If you find a gap that’s too wide to bridge with your chosen pebbles, dig through your sorted stone collection for a slightly larger piece that fits snugly without nudging neighbouring stones out of position. Forcing stones is a classic beginner error that creates a ripple effect of misalignment spreading outward from the problem spot.
As you complete each section — and before the mortar has fully cured — use a stiff brush dampened with water to gently sweep the surface clean of any mortar smears. Mortar that dries onto the face of the stones is genuinely difficult to remove without risking damage to the surface, so this light ongoing cleaning is a habit worth building from your very first panel. Keep a spray bottle of water nearby and mist the freshly set stones occasionally during hot weather to slow the curing process and stop the mortar underneath from drying out too fast.
Finishing, Jointing, and Long-Term Maintenance
Once all your stones are set and the mortar underneath has had at least twenty-four hours to cure, the final step is jointing — filling those narrow gaps between the stones with a material that locks everything together and stops water and debris from working their way into the base layer. Traditional risseu jointing used a thin slurry of lime and sand, which is flexible, breathable, and sits beautifully alongside the stones. Many modern makers use a fine-grained, polymer-modified jointing sand or a proprietary pointing mortar instead, both of which offer great durability and are easier to apply.
To joint the surface, mix your chosen material to a pourable consistency and pour it steadily over the completed panel, using a soft brush to work it into all the gaps. Don’t apply so much at once that it pools on the surface and hides the stone faces. Move systematically across the panel, brushing with circular and back-and-forth motions to make sure the jointing material reaches all the way to the bottom of each gap. Once everything is filled, mist the surface lightly with water to start the curing process, and cover with hessian or damp newspaper if it’s a particularly hot day.
Let the completed risseu cure undisturbed for at least forty-eight hours before any light foot traffic, and a full week before heavy use. During this time, keep the surface gently misted in hot weather and shield it from heavy rain, which can wash freshly set jointing material straight out of the gaps before it’s had a chance to consolidate. A little patience here goes a long way — this is not the moment to rush after weeks of careful work.
Once it’s properly cured, long-term maintenance is surprisingly minimal. An annual check for any stones that have worked loose, a seasonal sweep to clear leaf litter and debris, and occasional re-pointing of any joints showing erosion will keep your path in great shape for decades. Sealing the finished surface with a breathable, water-based stone sealer is optional, but it’s a good idea for paths in exposed positions or areas that see heavy use — it helps preserve the colour contrast between light and dark stones and reduces organic staining from leaves, moss, and the like.
Creative Variations and Inspirational Ideas
Once you’ve got the fundamentals under your belt through a first successful project, a whole world of creative possibility opens up. Traditional Ligurian designs are a wonderfully rich source of inspiration — you’ll find them in books on regional craft traditions and in countless photographs of historic Ligurian towns. That said, there’s nothing sacred about sticking to traditional imagery. Plenty of contemporary makers combine this ancient technique with modern geometric abstraction, botanical illustration, or even figurative portraiture, creating pieces that are entirely original while still being rooted in a genuinely noble craft tradition.
Scale is one of the most interesting variables to play with as your skills develop. A small risseu panel — maybe forty by forty centimetres — set into an otherwise plain gravel garden creates a focal point of surprising visual impact. A long risseu path leading from a garden gate to a front door completely transforms the approach to a home. A circular risseu set beneath a garden table becomes the visual heart of an outdoor dining space. The craft scales beautifully in all directions, and each scale brings its own particular challenges and pleasures.
Think about incorporating found or personally meaningful stones too. Sea glass, fossil-bearing limestone fragments, chips of coloured ceramic, or smooth stones collected from favourite places can all be worked into a risseu panel to create something that’s both visually distinctive and deeply personal. This is, after all, very much the spirit in which the original Ligurian craftsmen worked — using what the landscape gave them to make something that expressed beauty, pride, and a real sense of place. Your risseu, made with your own hands from materials you’ve chosen yourself, carries something of that same spirit forward into a new century.
- Start with a small practice panel before committing to a full path.
- Sort your pebbles carefully by size and colour before beginning.
- Always set stones on their edge, not flat, for the authentic risseu effect.
- Work from the centre motif outward toward the border.
- Keep mortar sections small and fresh — never let mortar skin over before setting.
- Clean stone faces regularly as you work to prevent mortar staining.
- Allow full curing time before use and inspect annually for loose stones.








What do you think?
It is nice to know your opinion. Leave a comment.