










With Just $130, This IKEA Cabinet Now Resembles a $7K Brutalist Masterpiece
The Rise of Budget Brutalism: When DIY Meets Design History
Brutalism is having a real moment in interior design, and honestly, it makes sense. What used to read as cold and institutional has been completely reframed by a younger generation of designers and homeowners who see something genuinely exciting in it — raw materials, structural honesty, and forms that don’t apologize for taking up space. The same architectural movement that brought us the Barbican in London and Boston City Hall is now showing up in living rooms, and when it’s done with some thought and creativity, the results can be pretty jaw-dropping.
Here’s the thing — you don’t need thousands of dollars to pull off a brutalist look at home. That’s a myth this IKEA hack blows apart pretty convincingly. For around $130 in materials and a weekend of actual work, one creative homeowner turned a basic flat-pack cabinet into something that genuinely looks like it belongs in a high-end furniture showroom with a $7,000 price tag. It’s the kind of piece that makes you stop and stare, trying to work out what you’re actually looking at and why it feels so solid and considered.
To understand why this works, it helps to think about what brutalism actually cares about. Texture over shine. Weight over delicacy. Showing what things are made of rather than hiding it. Concrete, stone, raw wood, metal — that’s the vocabulary. When you apply those same values to an IKEA cabinet using the right materials and techniques, the change isn’t just skin-deep. The whole object starts saying something different about permanence, craft, and what a room can feel like.
Choosing Your Canvas: Which IKEA Cabinet Works Best
Not every IKEA cabinet is going to work equally well here, and picking the right base piece might honestly be the most important call you make in this whole project. What you’re looking for is something with clean, flat surfaces, no fussy decorative detailing, solid geometric proportions, and enough structural integrity to handle the extra weight of the finishing materials. The BESTA, KALLAX, and IVAR lines come up again and again for exactly this reason — they’re simple, well-built, and genuinely blank slates.
The BESTA system especially is worth talking about. It’s modular, the panel surfaces are flat and easy to work with, and the proportions — whether you go low-and-wide or tall-and-narrow — naturally lend themselves to that monolithic quality brutalism is all about. A tall BESTA unit can end up looking remarkably like a poured concrete architectural element, while a wide, low configuration picks up on the horizontal emphasis you see in a lot of brutalist buildings.
Before you buy anything, measure your space and think carefully about how the cabinet will sit relative to everything around it. Brutalism lives and dies by visual weight and presence, so a piece that’s too small for the room will just read as a curiosity rather than a statement. Give it some room to breathe — a wall or corner with a bit of open space around it, so your eye can actually appreciate the form. Think of it the way an architect thinks about placing a building: the empty space around the object matters just as much as the object itself.

The Materials That Make the Magic: A Complete Supply List
What makes this transformation so clever is that the materials doing the heavy lifting are completely accessible — nothing obscure, nothing you’d need a specialist supplier to track down. The star of the show is a microcement or concrete overlay product, which is a thin, flexible, cement-based coating that sticks to just about anything — wood, MDF, existing laminate. You can find it at most home improvement stores or online, and it’s the thing that makes the whole effect possible.
Beyond that, you’ll need a handful of tools and supporting materials to see the project through. Here’s the full list:
- Microcement or concrete overlay compound (approximately 3–5 kg for a standard cabinet)
- Acrylic primer suitable for non-porous surfaces
- Fine and medium grit sandpaper (120 and 220 grit)
- Flexible palette knives or concrete spatulas in varying widths
- Trowels for larger flat sections
- Sealant or penetrating concrete sealer (matte finish for authenticity)
- Painter’s tape and drop cloths
- Replacement hardware — ideally raw steel, blackened metal, or matte black pulls
- Optional: iron powder or graphite powder for additional depth and color variation
All of this, including the cabinet itself, typically comes to around $130 if you shop carefully and skip the premium brands. That said, don’t cut corners on the sealant — it’s the last thing people will actually see, and it’s what determines whether the piece looks convincingly like concrete or like a craft project. A cheap sealant will yellow or peel over time and look plasticky up close. A quality penetrating sealer sinks into the surface and just lets the texture do its thing, which is exactly what you want.
Step-by-Step: The Transformation Process in Detail
Start with surface prep, and don’t rush it — this is the step that separates a finish that looks professional from one that looks like something went wrong. Every surface that’s going to get the concrete coating needs to be lightly sanded first, so the primer has something to grip. IKEA’s factory finish is specifically designed to resist absorption, so even surfaces that feel rough already need this treatment. Sand, wipe down with a damp cloth, let it dry fully, and then prime. Once the primer’s on, let it cure overnight before you do anything else.
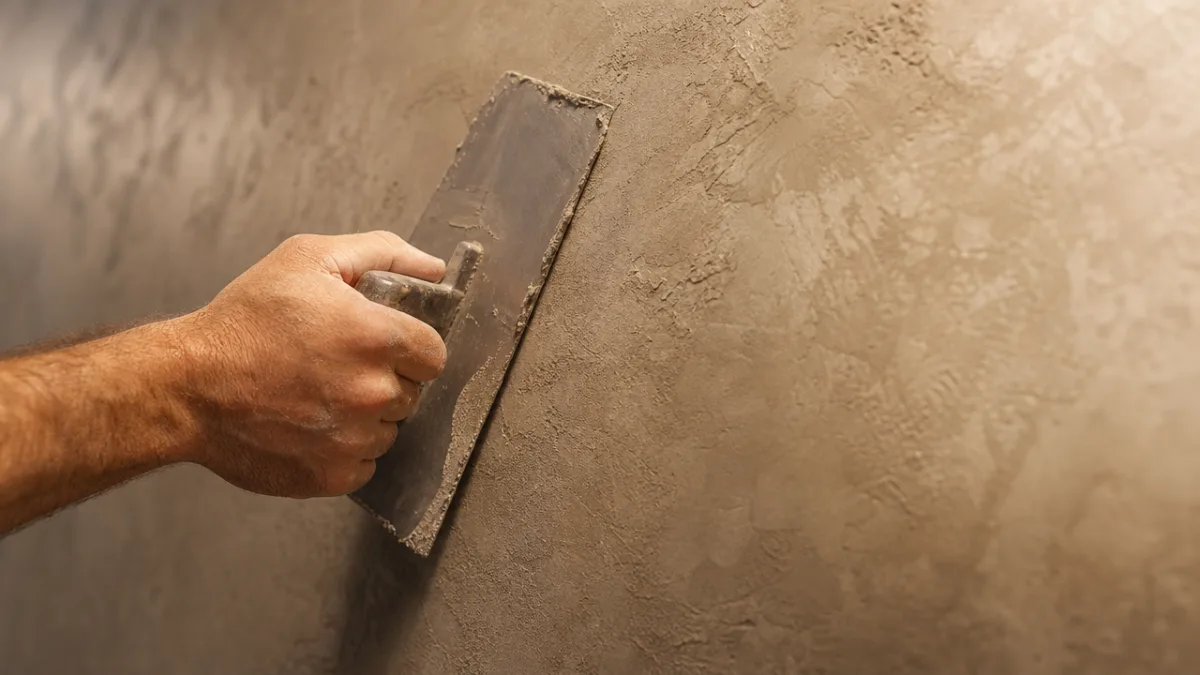
When the primer has fully cured, you can start on the first coat of microcement, and this is genuinely the fun part. Using your palette knife or trowel, work the compound onto the surface in irregular, overlapping strokes, varying the thickness as you go. This is not a job for perfectionists. The whole point is that variation — the uneven layering, the tool marks, the places where it’s thicker or thinner — because that’s exactly what mimics the texture of real poured concrete. Let it be imperfect.
Plan on three to four coats total, applying each new layer after the previous one has dried but before it’s fully cured. That timing matters because it allows the layers to bond together chemically, giving you one unified surface rather than a series of separate films that could eventually peel apart. Between the second and third coats, go over the surface lightly with 220 grit sandpaper to knock back any high spots and smooth things out for the finishing layers. The final coat deserves a bit more care — long, sweeping strokes with a broad, flexible spatula, pulling the surface together while keeping all that interesting texture underneath.
Give the final coat at least 48 hours to cure before you seal it. Apply the sealer in two thin coats, with a light sand in between, following the manufacturer’s instructions. The matte finish is what really sells the illusion — it gives the surface that slightly flat, light-absorbing quality that real concrete has. More than almost anything else, that quality is what makes your eye accept the material and stop hunting for evidence that it’s something else underneath.
Hardware, Styling, and the Finishing Details That Seal the Deal
Hardware is what takes this from good to genuinely great. Whatever handles or knobs came with the cabinet, swap them out — they’ll give the game away immediately if you leave them. Brutalism calls for hardware that feels like it belongs to the same material world as the rest of the piece. Think flat steel bar pulls with visible screws, blackened iron ring pulls, or even simple through-bolted rods of black pipe. The hardware should look like an engineer chose it, not a stylist, even if you spent real time thinking about the choice.
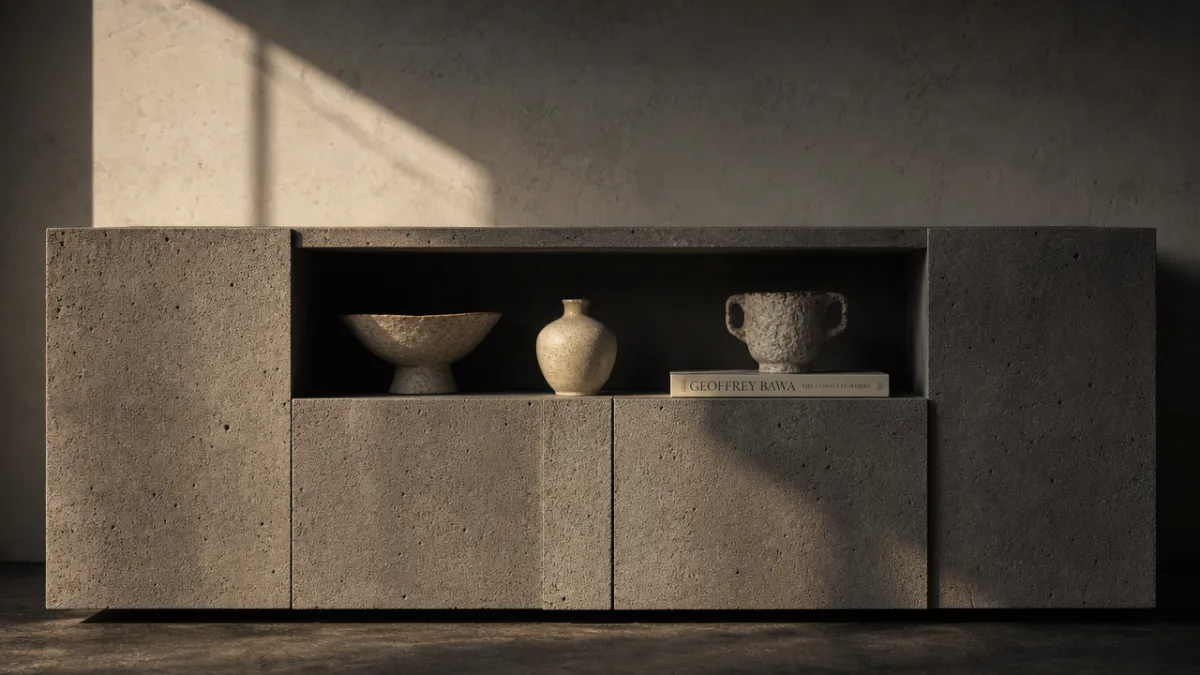
When it comes to styling the cabinet in the room, the word to hold onto is restraint. Brutalism doesn’t want to be softened or overwhelmed by what’s around it — it wants room to exist on its own terms, with nearby objects that share its honesty about materials. A small collection of ceramic vessels, one sculptural object, or a stack of art books with their spines showing — that’s the right neighborhood for a piece like this. Load it up with colorful knick-knacks and busy pattern, and it’ll look like a mistake rather than a statement.
Lighting is also worth thinking about more than you might expect. Concrete — real or simulated — looks its best under directional light that catches the surface at an angle, pulling the texture into relief and creating the kind of shadow play that makes the whole thing feel genuinely three-dimensional. A single floor lamp off to one side of the cabinet will do more for it than any extra styling you could add. A track light or even a simple clip-on spotlight pointed at an angle can get you the same result, and it transforms the cabinet from a piece of furniture into something that feels closer to architecture.
Why This Hack Resonates: The Deeper Appeal of Brutalist DIY
The appeal of projects like this one goes well beyond the savings, though the savings are genuinely significant. There’s something culturally interesting happening when so many people are drawn to the brutalist aesthetic and willing to spend their weekends bringing it into their homes. For all its associations with postwar austerity and institutional scale, brutalism represents a kind of honesty about materials and construction that feels almost countercultural right now — in an era of fast furniture, surfaces that exist mainly to look good in photos, and aesthetics that date in a season.
There’s also real satisfaction in the making itself — in taking a mass-produced object and turning it into something that reads as handmade, as effortful, as specifically intended. The microcement application is tactile and immediate in a way that most modern making experiences just aren’t. You’re working with your hands, reading the surface as you go, making dozens of small decisions about pressure and angle and thickness that add up to something genuinely unique. No two of these cabinets will ever look exactly the same, and that’s entirely the point.
The $7,000 number in the headline isn’t just hype. Real brutalist furniture — pieces made from solid cast concrete, raw steel, or other heavy materials by people who specialize in this work — really does cost that much, often more. The mass, the permanence, the labor involved in shaping those materials is baked into the price. What this hack pulls off is a visual translation of that same aesthetic language into something most people can actually afford, without pretending the underlying material reality is identical. It’s an honest illusion — which feels like exactly the right spirit for a movement built on honesty in the first place.
And then there’s the question of longevity. Unlike a lot of trendy DIY projects that feel dated within a couple of years, a well-executed brutalist cabinet has real staying power. The concrete and stone textures, the raw metal hardware, the monolithic proportions — these things have been visually compelling for a very long time, and they’re not going anywhere. A $130 project that looks this deliberate, this permanent, and this considered is genuinely good value, and a real addition to any home that cares more about lasting material quality than whatever’s cycling through the trend cycle right now.








What do you think?
It is nice to know your opinion. Leave a comment.