










Milk Crate Magic: Neat Things You Can Make With Upcycled Milk Crates
The Upcycling Revolution: Why Milk Crates Deserve a Second Life
If you’ve ever looked at a stack of old milk crates and thought “there’s got to be something useful I can do with those,” you’re in good company. These boxy little workhorses were originally designed to haul dairy from farms to stores, but it turns out that same rugged construction makes them fantastic for all kinds of DIY projects around the house. Instead of ending up in a landfill, a milk crate can become a bookshelf, a garden planter, a piece of furniture — honestly, the list goes on longer than you might expect.
What makes milk crates so great to work with goes beyond just keeping stuff out of the trash, though that’s certainly a nice bonus. They’re genuinely tough — most are made from high-density polyethylene and can hold hundreds of pounds without warping or cracking. The grid walls give you natural ventilation and a kind of industrial texture that looks surprisingly at home in everything from a minimalist loft to a maximalist boho space. And if you source them responsibly, they can cost you absolutely nothing.
Speaking of sourcing: it’s worth pausing here to mention that a lot of milk crates technically belong to dairy companies and are stamped with ownership markings. The right move is to look for crates that have genuinely been discarded, buy them from a legitimate supplier, or just pick up plastic storage crates sold for this exact purpose at retail stores. With that sorted, let’s dig into what you can actually make with them — because people have pulled off some genuinely impressive things.
Building Your Dream Storage System: Organization and Shelving
If you want a quick win with milk crates, custom shelving is where to start. The big advantage over store-bought shelving is flexibility — you’re not locked into whatever dimensions some manufacturer decided were standard. Need a low bookshelf that fits along a weirdly short wall? A tall unit for a home office? A compact storage cube squeezed into a small apartment corner? Just rearrange your crates until the configuration fits your actual space, not the other way around.
Putting it together is easier than you’d think. Zip ties, bungee cords, or connector clips from the hardware store hold crates together securely, and you can stack them into towers or spread them out into wide, low credenzas depending on what you need. For taller builds, screw an L-bracket into a wall stud for peace of mind. Lay a piece of plywood or a reclaimed wood plank across the top and suddenly the whole thing looks finished and intentional rather than cobbled together.
The beauty of this kind of shelving is how well it adapts to different rooms. In a kid’s bedroom, a few colorful crates at floor level let children sort their own books and toys, which does wonders for keeping things tidy. In a garage or workshop, crates mounted to the wall with their openings facing out become instant bins for tools and hardware. In a home office, a row of crates under a desk gives you filing space, easy-access compartments, and even a spot to hang folders using simple hooks threaded through the grid walls.
If the raw crate look isn’t your style, there are easy ways to dress things up. Spray paint a matching set before assembly and the finished shelving looks like a deliberate design choice rather than an improvised one. Line the bottoms with fabric or contact paper, add cut-to-size cushions, and you’ve got something that honestly looks like it could have come from a high-end home goods store — except you built it yourself for next to nothing.

Furniture That Earns Its Keep: Seating, Tables, and More
Here’s where things get really interesting. A standard plastic milk crate can hold well over three hundred pounds when upright, which means it’s not just strong enough for shelving — it’s strong enough to sit on, build a table from, or even use as the base of a bed frame. People have furnished entire rooms this way, and the results are often way more attractive than you’d expect going in.
The milk crate ottoman is probably the easiest place to start if you want to try furniture. You stack one or a couple of crates together, cut a piece of plywood or foam board for the top, add some batting or foam for cushioning, wrap it all in fabric, and staple everything down underneath. What you end up with is a solid little piece that works as a footrest, a seat, or a coffee table — and the hollow crate underneath is still completely usable for storing blankets, magazines, or all those remote controls that seem to multiply on their own. Pick the right fabric and this thing genuinely looks like something you’d find at a boutique home store.
More ambitious builds like bed frames and sofas take more crates and more planning, but they’re worth it. For a platform bed, you arrange crates in a grid on the floor, top them with plywood, and add a mattress. Every single crate underneath becomes accessible storage — you slide things in from the side, which is a huge upgrade over just stuffing things under a regular bed. For a sofa, the basic approach is to build a rectangular crate frame, add a plywood back and seat platform, then fit it with cushions. The storage built into the base is almost a bonus at that point, because the sofa itself is already doing everything you need.
Garden Greatness: Outdoor and Planting Applications
Milk crates are surprisingly well-suited for gardening, and it largely comes down to that grid construction — it drains and aerates naturally in a way that a solid-sided container just can’t match. If you’re working with a small balcony, a tiny patio, or no yard at all, a handful of milk crates can give you a genuinely productive container garden. Just line the inside with landscape fabric or burlap to keep the soil in while still letting water escape, fill with good potting mix, and you’re ready to plant.
Vertical milk crate gardens are an especially clever solution for tight spaces. Mount crates on a fence, a balcony railing, or a simple wooden frame you build yourself, with the openings facing out and angled slightly upward. Each crate holds a solid amount of soil and can support all kinds of plants — strawberries, lettuce, herbs, trailing flowers like nasturtiums. A wall of six to twelve crates can realistically produce enough fresh herbs and greens to make a noticeable dent in your grocery bill through the growing season.
Outside of planting, crates pull their weight in plenty of other ways around the garden. Inside a potting shed, wall-mounted crates keep your trowels, gloves, seed packets, and hand tools organized and easy to grab. In the garden itself, they work beautifully as harvesting baskets — the grid sides let dirt fall off root vegetables naturally, and the handles make them easy to haul around. You can even stack three crates in a row to create a simple but functional composting system, with separate bins for different stages of the process. It keeps things tidy and looks far more intentional than just a pile in the corner.

Kids, Creativity, and Classroom Magic
Milk crates have been a fixture in classrooms for decades, and for good reason. Teachers figured out pretty quickly that something durable, reconfigurable, and easy to clean is basically a dream material for a room full of kids. The DIY and homeschool communities have picked up on this too, finding new and creative ways to use crates to support how children learn, create, and play both at school and at home.
A milk crate reading nook is one of those ideas that sounds almost too simple, but kids absolutely love it. Arrange four crates in a square, drop a cushion on top, prop up a back support with a fifth crate or a foam panel, and surround the whole setup with a few more crates packed with books. That’s it — you’ve built a little reading sanctuary that kids will actually want to spend time in. Drape a fabric canopy from a ceiling hook or nestle the whole thing inside a play tent and it becomes genuinely magical. The cozy, enclosed feeling of the space makes picking up a book feel like an event rather than a chore.
For younger kids, the crates themselves become the toy. A set of large plastic crates can be stacked, flipped, and rearranged to build forts, obstacle courses, or stages for performances. Upside down, they work as stepping stones or balance challenges. In an art corner, a single crate with cardboard dividers fitted inside becomes a surprisingly effective organizer for markers, paintbrushes, crayons, and paint containers. They’re easy to reach into, hard to knock over, and simple to wipe clean — which anyone who’s done crafts with young children knows is genuinely priceless.
Workshop and Garage Innovations: Tools, Sports Gear, and Heavy-Duty Storage
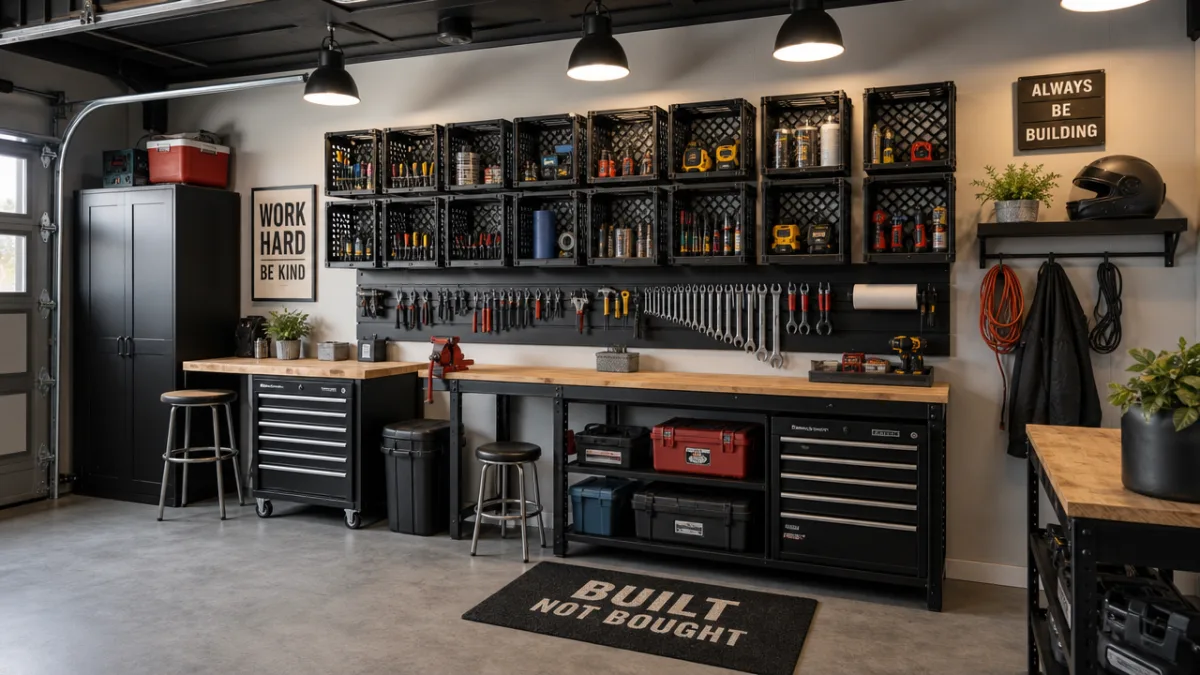
If the living room ottoman is the refined end of milk crate DIY, the garage and workshop are where things get properly rugged. This is the environment milk crates were basically born for — heavy loads, tough conditions, and a real need for organization that actually holds up over time. Whether you’re managing a wall of hand tools, corralling sporting equipment, or dealing with years’ worth of accumulated automotive supplies, a well-planned crate system can genuinely transform a chaotic garage into somewhere you actually enjoy spending time.
Wall-mounted crates are a technique experienced workshop folks keep coming back to because it just works. Secure crates to wall studs with sturdy brackets at chest height and your most-used items stay within easy reach without eating up floor space. Label each crate clearly — drill bits, fasteners, electrical supplies, plumbing bits — and you’ve built yourself a visual inventory system where it’s immediately obvious when something’s running low or gone missing. If you share the space with a partner, older kids, or a small team, that kind of clear organization alone can save a surprising amount of daily frustration.
Sports gear is another area where crates really earn their keep. Helmets, knee pads, and balls fit neatly into individual crates near the garage door or mudroom entrance, so heading out for a bike ride or soccer game doesn’t require fifteen minutes of excavating a pile of gear. If you’ve got multiple kids in different activities, try color-coding crates by child or by sport — even young kids can learn to manage a system that clear. You spend one afternoon setting it up and it pays you back in less daily friction for years.
For the more ambitious builder, crates can become the backbone of bigger workshop projects. A wooden platform on wheels with crates mounted on top becomes a mobile workstation you can roll exactly where you need it and tuck away when you’re done. A parts organization station, a portable paint setup, a drill press support table — all of these can be built around crates as the primary structure with some basic woodworking for tops and frames. The low cost of the materials means you can tinker with your layout as your needs change, which is something commercial workshop furniture rarely lets you do.
Tips, Techniques, and Getting Started on Your Own Projects
Before you grab a bunch of crates and start building, it’s worth spending a little time thinking through what you actually need. Measure the space you’re working with, figure out roughly how many crates your project will require, and decide whether the finished piece needs to be permanent or something you can move around. Even a quick sketch on a piece of paper — nothing fancy — can save you the headache of getting halfway through a project and realizing you need a completely different setup. A few minutes of planning up front is almost always worth it.
The good news is that most milk crate projects don’t require much in the way of tools or supplies. A pack of zip ties in a couple of sizes is honestly the single most useful thing you can have on hand — they connect crates quickly, hold firmly, and work in almost any configuration you can imagine. For larger or load-bearing builds, L-brackets and corner braces from the hardware store add real structural support. Furniture projects will call for a saw, a drill, and a staple gun for the most part. Finishing touches like spray paint, fabric, and foam padding are all cheap and easy to find at any craft or hardware store.
Don’t skip the safety basics, especially if you’re building something taller or something that people will sit on. Shelving units over a few feet high should be anchored to a wall stud — this is especially important if you have kids or pets who might pull on them. For furniture, test the stability thoroughly before actually putting weight on it and make sure every connection point feels solid. If you’re painting, use a product formulated for plastic and give it enough time to fully cure before you start assembling. None of this adds much time to a project, but it does add a lot to how long the finished piece holds up and how safe it is to use.
Honestly, the best part of working with milk crates is how low the stakes feel. Because the material is cheap or free, you don’t have to stress about every decision being perfect on the first try. You can experiment, change your mind, pull things apart and reconfigure them. A lot of people start with one simple shelf or an ottoman and gradually find themselves looking at more and more of their home through that same creative lens — and realizing that designing things thoughtfully and being mindful about waste aren’t really in conflict at all. They end up feeding each other, one crate at a time.








What do you think?
It is nice to know your opinion. Leave a comment.