










Home Sauna Build Guide: Step-by-Step & Pro Tips
Why Build a Home Sauna? Benefits Worth Every Nail
There is a reason saunas have been central to Nordic wellness culture for thousands of years. The combination of deep, penetrating heat and the ritual of stepping away from daily stress creates a physiological and psychological reset that few other home amenities can match. Building your own sauna means you have access to that reset on your own schedule, without memberships, crowded facilities, or driving anywhere at all.
From a health standpoint, regular sauna use has been linked to improved cardiovascular function, reduced muscle soreness, better sleep quality, and even a measurable decrease in stress hormones. Studies published in major medical journals have shown that people who use saunas four or more times per week see notable reductions in blood pressure and risk of certain cardiac events. When your sauna is steps from your bedroom, those four sessions a week become genuinely achievable rather than aspirational.
Beyond health, a home sauna adds meaningful value to your property. Depending on your market, a well-built indoor or outdoor sauna can increase resale appeal significantly, particularly in regions where wellness amenities are in high demand. Many homeowners report that the sauna becomes the most-used room in the house within weeks of completion, making it one of the highest-return projects you can undertake both financially and personally.
Planning Your Sauna: Location, Size, and Type
Before picking up a single tool, you need to make three foundational decisions: where the sauna will go, how large it will be, and what type of heat source you will use. Each of these decisions shapes every choice that follows, from materials and electrical work to ventilation and finishing. Rushing this phase is the single most common mistake first-time sauna builders make, and it is also the easiest mistake to avoid with a little upfront patience.
Location options break down into indoor versus outdoor builds. Indoor saunas can be placed in a basement, bathroom, spare bedroom, or garage and benefit from climate-controlled environments that make heating faster and more efficient. Outdoor saunas, often built as standalone structures or converted sheds, offer a more traditional experience and eliminate moisture concerns for the rest of your home. Both have their merits, and your choice should weigh your available space, your climate, and how you envision using the sauna across all four seasons.
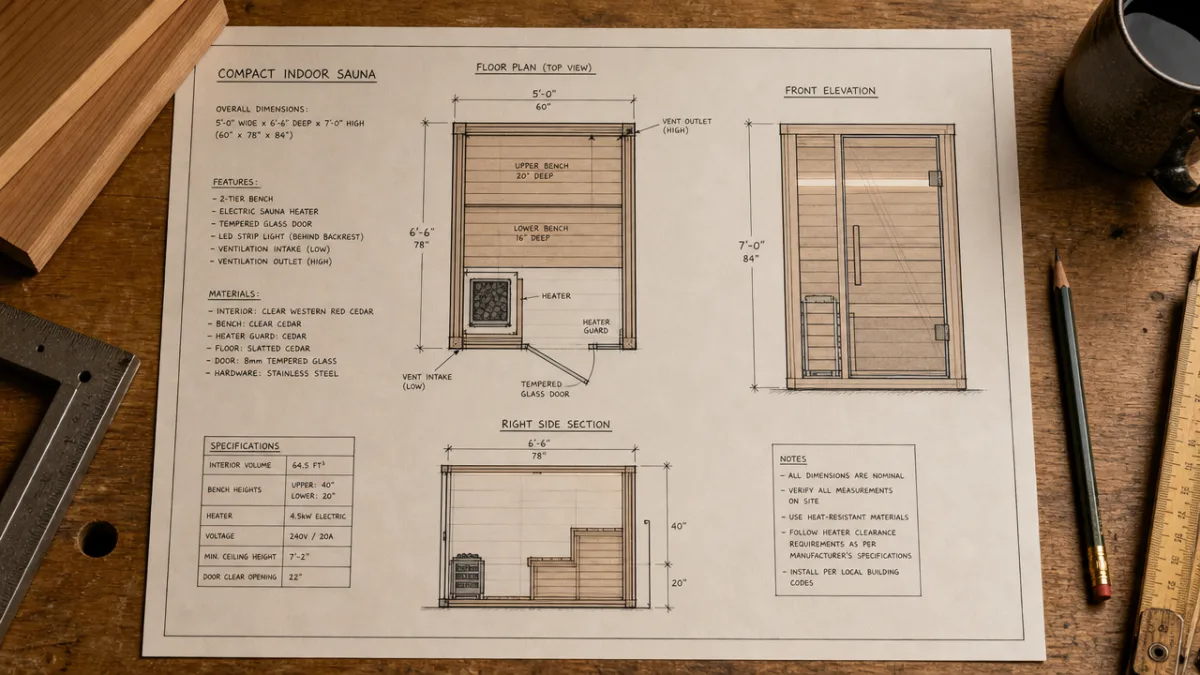
Size is largely a matter of how many people you want to accommodate and how much floor space you can dedicate. A single-person sauna can work in as little as 36 square feet, while a family-sized unit typically needs 60 to 80 square feet or more. When planning benches, remember the standard rule: upper benches sit at roughly 36 to 48 inches from the floor, and you need at least 18 inches of clearance above the top bench to the ceiling so users can sit comfortably without touching hot wood. As for heater type, the three main options are traditional electric, wood-burning, and infrared, each with distinct installation requirements and heat character.
Materials and Tools: What You Actually Need
Selecting the right wood is one of the most important material decisions in any sauna build, and the choices you make here will affect both performance and longevity. Cedar is the gold standard for most residential saunas: it is naturally resistant to moisture and decay, it stays relatively cool to the touch even at high temperatures, and it releases a pleasant aroma when heated. Western red cedar is the most widely available variety in North America and strikes an excellent balance between cost and quality. Hemlock and aspen are solid budget-friendly alternatives that also perform well in high-humidity environments.
For the structural framing, standard kiln-dried 2×4 lumber is perfectly appropriate. The framing will be covered by your interior tongue-and-groove paneling, so appearance is not a concern here, but moisture resistance is. Use pressure-treated lumber only for any framing that will be in direct contact with a concrete slab or exterior ground. Between the framing and the interior paneling, you will install a vapor barrier and insulation. Foil-faced insulation or standard fiberglass batts with a foil vapor barrier are both commonly used, and the goal is to keep the heat inside the sauna and protect the surrounding structure from moisture migration.
Your tools list does not need to be intimidating. For most home sauna builds, you will need a circular saw or miter saw for cutting paneling, a drill and driver for fastening, a level, a staple gun for the vapor barrier, and basic hand tools for trim work. If you are building an outdoor structure from scratch, add a framing nailer to that list. Beyond tools, stock up on stainless steel screws or hidden fasteners specifically rated for sauna use, since standard fasteners can rust and bleed unsightly streaks across your cedar paneling within the first year of operation.
- Western red cedar, hemlock, or aspen tongue-and-groove paneling (1×4 or 1×6 profiles are most common)
- Kiln-dried 2×4 framing lumber
- Foil-faced vapor barrier or 6-mil poly sheeting with foil insulation
- R-11 or R-13 fiberglass batt insulation minimum, higher R-value for colder climates
- Stainless steel ring-shank nails or hidden fastener clips for paneling
- Sauna-rated electric heater or wood stove with appropriate clearances
- Tempered glass door with pre-hung frame, sized to your rough opening
- Ventilation hardware including intake and exhaust vents
Step-by-Step Construction: From Framing to Finishing
Begin with your floor. For an indoor sauna on a wood subfloor, install cement board over the subfloor to create a moisture-resistant base, then finish with tile or leave bare for drainage. For a concrete slab, you can apply a waterproof membrane and tile directly. The floor is the one area of a sauna where cedar is not recommended, as prolonged foot traffic and water exposure will cause it to degrade quickly. Non-slip tile or composite decking materials are far more practical and safe underfoot.
Frame your walls using standard 16-inch on-center stud spacing. Once framing is complete, run any electrical rough-in before closing up the walls. Sauna heaters require a dedicated 240-volt circuit, so if you are not a licensed electrician, this is the stage to bring one in. The investment in professional electrical work at this point is far cheaper than the alternative of correcting code violations later or, worse, dealing with a safety incident. After electrical rough-in is inspected and approved, install your insulation batts between studs, then staple your vapor barrier across the entire interior face of the framing, sealing all seams with foil tape.
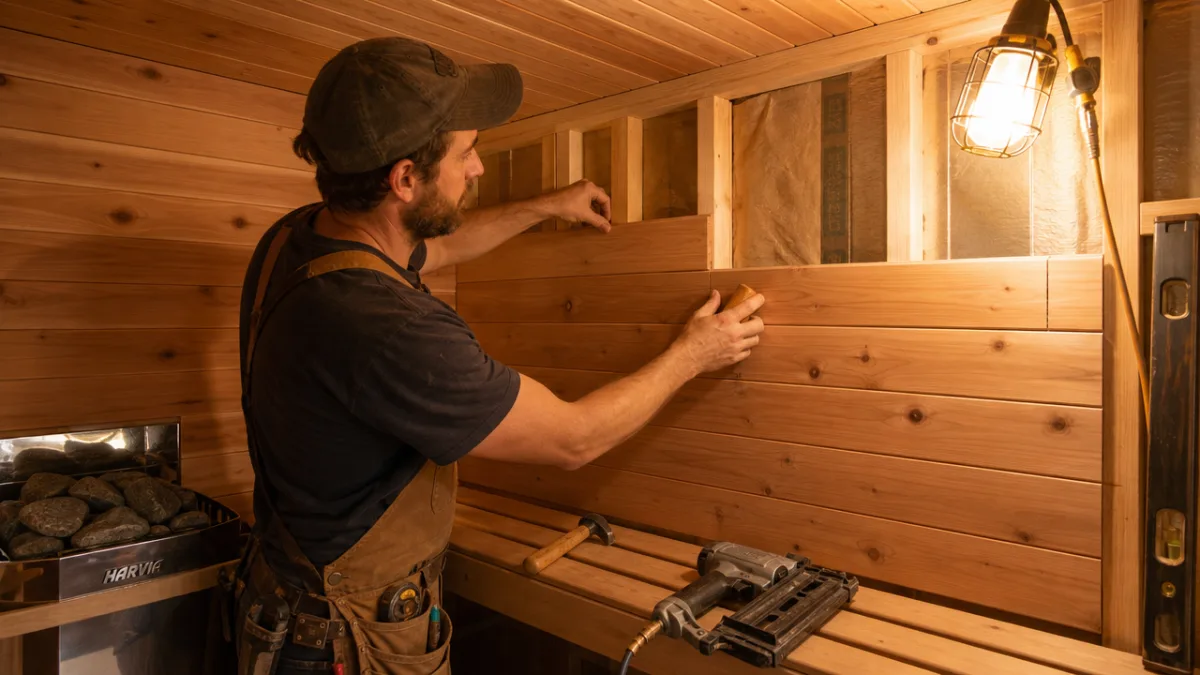
Installing the tongue-and-groove paneling is the most satisfying part of the build and the stage where your sauna starts to look like a sauna. Begin at the bottom of each wall and work upward, fitting the groove of each board over the tongue of the board below. Fasten through the tongue at a 45-degree angle using stainless nails or hidden clips to keep the face of the paneling mark-free. Take time to ensure your first course is perfectly level; every board above it will follow that lead. For the ceiling, paneling runs perpendicular to your wall boards for visual interest and structural reasons, and the ceiling should always be insulated to at least the same R-value as the walls.
Build your benches from clear-grade cedar using 2×4 or 2×6 stock. The upper bench is where users spend most of their time in a traditional sauna, and it needs to be sturdy enough to support full body weight without flex. Use wide spacing between bench slats, roughly half an inch to an inch, to allow airflow and drainage. Sand all bench surfaces to at least 120-grit, rounding over any sharp edges, and leave the wood completely unfinished. No stains, sealers, or varnishes belong on sauna benches; they will off-gas toxic fumes when heated and can cause skin burns on contact.
Heater Installation and Ventilation: Getting the Heat Right
The heater is the heart of your sauna, and sizing it correctly is non-negotiable. The general rule for electric sauna heaters is one kilowatt of power for every 45 cubic feet of sauna volume, but this baseline needs to be adjusted upward if your walls are exterior walls exposed to cold weather, if you have large glass panels, or if you live in a particularly cold climate. Under-powered heaters struggle to reach target temperatures, cycle constantly, and wear out prematurely. Erring slightly on the side of a larger heater is always the smarter choice.
Placement of the heater matters as much as its size. Electric heaters are almost always floor-mounted in a corner, positioned to meet the manufacturer’s required clearances from walls, benches, and combustibles. These clearances are not suggestions; they are safety specifications, and most local building codes require them to be met for the installation to pass inspection. The heater should have a protective guard around the sauna stones to prevent accidental contact. Wood-burning stoves require a proper flue pipe that exits through the wall or roof with an appropriate heat shield and weatherproof cap, and they are typically only practical in outdoor sauna structures where managing combustion air and ash removal is more straightforward.
Ventilation is the aspect of sauna construction that most DIY guides underserve, and it is genuinely critical both for comfort and for the longevity of your structure. A sauna needs a fresh air intake near the floor, typically just above the heater, and an exhaust vent on the opposite wall near the ceiling or through the ceiling itself. This creates a convective loop that refreshes oxygen, prevents the space from feeling stuffy, and allows moisture to escape after sessions. Without adequate exhaust, moisture accumulates in the wall cavity behind your paneling and causes rot and mold that can compromise the entire structure within a few years. Install adjustable vents so you can fine-tune the airflow to your preferences.
Safety, Maintenance, and Pro Tips for Long-Term Enjoyment
Safety in a home sauna environment begins with understanding the space you have built. Always have a bucket of water and a ladle on hand near your heater stones; adding small amounts of water to the stones, a practice called löyly in Finnish, releases a burst of steam that raises the perceived temperature dramatically. Do this gradually and never pour large volumes of water over the stones at once, as thermal shock can crack or damage them over time. Keep a working timer visible inside the sauna and make it a habit to limit sessions to 15 to 20 minutes at a stretch, taking a cool-down break before returning for another round.
Electrical safety deserves ongoing attention even after your initial installation. Inspect the heater’s wiring connections and control unit annually for any signs of corrosion, heat damage, or rodent intrusion, particularly in outdoor installations. The high-humidity environment of a sauna is hard on electrical components, and catching a developing problem early is far preferable to a mid-winter heater failure. Keep a fire extinguisher rated for electrical fires accessible just outside the sauna door, and never leave a sauna heater running unattended for extended periods.
Maintenance of the wood surfaces is mercifully simple compared to many home finishes. After sessions, leave the door open slightly to allow the interior to air dry completely before closing up. Wipe bench surfaces with a damp cloth if needed, and periodically clean the entire interior with a very mild solution of baking soda and water to neutralize any body oil or mineral buildup. If bench surfaces begin to look gray or weathered after several years of use, a light sanding with 120-grit paper restores them to a near-new appearance. The heater stones should be inspected once a year and replaced whenever they begin to crack or crumble, as damaged stones can shift and block heater elements.
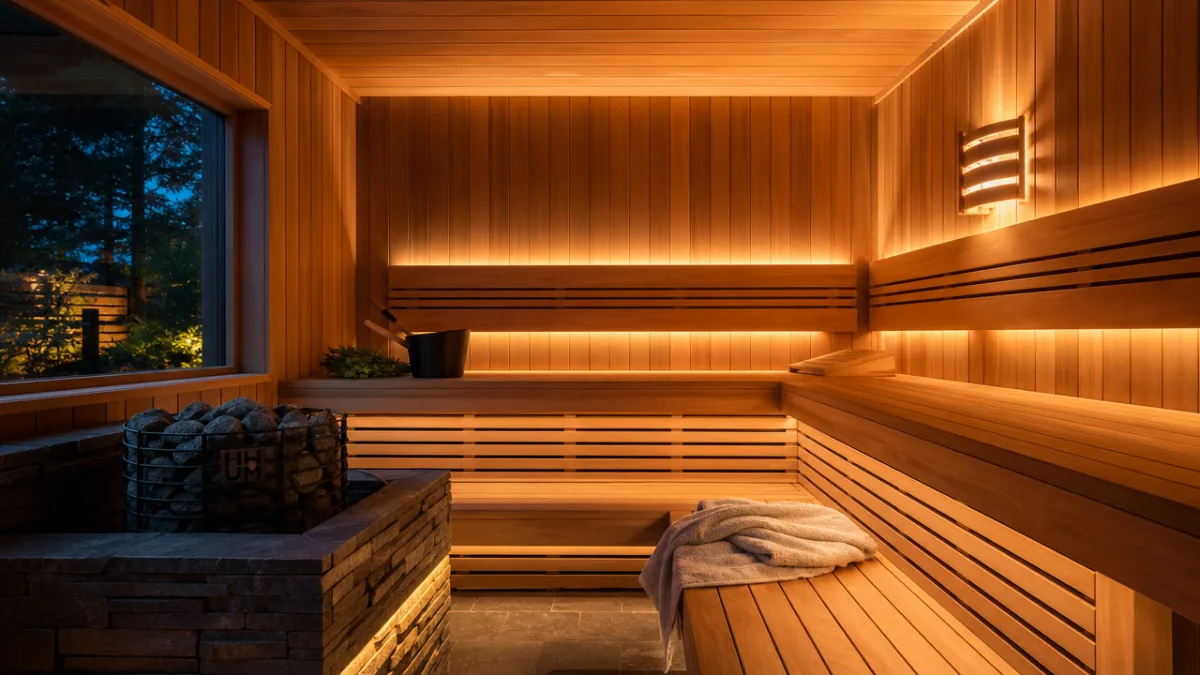
A few pro-level tips will separate your finished sauna from a merely functional one. First, install a small LED light fixture rated for sauna use, typically in a recess behind the upper bench, for ambient lighting that creates a relaxing atmosphere without glare. Standard household fixtures cannot handle the heat and humidity and must never be used. Second, add a small window if your build permits; natural light dramatically improves the experience, and a tempered double-pane glass unit installed with proper flashing will not compromise your thermal envelope. Third, plan your door to swing outward so it can never be blocked by a person who has fainted or become disoriented, an important safety consideration that building codes in many jurisdictions mandate.
Cost Breakdown and Realistic Timelines
Understanding the true cost of a home sauna build helps you plan realistically and avoid the budget creep that plagues so many renovation projects. For a modest indoor sauna measuring approximately 4 by 6 feet with an electric heater, materials alone typically run between $3,000 and $6,000 depending on wood species, heater brand, and your local lumber market. Larger builds or outdoor structures with their own framing naturally cost more, with a well-appointed 8-by-10 outdoor sauna reaching $10,000 to $15,000 in materials before any labor costs are factored in.
Labor is the wildcard, particularly for the electrical work and any concrete or foundation work on an outdoor build. Licensed electricians charge widely varying rates by region, but budget at least $500 to $1,500 for the dedicated circuit installation and any associated panel work. If you are doing the carpentry yourself and only hiring out the electrical, a complete indoor sauna can often be finished for well under $8,000 total, representing tremendous value compared to even modestly priced prefabricated sauna kits, which routinely sell for $5,000 to $12,000 for equivalent size and quality while offering far less customization.
For timeline, a committed DIY builder working on weekends can realistically complete a framed-and-finished indoor sauna in four to eight weeks from first cut to first session. The main variable is the electrical inspection scheduling in your area, which can sometimes introduce a waiting period of one to three weeks depending on your local building department’s workload. Plan your project so that the electrical rough-in is completed early, inspection is called in promptly, and you use the waiting period for tasks like assembling bench components or installing exterior finishing on an outdoor structure. Patience in the planning and permitting phase pays off in a build that is both safe and code-compliant, protecting your investment and your household for decades to come.








What do you think?
It is nice to know your opinion. Leave a comment.