










17 DIY Wall Art Canvas Ideas to Transform Your Space
Why DIY Canvas Art Belongs in Every Home
There’s something really special about hanging art on your walls that you actually made yourself. DIY canvas art has taken off over the past decade, and honestly, it makes total sense — it lets you put your own stamp on your space in a way that a mass-produced print just can’t replicate. And the best part? You don’t need to be a seasoned artist to pull it off. Whether you’ve been painting for years or you’ve literally never touched a brush, there’s a technique out there that fits your skill level and your style.
Beyond the fun of making something, DIY canvas art is surprisingly affordable. A quick trip to your local craft store can get you a stretched canvas, a few tubes of acrylic paint, and some brushes for under twenty dollars. Compare that to what you’d spend on framed gallery prints or commissioned pieces, and the difference is hard to ignore. You could fill an entire gallery wall for less than a single piece might cost at a home décor boutique — which makes this a pretty great option if you’re decorating on a budget.
Wall art has a genuinely transformative effect on a room. A bare wall can feel cold and unfinished, but a well-placed canvas instantly anchors a space and gives it personality. When that art is something you made yourself, it adds an extra layer of warmth — guests notice, it sparks conversation, and your home starts to feel like a real reflection of you rather than a catalog page. These seventeen ideas will get you started no matter where you’re at skill-wise.
Abstract Painting Techniques for Beginners
Abstract art is honestly one of the best places to start if you’re new to DIY because it takes the pressure completely off. There are no proportions to nail, no perspective to wrestle with — it’s really just about color, texture, and going with your gut. With abstract painting, the happy accidents are often the best parts of the finished piece. Techniques like pour painting, palette knife work, and gestural brushstrokes all fall under this category, and they each produce wildly different results from the same basic supplies.
One technique that’s been blowing up on social media lately is acrylic pour painting. You mix your acrylics with a pouring medium until they’re nice and fluid, pour them onto the canvas, then tilt and rotate it to let the colors flow and blend on their own. The result is these gorgeous organic, marbled patterns that look incredibly intricate even though the process itself is pretty low-effort. If you add a drop of silicone oil to your mixture, you’ll get beautiful lacy cells spreading through the design — it ends up looking almost geological, like something you’d see under a microscope.
Another great beginner option is color blocking. You use painter’s tape to divide your canvas into sections, then fill each one with a bold, flat color. It draws from mid-century modern design and looks right at home in contemporary spaces. Once you peel the tape off after the paint dries, those crisp, clean lines give the whole piece a graphic, polished look that feels intentional. Try pairing colors that are having a moment — terracotta and sage, or navy and mustard — to keep things feeling fresh and connected to your existing décor.
Texture and Mixed Media Canvas Art
If you want your wall art to do more than just look good — if you want it to actually invite people to lean in and look closer — texture is where it’s at. Mixed media canvas work brings paint together with things like modeling paste, sand, fabric scraps, tissue paper, and even natural elements like dried botanicals or twine. All that layering turns a flat canvas into something almost sculptural, and as the light in your room shifts throughout the day, the texture plays with it in really interesting ways.
One of the easiest textured techniques is applying modeling paste or joint compound to your canvas with a palette knife or an old credit card before you paint. You can push it into peaks and ridges, drag it into swooping lines, or press found objects into it — bubble wrap, a comb, crumpled aluminum foil — to create stamped patterns. Once it’s fully dry, you paint right over the top, and the texture catches the color in these unpredictable, beautiful ways. Dry brushing a lighter shade over the raised areas afterward adds even more dimension to the finished piece.
Decoupage is another mixed media technique worth trying. Tear up newspaper, sheet music, book pages, or decorative tissue paper and layer the pieces across your canvas using a decoupage medium. The result is a rich, collaged base that has both visual texture and a kind of narrative quality to it. You can leave the collage as the main event or paint over parts of it, letting the text and patterns beneath show through translucent layers of color. This approach works especially well for vintage or literary-themed pieces — perfect for a study, a library corner, or a cozy reading nook.
Nature-Inspired Canvas Art for a Calm Atmosphere
Biophilic design — the idea of weaving natural elements into your home — has become one of the biggest influences in interior decorating, and your DIY canvas art can be a really beautiful expression of that. Nature-inspired artwork brings in organic shapes, earthy tones, and botanical motifs that make a space feel grounded and calm. Whether you’re painting loose botanical shapes with acrylics, pressing real leaves and flowers directly onto the canvas, or sketching out minimalist plant drawings, the result is almost always serene and timeless.
Botanical leaf prints are one of the simplest and most satisfying projects in this category. Grab some leaves with interesting vein structures from your garden or a local park, coat one side with acrylic paint, and press them firmly onto your canvas. When you peel the leaf away, you’re left with a detailed impression full of natural variation. Repeat the process with different leaf shapes and a cohesive color palette — maybe greens and creams on a white background, or warm ochres and burnt siennas on a dark ground — and you end up with something that looks effortlessly elegant.
If you want to take the nature theme a step further, try creating a triptych of abstract landscape canvases. Three matching canvases hung side by side can tell a continuous story — a pale sky fading into rolling hills, or a misty seascape shifting from deep navy into soft, foamy white. This format works really well above a sofa or along a hallway, where the horizontal spread mirrors the natural sweep of a real landscape. Sticking to a muted, limited palette keeps the set feeling cohesive and calm rather than overwhelming.
Geometric and Modern Minimalist Canvas Art
Geometric canvas art hits a sweet spot that a lot of DIY projects miss — it’s accessible technique-wise, but the results look genuinely striking. Because everything is built on straight lines, measured angles, and repeating patterns, you don’t need any freehand drawing ability whatsoever. All you really need is painter’s tape, a ruler, and a clear plan before the paint comes out. There’s something deeply satisfying about the precision of it, and the finished pieces slot naturally into modern, Scandinavian, or industrial-style spaces.
The triangle might be the most versatile shape you can work with in geometric art. Divide a canvas into a series of triangles in varying sizes, paint each one in a slightly different tone within the same color family, and you get this faceted, jewel-like effect sometimes called low-poly art — a nod to the look of early 3D computer graphics. It’s actually pretty forgiving, because slight variations in tone and edge just add to the handmade character of the piece. Try cool grays and whites for a sleek, gallery-ready vibe, or warm sunset tones if you want something with a little more life to it.
Minimalist line art has also been dominating home décor for the past few years, and it’s not hard to see why. Using a fine brush or a paint marker, you draw a single continuous line — a face, an animal, a botanical shape, an architectural form — on a clean white or matte black canvas. The power of this technique is in its restraint; what you leave unpainted matters just as much as what you put down. A set of three or four single-line drawings in matching frames makes for a cohesive gallery wall moment that feels both current and genuinely personal.
Upcycled and Budget Canvas Art Projects
Some of the most creative DIY canvas art doesn’t require a single trip to the craft store. The upcycling approach is budget-friendly and better for the environment, and it often produces work with a layered, lived-in quality that you just can’t get from brand-new materials. Old canvases primed over with fresh gesso, fabric scraps stretched across a frame, even corrugated cardboard covered in paint — all of these can become the base for something genuinely beautiful.
Fabric-wrapped canvases are criminally underrated as a DIY project. Take a piece of interesting upholstery fabric, a vintage scarf, or even a section cut from a patterned bedsheet, stretch it tightly over a wooden stretcher frame, and secure it at the back with a staple gun. No paint needed — the pattern and texture of the fabric are the artwork. This works especially well with bold geometric prints, William Morris-style florals, or woven ethnic textiles. The end result looks intentional and design-forward in a way that’s honestly surprising given how simple the whole process is.
Stencil art is another affordable option that delivers results that look way more polished than the effort involved. Craft stores carry tons of stencil designs, or you can cut your own from acetate sheets with a craft knife. Dab paint over the stencil with a sponge or brush, layer two stencils at a slight offset for a shadow effect, or combine stenciling with a painted background for something that feels more spontaneous. Metallic paint through a stencil on a dark canvas is a particularly dramatic combination — perfect for a bedroom, entryway, or dining room that could use a touch of glamour.
Arranging and Displaying Your DIY Canvas Collection
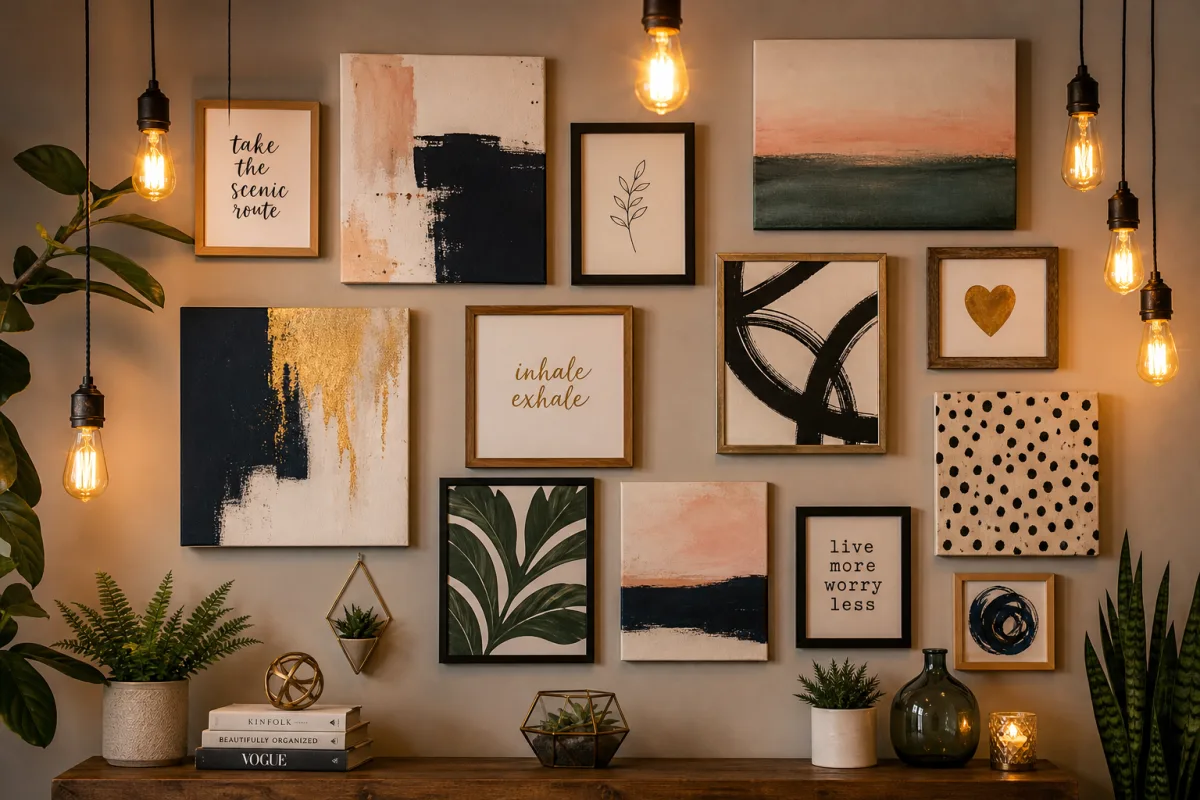
Making great individual canvases is only half the equation — how you arrange and display them can be the difference between a pile of paintings and a genuinely curated feature wall. The gallery wall has become a go-to format in contemporary home design, and DIY canvases are particularly well suited to it. Unlike store-bought prints that all come in standard sizes, handmade canvases naturally vary in size, proportion, and style, which gives a gallery wall that organic, collected-over-time feel that’s hard to fake.
Before you drive a single nail, lay your canvases out on the floor in the arrangement you’re thinking about and take a photo from above. It sounds simple, but it’s a game-changer — you can see the overall balance, spacing, and flow of the grouping without committing to holes in the wall. Mix up the orientations, some portrait and some landscape, and vary the sizes deliberately so your eye has somewhere interesting to travel. Keeping the spacing between pieces consistent — usually around three to four inches — makes the whole arrangement feel thoughtfully curated even when the artwork itself is totally varied in color and style.
For a more relaxed display, try leaning larger canvases against the wall on a picture ledge, mantelpiece, or open shelving. This is especially handy in rented spaces where you can’t do much to the walls, and it has the bonus of being easy to rearrange as your collection grows and your taste shifts. Stacking canvases at slightly different depths creates that layered, gallery-studio look that feels current and artistically confident. Add in a few small sculptural objects, a trailing plant, or some books, and you’ve got a display that engages people on multiple levels — and makes your space feel unmistakably, genuinely yours.








What do you think?
It is nice to know your opinion. Leave a comment.