










Why a Crate Planter Stand Is the Perfect Gateway to Vertical Gardening
Vertical gardening has captured the imagination of home gardeners, urban dwellers, and outdoor decorating enthusiasts alike. The idea of growing upward rather than outward opens up a world of possibilities for those who lack sprawling yard space but still dream of lush, green growing areas. If you’ve been scrolling through inspiration boards and feeling overwhelmed by elaborate trellis systems and complex wall-mounted installations, a crate planter stand is exactly the approachable, beautiful entry point you’ve been looking for. It delivers that stacked, layered garden aesthetic without requiring advanced woodworking skills or a significant financial investment.
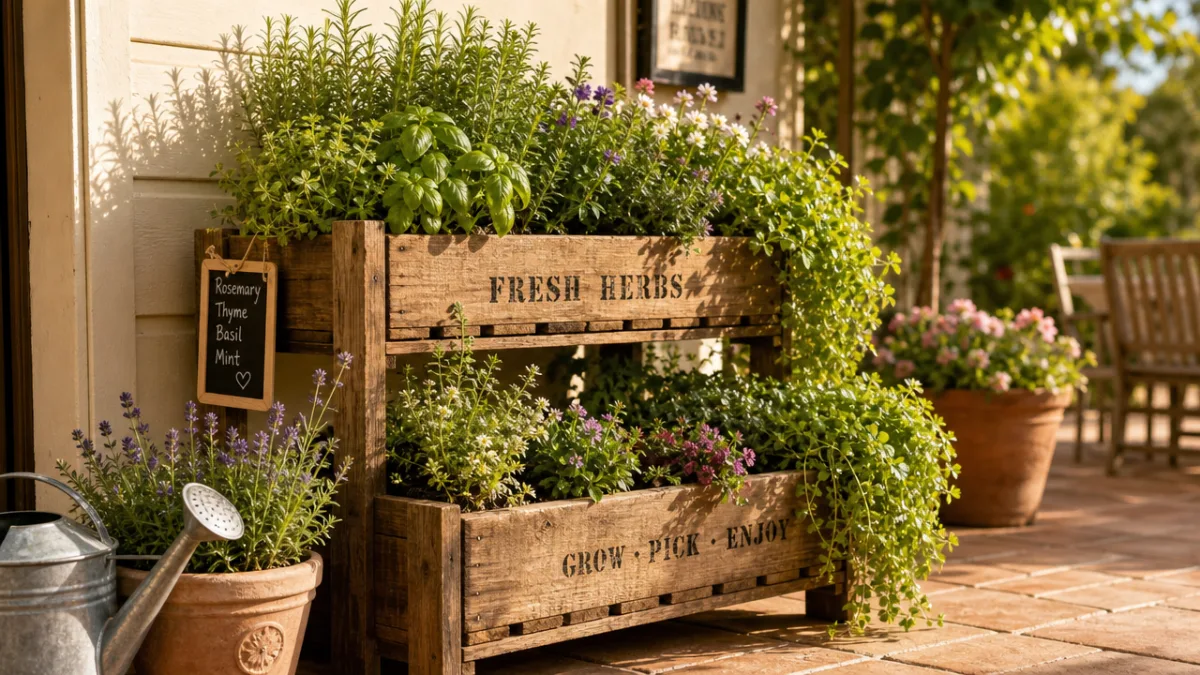
Wooden crates have long been a staple of rustic and farmhouse-style décor, but their utility goes far beyond simple storage or display shelving. When stacked and secured with intention, they transform into a functional planting structure that mimics the vertical wall garden look on a much more manageable scale. A crate planter stand is freestanding, portable, and endlessly customizable, making it ideal for patios, balconies, backyard corners, and even bright indoor spaces. You can move it with the seasons, rearrange the crates as your plants grow, and adapt the whole structure to suit your evolving style.
Perhaps the most compelling reason to start with a crate planter stand rather than diving straight into a full vertical garden installation is the low stakes involved. If you find that vertical gardening isn’t quite for you, or if you want to experiment with different plant combinations before committing, you haven’t made a permanent alteration to your wall or fence. The stand can be repurposed, disassembled, or redesigned without any regret. It’s gardening with flexibility built right into the design, and that freedom is genuinely liberating for beginners and experienced gardeners alike.
Choosing the Right Crates for Your Planter Stand
Not all wooden crates are created equal, and selecting the right ones will make the difference between a planter stand that lasts for years and one that splinters and warps after a single rainy season. Look for crates made from sturdy hardwoods like pine, oak, or cedar. Cedar is particularly prized in gardening applications because it contains natural oils that resist moisture, rot, and insect damage without the need for chemical treatments. This makes it a safer choice when you’re growing edible herbs or vegetables, since you won’t have to worry about preservative chemicals leaching into your soil.
When it comes to sourcing crates, you have more options than you might think. Craft stores, home improvement retailers, and online marketplaces all carry unfinished wooden crates in a range of sizes. Vintage and antique shops sometimes stock old fruit or wine crates with beautiful weathered patinas that add instant character to a garden display. Farmers markets and grocery wholesalers occasionally have surplus wooden produce crates available at very low cost or even free. Whatever source you choose, inspect each crate carefully for structural integrity, checking that the slats are firmly attached and the corners are solid before you commit to buying.
Size and proportion matter enormously when you’re stacking crates into a vertical structure. A pleasing arrangement typically combines two or three different sizes, with larger crates forming the base and progressively smaller ones rising toward the top. This creates a natural pyramid or staggered silhouette that’s both stable and visually interesting. Standard wine crates, small produce boxes, and medium storage crates each serve a slightly different purpose in the stack, and mixing them thoughtfully gives your finished stand the layered, curated look that makes vertical crate gardens so appealing on design boards and in real life alike.
How to Build and Assemble Your Crate Planter Stand
Building a crate planter stand is one of those projects that rewards careful planning before you pick up a single tool. Start by sketching out your desired configuration on paper, noting the dimensions of each crate and how they’ll relate to one another when stacked. Decide whether you want a symmetrical arrangement or an asymmetrical offset design, which gives a more relaxed, organic look. Consider the total height of your finished structure and whether it needs to lean against a wall for added support or if it will stand freely in an open space with a wide enough base to remain stable on its own.
Once your design is settled, gather your materials and tools. You’ll need the crates themselves, wood screws or heavy-duty staples for fastening, a drill, sandpaper in medium and fine grits, and optionally a wood stain, paint, or sealant for finishing. If you plan to grow plants directly in the crates without separate pots, you’ll also need landscape fabric or burlap to line the interior, which prevents soil from spilling through the gaps between slats while still allowing water to drain properly. Proper drainage is essential — waterlogged roots are one of the most common causes of plant failure in container and vertical gardens.
Assembly is straightforward but requires patience. Sand all crate surfaces thoroughly to remove splinters and open up the wood grain, which helps any stain or sealant you apply later to penetrate more deeply. Secure crates to one another using wood screws driven through the base of each upper crate into the top of the one beneath it, or use heavy-duty L-brackets at the joints for maximum stability. If your structure will be outdoors and exposed to wind, consider anchoring the base crates to a wooden pallet or a simple plywood platform. This adds weight at the bottom and dramatically reduces the risk of the whole structure toppling in a strong gust.
Finishing and Weatherproofing Your Wooden Crates
Raw, unfinished wood has a natural charm, but if you want your crate planter stand to survive multiple growing seasons without significant deterioration, some form of finishing is strongly recommended. Wood stains that penetrate the grain offer excellent protection while preserving the natural texture and character of the wood. Exterior-grade sealants and deck treatments work well for crates that will be constantly exposed to rain. If you prefer a painted look, choose an exterior latex or enamel paint and apply at least two coats, allowing full drying time between applications, followed by a clear waterproof topcoat for maximum longevity.
Color choice in your finish can dramatically affect the overall mood of your vertical garden display. Crisp white paint gives a clean, cottage-garden aesthetic that makes green foliage pop brilliantly. Natural wood tones or warm amber stains complement Mediterranean or bohemian garden styles. Dark charcoal or slate grey creates a sophisticated, contemporary look that pairs beautifully with metallic plant labels and geometric pot shapes. Whatever color direction you choose, the finish ties all the individual crates together into a cohesive unit and elevates the whole structure from a simple DIY project to a polished design feature in your outdoor space.
Pay special attention to the interior surfaces of any crate that will hold soil directly, whether lined with fabric or not. Coat the interior with a non-toxic waterproof sealant to extend the life of the wood significantly, since those surfaces are in constant contact with moisture from watering and rain. Allow the sealant to cure fully — usually 24 to 48 hours — before introducing soil or plants. Taking this extra step at the construction phase will save you from having to replace deteriorating crates just a season or two into enjoying your garden, making the initial effort absolutely worthwhile.

Choosing the Right Plants for Your Vertical Crate Garden
Plant selection is where the creative fun of a crate planter stand really begins. Because the structure offers multiple planting levels, you have the opportunity to create a layered tapestry of textures, heights, and colors that reads beautifully from a distance and reveals delightful detail up close. The key to a successful planting scheme is thinking in terms of thrillers, fillers, and spillers — the classic container gardening trio. Thrillers are tall, dramatic plants that draw the eye; fillers are medium-height plants that add fullness and density; spillers are trailing plants that cascade over the edges of crates and soften the hard lines of the wooden structure.
For a purely decorative crate garden, consider combinations like upright rosemary or lavender as your thriller, compact flowering petunias or bacopa as fillers, and trailing string of pearls, sweet potato vine, or trailing verbena as spillers. These combinations work across a wide range of climates and can be swapped out seasonally to keep the display looking fresh year-round. Spring might bring tulips and pansies, summer calls for dahlias and calibrachoa, autumn invites ornamental kale and mums, and in mild climates you can even maintain winter interest with evergreen herbs and cyclamen in the colder months.
For those who prefer a more practical, edible crate garden, the vertical structure is ideal for growing a productive kitchen garden in a compact footprint. Herbs are particularly well-suited to crate growing: basil, parsley, chives, mint, thyme, oregano, and sage all thrive in relatively shallow containers and benefit enormously from the excellent drainage a slatted crate provides. Compact varieties of salad greens, strawberries, cherry tomatoes, and even dwarf pepper plants can also perform beautifully in crates when given appropriate soil depth and regular feeding. The visual appeal of a productive herb wall is a bonus that comes entirely free with all those delicious flavors.
Soil, Watering, and Feeding for Crate Planters
Soil choice in container and vertical gardening is more consequential than it is in traditional in-ground planting, and it deserves careful attention. Standard garden soil is too heavy and compacts too readily in containers, restricting root growth and impeding drainage. Instead, choose a high-quality potting mix formulated specifically for containers, ideally one that contains perlite or vermiculite for aeration and a moisture-retaining component like coir fiber to balance drainage with appropriate water retention. For edible gardens, look for organic potting mixes free from synthetic fertilizer pellets that could potentially affect the flavor or safety of your harvest.
Watering a vertical crate stand requires a slightly different rhythm than watering a traditional garden bed. Because containers dry out more quickly than ground soil — especially in warm weather or when positioned in full sun — you’ll likely need to water more frequently than you expect. Check moisture levels by pressing a finger an inch into the soil; if it feels dry at that depth, it’s time to water. Water thoroughly until it drains freely from the base of each crate, ensuring the entire root zone is moistened rather than just the surface. Installing a simple drip irrigation system through the crates is an investment that pays dividends in healthier plants and significantly reduced daily maintenance.
Feeding your crate garden regularly is essential because frequent watering gradually flushes nutrients out of the potting mix. A balanced, slow-release granular fertilizer incorporated into the potting mix at planting time gives plants a steady nutritional foundation through the season. Supplementing with a liquid feed every two to three weeks during active growing periods will keep foliage lush, flowers prolific, and edible plants productive. For organic gardens, liquid seaweed or fish emulsion fertilizers are excellent choices that improve overall soil biology while delivering the macronutrients and trace minerals your plants need to perform at their best in the contained environment of a crate planter stand.

Styling and Displaying Your Crate Planter Stand
A beautifully planted crate stand deserves a setting that shows it off to full advantage. Placement is the first consideration, and it involves both practical and aesthetic decisions. Practically, most flowering plants and vegetables need at least six hours of direct sunlight daily, so south-facing or west-facing walls and fences are ideal locations. Shade-tolerant plants like ferns, hostas, and impatiens open up north-facing or heavily shaded spots that might otherwise feel like dead zones in your outdoor space. Whatever your light conditions, matching your plant selection to the actual available sunlight is far more important than any decorative decision you’ll make.
Aesthetically, a crate planter stand works as a standalone focal point or as part of a larger composed vignette. Placing it against a painted fence or a textured brick wall creates a dramatic backdrop that amplifies the visual impact of your plantings. Surrounding the base of the stand with complementary planters, lanterns, decorative stones, or garden sculptures creates a layered scene with genuine depth and interest. String lights woven through the crates add a magical quality to evening gatherings, transforming your vertical garden from a daytime feature into a glowing centerpiece after dark.
Personalizing your crate stand with small decorative touches makes it feel truly bespoke and uniquely yours. Vintage metal plant labels, hand-painted signs, small chalkboard tags identifying your herbs, or decorative hardware pulls added to crate fronts all contribute to a personality-filled display that reflects your individual aesthetic. Some gardeners tuck small decorative items between plants — a tiny ceramic bird, a weathered stone, a miniature watering can — that create moments of surprise and delight when noticed up close. These small details are what distinguish a thoughtfully curated vertical garden from a simple stack of crates holding plants.
Adapting Your Crate Stand Through the Seasons
One of the great joys of a freestanding, modular crate planter stand is how easily it adapts to seasonal change. Unlike permanent vertical garden installations, you can swap out individual crate plantings as seasons shift without dismantling the entire structure. In early spring, plant cool-season annuals like snapdragons, pansies, and violas that thrive in the mild temperatures and won’t bolt in the way warm-season plants would. As temperatures climb into summer, replace those cool-season plants with heat-loving tropicals, bold succulents, and productive edibles that revel in the warmth and long days of the growing season.
Autumn brings one of the most satisfying seasonal transitions in the crate garden calendar. Warm oranges, deep burgundies, burnished golds, and rich purples in the form of ornamental grasses, fall asters, chrysanthemums, heuchera, and ornamental peppers create a display that feels festive and in tune with the season. Adding decorative gourds, small pumpkins, or dried seed heads around the base of the stand extends the autumnal theme beyond the plants themselves. In frost-prone climates, this is also the time to assess which tender perennials are worth overwintering indoors and which annuals have completed their life cycle and can be composted.
In winter, a crate planter stand needn’t become an eyesore or simply disappear into the shed. In mild climates, evergreen herbs, winter-flowering pansies, and structural plants like dwarf conifers or boxwood keep the stand looking intentional and attractive through the coldest months. In harsher climates, consider repurposing the stand seasonally as a display for potted bare branches with berries, strings of outdoor lights, pinecone arrangements, or weatherproof decorative objects that bridge the gap between the last frost and the first signs of spring. Treating the stand as a year-round design element rather than a purely seasonal object maximizes both its practical value and its contribution to your outdoor space.
The Lasting Value of Starting with a Crate Planter Stand
There’s something profoundly satisfying about a project that delivers immediate visual impact while also teaching you skills and knowledge that serve you well in larger future endeavors. Building and planting a crate stand teaches you the fundamentals of container gardening: soil preparation, drainage, watering rhythms, seasonal plant selection, and the importance of matching plants to light conditions. These are the same foundational skills required for any form of vertical or container gardening, and learning them through a low-stakes, reversible project like a crate stand is an ideal way to build genuine confidence before tackling more ambitious installations.
The financial accessibility of a crate planter stand compared to elaborate modular vertical garden systems or professionally installed living walls is significant. A complete crate stand with soil, plants, and finishing materials can typically be assembled for a fraction of the cost of commercial alternatives, yet the visual result, when planted and styled with care, is remarkably comparable. This accessibility makes vertical gardening genuinely democratic, opening up the beautiful, space-efficient possibilities of growing upward to renters, first-time homeowners, apartment balcony gardeners, and anyone who has ever dismissed the idea as too expensive or too complex to be worth pursuing.
Ultimately, a crate planter stand is more than a DIY garden project. It’s an invitation to engage more thoughtfully with your outdoor space, to slow down and observe how plants grow and change, and to discover the deep satisfaction that comes from creating something beautiful and living with your own hands. Whether it becomes the beginning of a lifelong passion for vertical gardening or simply a charming feature in one corner of your patio, the crate planter stand earns its place as one of the most rewarding, achievable, and genuinely lovely garden projects you can undertake this season. Start with one stack of crates, a bag of quality potting mix, and a handful of plants you love — and see exactly where it takes you.
Quick-Reference Guide: Getting Started with Your Crate Planter Stand
Before you head to the hardware store or start browsing online for crates, it’s worth gathering your thoughts around a few key decisions that will shape the entire project. Having clarity on these points upfront prevents the kind of mid-project uncertainty that leads to inconsistent results or unnecessary expense. Here’s a practical checklist of the decisions and preparations that will set your crate garden build up for genuine success from the very beginning.
- Decide on your location first — measure the available space and assess how many hours of direct sunlight the area receives daily, as this determines every plant choice you’ll make.
- Choose crates made from rot-resistant wood — cedar or treated pine will outlast cheaper softwoods significantly, especially in wet climates or when crates are planted directly with soil.
- Plan your configuration on paper — sketch the stack arrangement, note crate dimensions, and confirm the structure will be stable before purchasing or assembling anything.
- Apply sealant before planting — coat interior and exterior surfaces with a non-toxic waterproof finish and allow it to cure fully before introducing soil or plants.
- Use quality potting mix, not garden soil — container-specific mixes provide the drainage and aeration that crate-grown plants need to thrive.
- Think in thrillers, fillers, and spillers — this classic container gardening formula produces the lush, layered look that makes vertical crate gardens so visually compelling.
- Water more frequently than you think necessary — containers dry out quickly; checking soil moisture daily during warm weather prevents the stress that leads to poor plant performance.
- Feed regularly throughout the growing season — supplementing with liquid fertilizer every two to three weeks keeps plants productive and displays looking their vibrant best.
With these fundamentals in place and a clear vision of what you want to create, your crate planter stand project is set up not just for completion, but for the kind of beautiful, flourishing result that makes you want to build another one immediately. Vertical gardening, in all its stacked and layered glory, starts here — with a handful of wooden crates, a little preparation, and a lot of well-founded enthusiasm for what your outdoor space can become.








What do you think?
It is nice to know your opinion. Leave a comment.