










Introduction to DIY Pallet Garden Tool Walls
If you’ve ever tripped over a rake in the garage or spent ten minutes hunting for a trowel buried under a pile of gloves and seed packets, you already know exactly why a dedicated garden tool storage solution is worth your time. A DIY pallet garden tool wall is one of those weekend projects that just feels good — it’s beginner-friendly, the results look genuinely great, and you end up with something you’ll actually use every day. Best of all, reclaimed wooden pallets are easy to find for free from hardware stores, garden centers, and warehouses, which makes this an almost zero-cost build that keeps good materials out of the landfill.
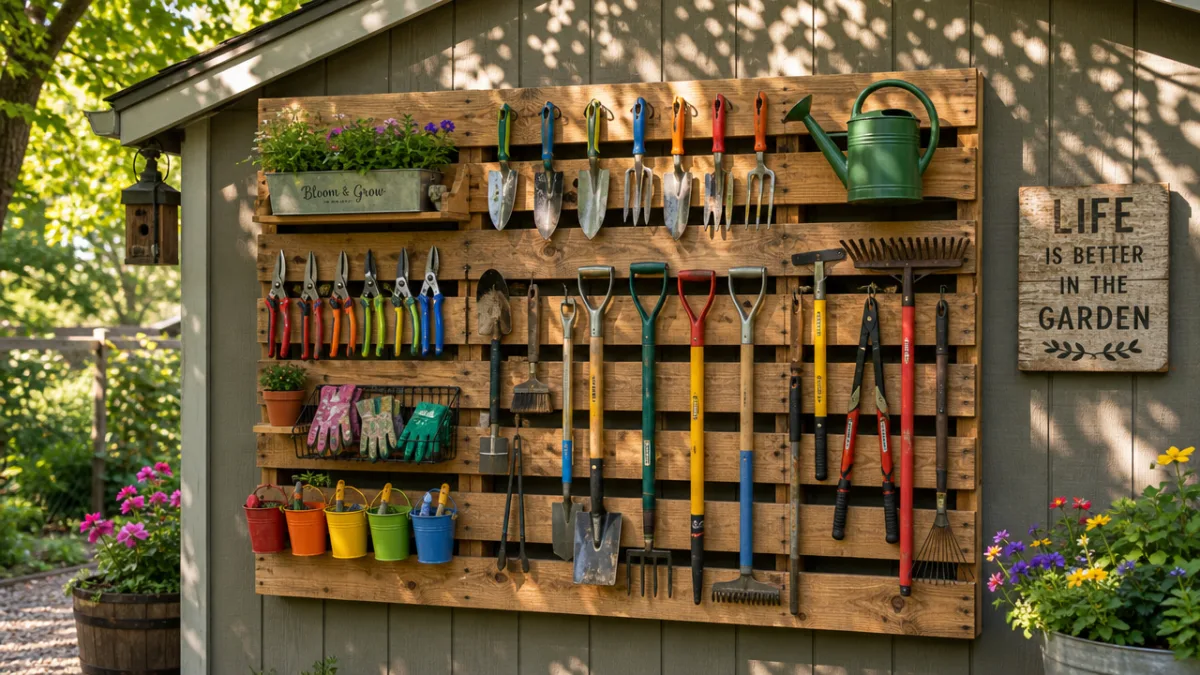
The idea is pretty simple: take a standard wooden shipping pallet, mount it on a garage wall, fence, or garden shed, and you’ve instantly got an organizer. The natural gaps between slats are perfect for long-handled tools like rakes, hoes, and shovels, and the spaces in between are easy to outfit with hooks, dowels, and small baskets for all those smaller bits and pieces every gardener accumulates. The rustic look of weathered wood also fits right in with almost any garden, whether you’ve got a tidy suburban backyard or a sprawling country property.
What really makes this project stand out for beginners is how little you actually need to pull it off. No workshop full of fancy equipment, no years of woodworking experience — just a few basic hand tools, some sandpaper, a drill, and a few hours of focused effort. By the time you’ve finished reading, you’ll know exactly how to plan, build, and customize your own pallet garden tool wall from start to finish.
Choosing and Sourcing the Right Pallet
Not all pallets are worth picking up, and choosing the right one is honestly one of the most important parts of this whole project. Start by checking the condition. Skip anything with broken slats, serious warping, deep stains from chemical spills, or boards that feel soft and spongy — that sponginess is a sign of rot. A good pallet should feel heavy and solid, with slats that are firmly attached to the central stringers and no major cracks running through load-bearing sections of wood.
The second thing to check is whether the pallet was treated with methyl bromide, a fumigation chemical that’s harmful to people and has no business being part of a DIY project. Every internationally shipped pallet is stamped with a code that tells you its treatment history. Look for “HT” on the stamp — that stands for heat-treated, and it’s the one you want. If you see “MB,” that’s methyl bromide, and you should leave it behind no matter how nice the pallet looks otherwise.
For free or cheap pallets, garden centers are a great first stop since they get frequent deliveries of bagged soil and mulch. Furniture stores, liquor retailers, hardware chains, and local Facebook Marketplace or Craigslist listings are all worth checking too. It’s worth calling ahead to ask if they’ll set one aside — clean, intact pallets in good shape do get snapped up fast. Try to find a standard GMA pallet, roughly 48 by 40 inches. That size gives you plenty of mounting surface without being so massive that it’s a hassle to move around.

Tools and Materials You Will Need
One of the best things about this project is how short the materials list really is. Beyond the pallet itself, everything else is inexpensive and easy to find at any hardware store. It’s worth gathering it all together before you start so the build can flow without you running out mid-step to find something. Getting organized before you begin is also just a good habit to build — it’ll serve you well when you move on to bigger projects.
Here’s everything you should have on hand before you get started:
- One heat-treated wooden pallet in good condition
- Medium-grit sandpaper (80 or 100 grit) and fine-grit sandpaper (150 or 220 grit)
- Exterior wood stain, paint, or a clear weatherproof sealant
- A power drill with a selection of wood-boring bits
- Heavy-duty wall anchors and lag bolts or deck screws for mounting
- S-hooks, pegboard hooks, or cup hooks in assorted sizes
- Wooden dowels or thick wooden pegs (optional, for long tool handles)
- Small wire or wooden baskets (optional, for small tools and supplies)
- A level and tape measure
- Safety glasses and work gloves
- A stud finder if mounting to an interior wall
You might also want to grab a small can of exterior primer if you’re planning to paint rather than stain — raw pallet wood tends to be quite porous and will soak up paint fast without something underneath it. A foam roller gives you nice even coverage across the flat faces of the slats, and a small brush handles the narrow gaps easily. Think about your finish color ahead of time: barn red, crisp white, forest green, and natural wood tones are all popular choices that look at home in a garden setting.
Step-by-Step Build Process
Start by sanding the whole pallet thoroughly. Pallet wood is rough, often full of splinters, and usually marked up with staples, ink stamps, and scuffs that need sorting out before anything else. Work through it methodically — medium-grit paper first to knock back the worst of the roughness, then follow up with fine-grit for a smoother result. Give extra attention to any edges or corners that hands will brush against regularly. It’s a bit tedious, but it’s the step that separates a polished finished product from something that still looks like a shipping pallet.
Once you’ve sanded, wipe everything down with a damp cloth to clear the dust, then let the wood dry completely before putting any finish on it. If you’re going with an exterior stain, work with the grain and give it at least two coats, letting each one dry fully before the next. If you’re painting, prime first, then two coats of exterior latex. Whichever route you take, sealing the wood properly isn’t just about looks — it’s what decides whether your tool wall holds up for one season or many years.
Once the finish has fully cured (give it at least 24 hours), you can start adding your organizational hardware, which is honestly the most enjoyable part. Drill holes between slats at measured intervals and insert wooden dowels at a slight upward angle to create simple, solid holders for long-handled tools like rakes, hoes, and cultivators. Cup hooks screwed into the face of the slats are perfect for hanging hand trowels, pruners, gloves, and small seed bags. Wire baskets clipped on with S-hooks give you a home for spray bottles, kneeling pads, and all those small accessories that don’t hang neatly anywhere else.
When it comes time to mount the finished pallet, get a second person to help you hold it level while you mark your anchor points — it makes the whole process much easier. For interior garage walls, use a stud finder and drive lag bolts through the pallet’s outer stringers directly into the studs for a rock-solid, wobble-free result. For fence mounting outdoors, heavy-duty exterior screws driven through both the pallet and the fence boards at several points will do the job well. Always use a level during installation — even a slight tilt becomes very obvious once the pallet is loaded up with tools.

Customization Ideas and Creative Upgrades
Once the basic structure is done, this is where things get fun. A pallet tool wall is essentially a blank canvas, and the only real limits on what you can do with it are your imagination and budget. One of the most popular upgrades is adding a chalkboard-painted section — either part of a slat or a small piece of wood tucked between two slats — where you can jot down planting reminders, seasonal to-do lists, or whatever you’re currently growing. Chalkboard paint is cheap and goes on easily over sanded wood.
Another great addition is a small shelf or two built into the pallet. Cut short lengths of one-by-four lumber, screw them in horizontally between slats, and you’ve got a handy little ledge for a pot of herbs, a small watering can, or a container of plant labels. Add them at different heights depending on what you need to store, and they also do a nice job of breaking up the flat surface of the pallet visually, giving the whole thing more dimension.
If you enjoy propagating plants, consider attaching a row of small tin cans or mason jars along the bottom slat using hose clamps or bent wire. They work beautifully as vessels for rooting cuttings, holding small succulent divisions, or just displaying a few stems of garden flowers. And if you use the garden in the evenings, a string of outdoor solar fairy lights woven through the slats adds a warm glow that turns the whole wall into a genuine decorative feature.
Color and Finish Inspiration
Your color choice really does set the whole mood of the finished piece. A whitewashed look — made by heavily diluting white exterior paint and wiping it across the grain — gives the pallet a coastal, Scandinavian feel that looks beautiful against dark fences or brick. Deep charcoal or slate gray reads as modern and sophisticated and works particularly well in contemporary garden designs. For a classic cottage garden atmosphere, sage green or faded terracotta are lovely options that age gracefully outdoors without looking tired or worn out.
If you’d rather let the natural wood grain do the talking, a clear exterior oil finish is a really elegant choice. Products like teak oil, Danish oil, or raw linseed oil soak into the wood and protect it from within, bringing out the natural color and grain without building up a surface layer that can peel or chip over time. These natural finishes do need reapplying every year or two, but it’s a quick and easy process — and a freshly oiled pallet has a warm, honeyed glow that no synthetic paint can quite match.
Seasonal Adaptation
One underrated advantage of a pallet tool wall is how naturally it adapts to the different demands of each gardening season. In spring and summer it might be packed with actively used hand tools, seedling trays hardening off in the open air, and gloves drying after a morning in the garden. Come autumn, those same hooks and pegs can hold bundled dried herbs, seed heads you’re saving, and tools getting a proper clean and oiling before winter. In colder climates, it can even double as an indoor drying rack for bulbs during the off-season months.
Maintenance, Longevity, and Safety Tips
A well-looked-after pallet tool wall can easily last five to ten years or more, depending on the quality of the original pallet, how thoroughly it was finished, and what conditions it faces outdoors. The single most important maintenance habit is inspecting the finish once a year and touching up anywhere the coating is showing wear, cracking, or peeling. Bare wood exposed to moisture softens and rots faster than you might expect, so catching and fixing any gaps in the finish before water gets in is what keeps the whole thing going for the long haul.
At least once a year, take everything off the wall and give the pallet itself a good look. Check that all the mounting hardware is still tight and that nothing has worked loose over the season. Look closely at the slats for any new cracking, especially around spots where hooks and dowels have been inserted, and if you find any splits developing, a little exterior wood glue and some clamping will sort them out. It’s also worth putting a thin coat of mineral oil or tool oil on any metal hooks or S-hooks to stop rust from forming and staining the wood.
Safety is worth addressing directly here, because a tool wall only helps if it’s preventing accidents and not creating new ones. Always store sharp tools like pruners, loppers, and hand saws with their cutting edges pointing downward or sheathed in a cover — never in an open-topped holder where a reaching hand could accidentally brush against a blade. Long-handled tools on pegs or dowels should be secure enough that there’s no risk of them swinging free and falling, which is especially important in households with children or pets who might brush against the wall.
Why This Project Is Perfect for Beginner Woodworkers
Beginner woodworking projects live or die by how forgiving they are of small mistakes. The pallet garden tool wall is about as forgiving as it gets, and that’s a real strength, not a consolation. Because pallets are inherently rustic and imperfect to begin with, minor inconsistencies in sanding, slightly uneven paint, or a hook that isn’t perfectly centered all just become part of the character rather than obvious flaws. That gives first-time builders room to focus on learning the fundamentals — how to use a drill safely, how to sand correctly, how to apply a wood finish — without the stress of needing a flawless result.
It also builds confidence in a really healthy way. The project is complete enough to feel like a genuine accomplishment, practical enough to use every single day, and visible enough in your garden or garage that people will notice it and comment on it. There’s a particular kind of quiet satisfaction that comes from looking at something useful you built yourself, and it’s surprisingly motivating — a lot of beginners say that finishing a pallet project was what pushed them to invest in better tools and take on something more ambitious next.
And maybe most valuably, this project teaches problem-solving habits that carry over directly into more complex woodworking. Figuring out where to place hooks, working out how to anchor the pallet to a specific wall type, making sure long tool handles won’t slide off their pegs — these are all small practical puzzles that require you to think ahead and adapt as you go. Experienced woodworkers solve these kinds of problems without even thinking about it, and the pallet tool wall is a great first place to start developing that same instinct.
Building Community Around the Project
The DIY community around pallet projects is one of the most welcoming and resource-rich corners of the making world. Online forums, Pinterest boards, Instagram accounts, and YouTube channels dedicated to pallet woodworking are full of builders at every level sharing their variations, troubleshooting tips, finish recommendations, and creative ideas. If you hit a snag during your build — an unexpected knot in the wood, a hook that won’t hold the weight you need, a finish that isn’t adhering properly — there’s almost certainly someone out there who has faced the exact same issue and written up exactly how they solved it.
Sharing your own finished project is equally rewarding. A simple before-and-after photo posted to a garden or DIY group almost always brings encouragement, questions about your process, and suggestions for upgrades you might not have thought of on your own. That kind of back-and-forth accelerates learning in ways that working alone simply can’t, and it turns what might otherwise be a solitary weekend task into a small moment of connection with people who share your enthusiasm for making useful, beautiful things out of humble materials.








What do you think?
It is nice to know your opinion. Leave a comment.