










DIY Garden Benches and Tables Made with Cinder Blocks: A Complete Guide
Why Cinder Blocks Are the Perfect Material for Outdoor Furniture
If you’re looking for a material that’s tough, affordable, and surprisingly versatile for garden furniture, cinder blocks are hard to beat. They’ve developed quite a following among DIYers and garden designers, and honestly, it’s easy to see why. These unassuming construction staples can take whatever the outdoors throws at them — scorching summer heat, heavy downpours, hard frosts — and just keep going without complaint.
What tends to surprise people is how flexible they are design-wise. Because the blocks are modular and stackable, you can build pretty much any configuration you want without needing specialized tools or a construction background. Long bench for a crowd? Easy. A little bistro table for two? Also easy. The fact that they’re all uniform in size makes estimating materials and planning the layout genuinely straightforward rather than a guessing game.
Then there’s the cost, which is really where cinder blocks shine. A single standard block runs about one to two dollars at most hardware stores, so you can build a solid garden bench for under thirty bucks in materials. When you compare that to what you’d spend on store-bought outdoor furniture — often hundreds of dollars, sometimes more — the math is pretty compelling. A weekend afternoon and a modest budget can get you something that looks great, holds up well, and will still be standing years from now.
Planning Your Cinder Block Garden Furniture Project
Before you buy a single block or grab a single tool, spend some time planning. It genuinely saves you headaches, extra trips to the store, and money you didn’t mean to spend. Start by measuring your outdoor space and sketching out a rough layout. Think about how you actually use the space day to day: How many people are you usually trying to seat? Is the table mostly for meals, or more of a casual surface for drinks and candles? Those answers will steer the dimensions of everything you build.
It also helps to think about how the furniture will relate to what’s already in your garden. A bench running alongside a raised bed can double nicely as a retaining edge, while a central table ringed by block seats can become a natural gathering spot in the middle of a lawn. Pay attention to where the sun hits at different times of day — you want your seating to be comfortable during the hours you actually use it, and even something as simple as which direction a bench faces can make a real difference in how much you enjoy sitting there.
Once you have a design in mind, write out a full materials list before you head to the store. Standard cinder blocks are roughly 8 by 8 by 16 inches, and most projects call for a mix of full and half blocks. For a basic bench, you’ll also want heavy-duty construction adhesive, wooden boards or thick lumber for the seat, and exterior paint or masonry sealer if you want to finish the surface. A solid list keeps you from making three separate hardware store runs, which — let’s be honest — always happens without one.
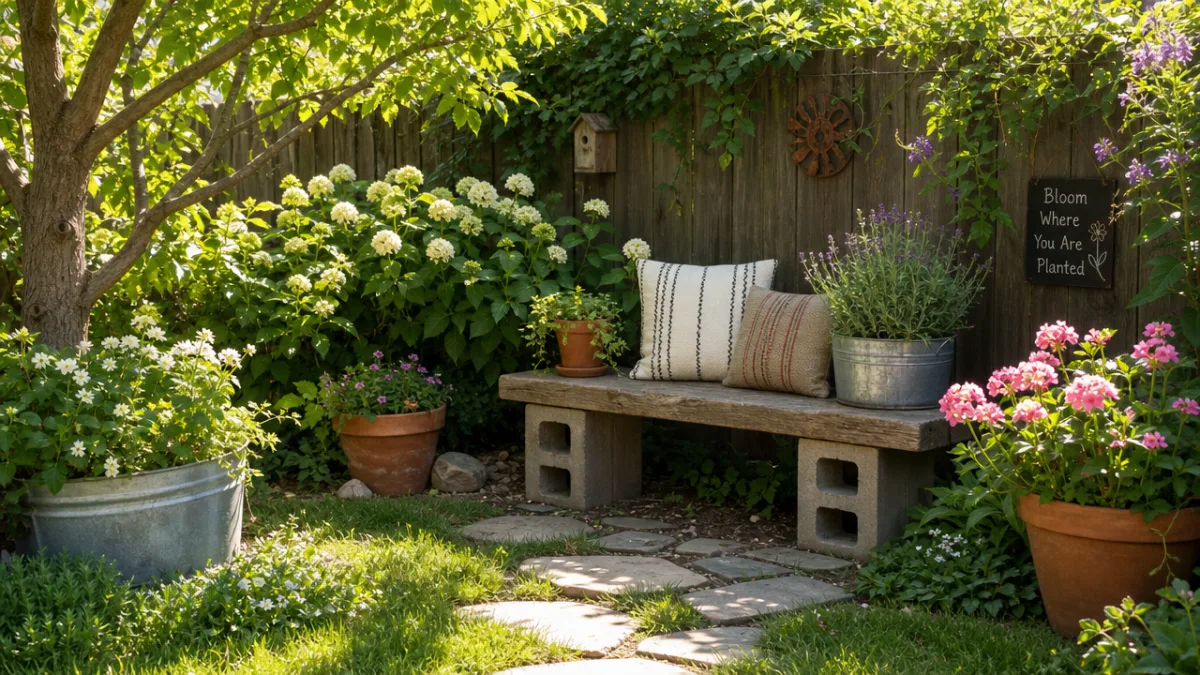
Building a Classic Cinder Block Garden Bench
The go-to cinder block bench design is also the simplest: two parallel stacks of blocks for the legs, with wooden planks laid across the top as the seat. Start by finding a level surface — a patio, deck, or packed gravel area all work well. Place your first row of blocks flat on the ground, with the two columns spaced roughly the width of your intended seat. For a typical bench, that’s usually about 12 to 16 inches between the inside edges of the two columns.
Stack the second layer on top, rotating the blocks 90 degrees if you like for a staggered, more stable pattern. Run a bead of heavy-duty landscape adhesive between layers to keep everything bonded and prevent shifting over time. Most people find 16 to 18 inches to be a comfortable bench height, which works out to two or three layers of standard blocks depending on exactly how tall yours are. Once the adhesive has cured per the manufacturer’s instructions, you’re ready to add the seat.
Cedar, redwood, and pressure-treated pine are all solid choices for the seat boards since they naturally hold up to moisture and bugs. Sand them smooth and give them two coats of exterior stain or sealant before laying them across the block legs. Leave small gaps between boards so water can drain and air can circulate underneath — trapped moisture is the enemy of wood. You can glue the boards down with construction adhesive, bolt them in with lag bolts, or just leave them loose so you can easily swap them out if they ever need replacing down the road.
Creating a Cinder Block Outdoor Table
Building a table follows the same basic logic as the bench, but the height changes things a bit. A standard dining table sits around 30 inches tall, which means you’re looking at roughly four layers of 8-inch blocks. A coffee table is shorter — 16 to 18 inches — so just two layers will get you there. Figure out which height fits your intended use, then plan the footprint of the base. A square or rectangular layout with stacks at each corner works well for most table builds.
One common approach is to arrange the blocks in a rectangular frame — either a solid base or a hollow structure that uses fewer blocks but needs a larger top to span the gaps. For the tabletop itself, you have some nice options: thick wooden boards laid side by side, a large flagstone or paving stone, tile over concrete backer board, or even a poured concrete slab if you want something really seamless. Each has its own look and maintenance needs, so pick whatever matches your style and how much upkeep you’re actually willing to do.
The finishing touches are where a cinder block table can go from purely functional to genuinely good-looking. A coat of exterior masonry paint in crisp white, warm terra cotta, or deep charcoal changes the whole vibe. A stenciled geometric pattern on the blocks before painting adds a handmade touch without requiring any special skill. You can also tuck small succulents or trailing plants into the hollow cores of the blocks, which turns the table base into a living planter and makes the whole thing feel like it belongs in the garden rather than just sitting in it.
Design Variations and Creative Ideas
Once you’re comfortable with the basics, there’s a lot of room to get creative. One popular variation is the L-shaped corner bench, which tucks into a corner of a patio or deck and creates a cozy, conversation-friendly nook. You just extend two bench runs from a shared corner block in perpendicular directions. Drop a matching cinder block table in the center of the L and you’ve got a complete outdoor seating set that looks like it was actually planned that way — because it was.
Another fun direction is to use the hollow cores of the blocks as a deliberate design feature. Stand blocks on end with the cores facing up, fill them with soil, and plant low-growing herbs, flowers, or succulents right inside the bench structure. A bench that combines horizontal and vertical blocks can have a strip of living plants running along its back edge, making the whole thing feel like part of the garden rather than just furniture sitting in it. In a kitchen garden, those planted pockets are a perfect spot for thyme, oregano, or creeping rosemary.
For a more finished, polished look, there are a few techniques worth trying. Applying stucco or thin-set mortar over the block surfaces creates a smooth, rendered finish that looks more like poured concrete furniture than cinder blocks. Mosaic tile work on a tabletop or bench face adds bold, personal color and pattern. And even something as simple as adding weatherproof cushions to the wooden seat boards softens the whole look and makes long summer evenings outside a lot more comfortable.

Tools, Materials, and Safety Tips
One of the best things about this kind of project is that you don’t need much in the way of tools. Chances are you already own most of what you’ll need, or can easily borrow it. The basics are a tape measure, a level, a rubber mallet for nudging blocks into place without cracking them, a caulk gun for the adhesive, and a circular or hand saw for cutting planks to length. Safety glasses and work gloves are worth putting on — cinder blocks have sharp edges and produce fine dust if they get chipped or cut.
When you’re picking out blocks at the store, take a moment to actually look at each one before loading it into your cart. Skip any blocks with visible cracks, chipped faces, or noticeable warping — those defects can affect both the look and stability of your finished piece. If you’re planning to paint the blocks, use a masonry-specific primer and paint rated for exterior use. Regular paint — even exterior paint — doesn’t bond well with the highly alkaline surface of concrete block and can start peeling within a season. A coat of masonry sealer before painting makes a real difference in how long it holds up.
It’s also worth thinking about your body during the build. A standard cinder block weighs 26 to 35 pounds, and repeatedly lifting them without good form is a quick way to hurt your back. Bend at the knees, hold the block close to your body, and don’t be too proud to ask someone to help move large quantities. Once you’ve finished building, give the structure a good shake and check that nothing wobbles before putting any weight on it. If any layer feels unstable, add more adhesive and let it cure completely before using the piece.
Maintenance and Longevity of Cinder Block Furniture
One of the most satisfying things about building with cinder blocks is knowing the result is going to last. The concrete masonry itself doesn’t rot, rust, or attract insects — the three things that take down most outdoor furniture before its time. A properly sealed or painted cinder block bench can easily stay in great shape for a decade or more with minimal effort, which makes the low upfront cost even more of a win when you think about it long-term.
The wood parts will need a bit more regular attention. At the start of each outdoor season, take a look at the seat planks and tabletop boards for cracking, splintering, warping, or that telltale gray color that comes from UV exposure. Sand down any rough spots and put on a fresh coat of exterior sealant or stain every year or two to keep them protected and looking good. If a board gets too far gone to save, just replace it — that’s actually one of the nicest things about this style of furniture. The wood lifts right out without disturbing the block structure underneath.
In colder climates, a little winter prep goes a long way. The blocks themselves handle freeze-thaw cycles pretty well, but painted or stuccoed surfaces can develop hairline cracks over time as moisture gets in and expands when it freezes. Throwing a weatherproof tarp over the furniture or bringing the wooden pieces inside during the worst months can head off most of that wear. In milder climates, you can really just leave everything out year-round and let it do its thing. Either way, cinder block garden furniture has a way of rewarding you season after season — sturdy, low-key, and genuinely built to stick around.
- Inspect wooden surfaces annually and reseal as needed to prevent moisture damage and UV fading.
- Check adhesive bonds between block layers each spring and reapply adhesive to any sections that show movement.
- Clean block surfaces with a stiff brush and mild detergent to remove algae, moss, or mineral staining.
- Touch up painted or sealed block surfaces whenever chips or peeling areas appear to prevent deeper moisture infiltration.
- Consider covering or storing wooden elements during prolonged winter periods in freezing climates for maximum longevity.








What do you think?
It is nice to know your opinion. Leave a comment.