










How to Care for Calla Lilies After They Bloom
Understanding the Post-Bloom Life Cycle of Calla Lilies
Calla lilies are some of the most gorgeous plants you can grow, whether in your garden or inside your home. Those trumpet-shaped flowers and bold, arrow-shaped leaves are hard to miss. But here’s where a lot of gardeners get stuck: what exactly are you supposed to do once the blooms fade? The good news is that understanding what’s happening with your plant after it flowers makes everything else much easier. Blooming typically lasts a few weeks, and after that, your calla lily shifts into a recovery and rest phase — one that has a huge impact on how well it performs next year.
Calla lilies grow from rhizomes — underground structures that store energy and nutrients between growing seasons. Once flowering is done, the plant’s attention turns to refilling those energy reserves. That’s a process you really want to support, not interrupt. If you cut the plant back too hard or just stop caring for it the moment the flowers are gone, those rhizomes end up running on empty, and you’ll likely end up with weak blooms — or none at all — when next season rolls around.
The exact timeline varies a little depending on which variety you’re growing, but the general idea holds true across the board. Whether you have the classic white Zantedeschia aethiopica or one of the colorful hybrids in yellow, purple, or deep red, the after-bloom care is pretty much the same. Keep an eye out for the signs that your plant is done flowering — the spathe turning green, starting to wilt, or curling inward — so you can respond quickly and give it what it needs during this transition.
Deadheading and Trimming Spent Blooms the Right Way
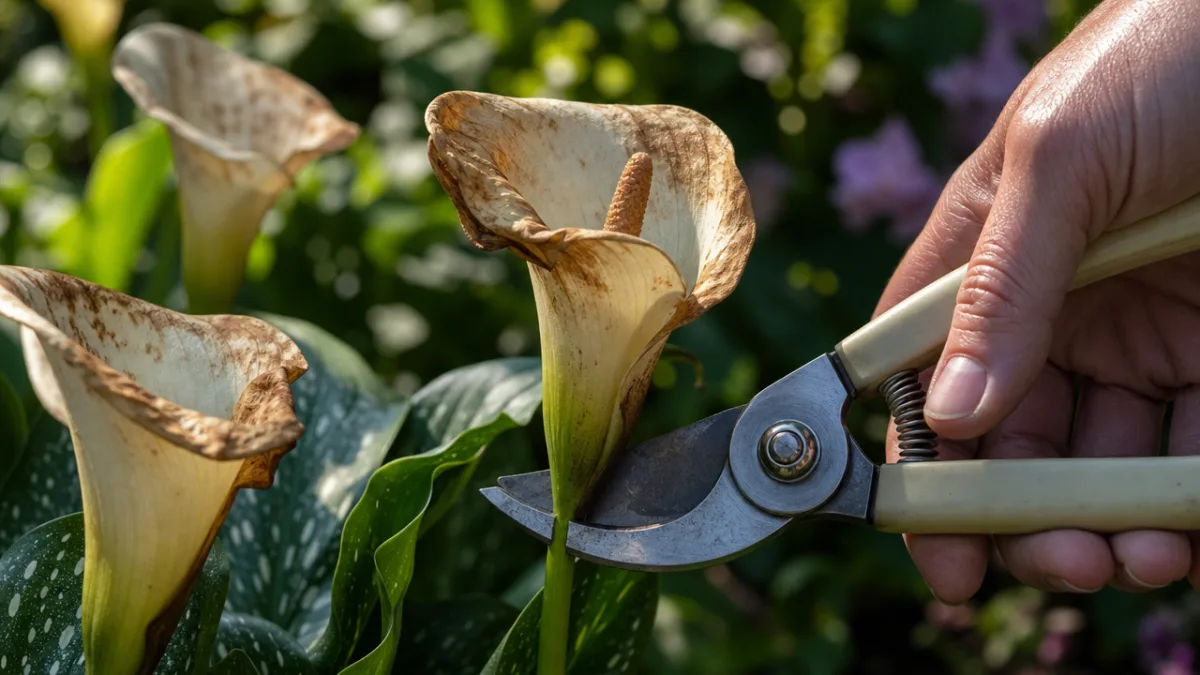
As soon as your calla lily’s flowers start to fade, your first job is deadheading — taking off those spent blooms. This isn’t just about keeping things tidy, though. If you leave dying flowers on the plant, it may start putting its energy into making seeds instead of sending that energy back down into the rhizome where it’s actually needed. Snipping faded blooms off promptly keeps the plant focused on storing up what it needs for next year. Use clean, sharp scissors or pruning shears and cut right at the base of the flower stem.
The key thing to remember here is to only remove the flower and stem — leave the leaves completely alone for now. The foliage is still doing important work after the blooms are gone, using photosynthesis to manufacture and store the sugars and starches that the rhizome will live off during dormancy. Think of the leaves as solar panels that keep running long after the flowers have checked out. Pulling them off too early is one of the most common mistakes people make with calla lilies, and it can really set the plant back over time.
Also, make a habit of cleaning your cutting tools before and after use — a quick wipe with rubbing alcohol or diluted bleach does the job. Calla lilies can be prone to fungal and bacterial issues, and a dirty blade is an easy way to spread problems from one plant to another. While you’re cutting, take a close look at the stems. If you spot any rot, odd discoloration, or unusual spots, cut away the affected tissue generously and consider applying a fungicide. It’s a small habit, but it makes a real difference in the long run.
Watering and Fertilizing During the Post-Bloom Recovery Period
Once the spent blooms are off, your calla lily moves into a kind of wind-down mode. You’ll still need to water it during this time, but start pulling back gradually as the weeks go by and the leaves begin to yellow and die off on their own. Calla lilies like soil that’s consistently moist but never soggy, and overwatering after bloom is one of the top reasons rhizomes rot. A good rule of thumb: let the top inch of soil dry out a little between waterings, and make sure your pots or garden beds are draining well.
Fertilizing after bloom is something a lot of gardeners skip, but it really does matter. Right after flowering wraps up, give your calla lily a feeding with a low-nitrogen, higher phosphorus and potassium fertilizer. Nitrogen is great for pushing leafy green growth, but that’s not the priority right now — phosphorus and potassium are what help the roots develop and the rhizome pack in energy for next season. Look for something labeled for flowering bulbs, or a fertilizer with an NPK ratio like 5-10-10. Follow the package instructions and aim for about once every three to four weeks during recovery.
Once the foliage starts turning yellow and dying back — which is completely normal, by the way — gradually ease off on both watering and fertilizing. This mimics the dry season that calla lilies experience in their native South Africa, essentially telling the plant it’s time to rest. If you keep pushing it with water and nutrients when it’s trying to slow down, you’ll throw off its natural rhythm and likely see weaker results the following year. The best thing you can do is follow the plant’s lead.
Preparing Calla Lilies for Dormancy
If your calla lily has gone dormant, that’s not a bad sign — it’s actually a really good one. It means the plant is doing exactly what it’s supposed to do. Once the foliage has fully yellowed and died back, it’s time to get the plant ready for its rest. In warmer climates where frost isn’t an issue, you can often just leave the rhizomes in the ground year-round. But if your winters bring freezing temperatures, you’ll need to dig them up and bring them indoors — these plants simply aren’t cold-hardy enough to survive a hard frost in the ground.
To dig up the rhizomes, use a garden fork or trowel and work your way carefully around the outside of the plant so you don’t accidentally slice through anything underground. Gently lift them out, shake off the loose dirt, and give each one a good look. Healthy rhizomes feel firm and solid; anything that’s soft, mushy, or smells off should be tossed. Let the rhizomes air out in a warm, ventilated spot for a few days before you store them. This curing step helps the outer skin toughen up a bit, which gives better protection during the months they’ll be in storage.
For storage, tuck the cured rhizomes into a paper bag, mesh bag, or a container with peat moss, vermiculite, or sawdust — these materials help manage moisture without letting things get too dry or too damp, which is the balance you’re going for. Store them somewhere cool, dark, and dry where the temperature stays pretty consistently between 50 and 60 degrees Fahrenheit. A basement, garage, or even an interior closet can work well. Check on them a few times over the winter and pull out any that have started to rot before they affect the healthy ones sitting nearby.
Replanting and Encouraging Strong New Growth
Come late winter or early spring, once the threat of frost has passed, it’s time to bring your rhizomes back out and get them ready for another season. Before you plant anything, give each one a final inspection and toss any that didn’t make it through storage. The healthy ones might already have small growth nubs starting to poke out, which is a great sign they’re ready to go. If you want to give them a head start, set them in a tray of barely moist potting mix indoors for a few weeks before your outdoor planting date — it encourages early root development and gets things moving faster.
When you’re ready to plant outside, pick a spot with full sun to partial shade and soil that drains well. Work in some compost or well-rotted organic matter to boost nutrition and improve drainage — calla lilies respond really well to both. Plant the rhizomes about three to four inches deep with the growing points facing up, and space them twelve to eighteen inches apart so they have room to breathe and fill out. Water them in gently after planting, and then try to be patient while you wait for those first little shoots to appear above the soil.
Once new leaves start emerging, get back on a regular feeding schedule with a balanced fertilizer to support that early growth push. As the plant gets bigger and starts heading toward bloom time, switch over to your low-nitrogen, bloom-focused fertilizer to encourage flowers. If you stay consistent with this whole care cycle — post-bloom recovery, dormancy, and then back to replanting — your calla lilies will genuinely get better year after year, putting out more vigorous growth and more flowers each season. It just takes a little patience and sticking with the routine.
Common Problems to Watch For and How to Address Them
Even when you’re doing everything right, calla lilies can still run into trouble. Rhizome rot is one of the most common issues, and it’s almost always tied to soil that stays too wet or doesn’t drain well enough. If you notice the lower leaves turning yellow ahead of schedule, the stems going mushy near the base, or a funky smell coming from the soil, rot is probably what you’re dealing with. Catch it early and you can often save the plant — improve drainage, cut back on watering, and remove any affected tissue to protect what’s still healthy.
Pests like aphids, spider mites, and thrips can also show up, especially when the weather is warm. They feed on the plant’s sap, which makes it harder for the foliage to do its job during the recovery period. Get into the habit of checking under leaves and along stems regularly. A few approaches that tend to work well for managing common pest problems include:
- Blasting the plant with a strong stream of water to knock aphids and mites loose from the foliage.
- Spraying with insecticidal soap or neem oil, both of which are gentle but effective on most soft-bodied insects.
- Bringing in beneficial insects like ladybugs or lacewings, which are natural predators for many common garden pests.
- Removing leaves that are heavily infested to cut down pest numbers and keep things from spreading.
- Going easy on high-nitrogen fertilizers, since the lush, soft growth they produce is exactly what pests tend to go after.
Fungal issues like botrytis (gray mold) and powdery mildew can crop up too, particularly when it’s humid or the leaves stay wet for long periods. To keep fungal problems at bay, water at the base of the plant rather than overhead, give plants enough space so air can move around them, and stay on top of clearing away dead or dying leaves and stems. If something does show up, treat it with an appropriate fungicide and adjust your care routine so the conditions that caused it are less likely to come back. As with most garden problems, prevention is a whole lot easier than trying to fix things after the fact.
Special Considerations for Container-Grown Calla Lilies
Growing calla lilies in pots and containers is a popular choice, and it’s easy to see why — you can move them around as needed and have much better control over the soil. After blooming, the care routine is essentially the same as it is for in-ground plants, but containers do come with a few quirks worth knowing about. Because the growing space is limited, soil moisture and nutrient levels can swing more dramatically, so you’ll want to keep a closer eye on both. Always make sure your pots have drainage holes, and if they’re sitting in saucers, empty those saucers regularly so the roots aren’t sitting in standing water.
As your potted calla lily winds down for dormancy, you have a convenient option that in-ground growers don’t: you can just stop watering, let the foliage die back naturally, and leave the rhizome right where it is in the pot. Move the whole container to a cool, dark storage spot rather than going through the effort of digging everything out. When you’re ready to start fresh in the spring, bring the pot back out into the light and warmth, refresh the top layer of potting mix with some fresh compost or a slow-release fertilizer, and start watering again to coax the rhizome out of its rest.
Every one to two years, plan on repotting — ideally at the start of a new growing season before things really kick off. Over time, the rhizomes multiply and can get pretty crowded in a container, which tends to mean fewer flowers and less vigorous growth overall. When you repot, divide the rhizomes if they’ve gotten too bunched up, keep the largest and firmest ones, and replant them in fresh, well-draining potting mix. It’s also a great chance to share the extras with fellow gardeners — passing along divisions is one of those gardening traditions that feels as good as it sounds.








What do you think?
It is nice to know your opinion. Leave a comment.