










Baby Safe Amigurumi Eyes: A Complete Guide to Keeping Crocheted Toys Safe for Infants and Toddlers
Understanding the Safety Risks of Standard Amigurumi Eyes
If you’re making amigurumi toys for babies or young toddlers, eye safety is probably the most important thing you need to think about. Those shiny plastic “safety eyes” that snap in with a little washer — the ones called for in almost every amigurumi pattern out there — are actually not safe for children under three. Confusing name, right? Despite what they’re called, these eyes are a real choking hazard. Persistent little fingers can work them loose, and once they come off, they’re small enough for a baby to swallow or inhale.
To really get why this matters, think about how babies and toddlers actually play with soft toys. Babies explore everything through touch and taste — your lovingly made amigurumi is going straight in the mouth, guaranteed. Toddlers take things a step further and get genuinely rough: pulling, twisting, squeezing with a surprising amount of force. Even a correctly installed plastic eye with a tight washer backing can pop loose if a determined two-year-old decides that toy is their new obsession.
Safety agencies in many countries — including the Consumer Product Safety Commission in the US and similar bodies in Europe — have rules about small parts in toys for young kids. Basically, if a component fits entirely inside a small-parts cylinder (roughly 1.25 inches long and 1.14 inches in diameter), it’s a choking hazard and doesn’t belong in a toy for children under three. Most standard amigurumi plastic eyes fall right into that danger zone, which is why learning the baby-safe alternatives is so worth your time.
Embroidered Eyes: The Gold Standard for Baby-Safe Amigurumi
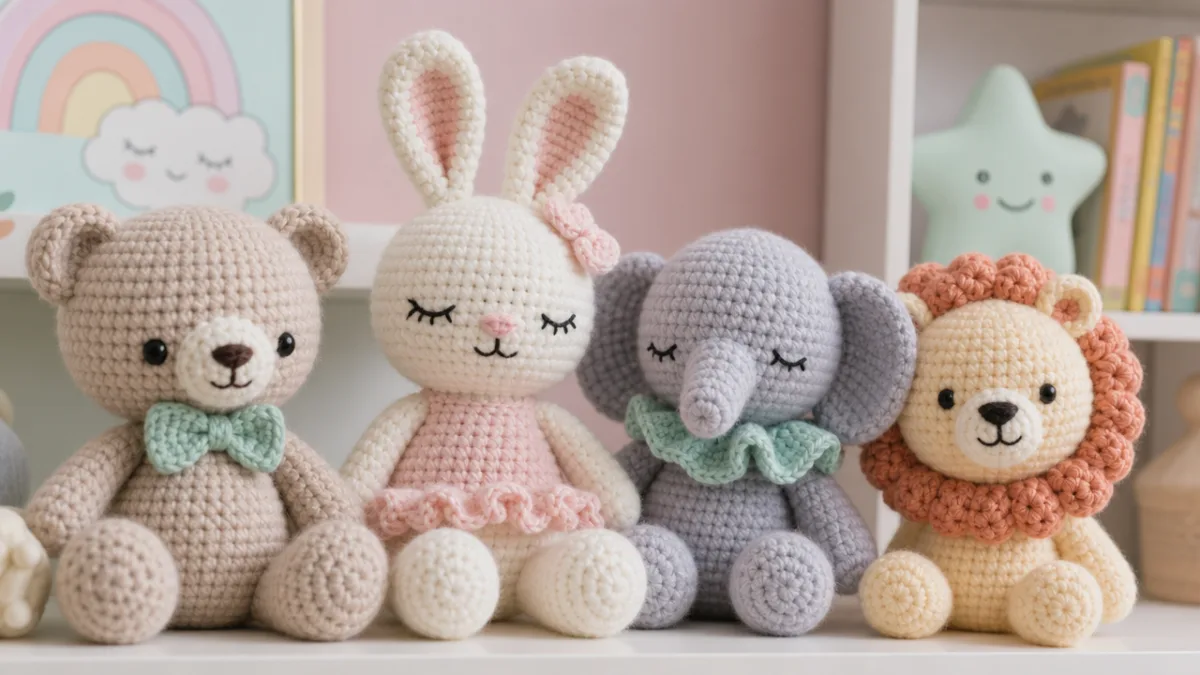
When it comes to baby-safe eyes, embroidery is the best of the best. Stitching eyes directly into the crocheted fabric using yarn or embroidery floss means there’s no separate part that could ever come loose — the eye is part of the toy itself. A baby can’t pull out an embroidered eye without scissors and a whole lot of effort they don’t have. That’s what makes this technique the gold standard for infant-safe amigurumi.
The good news is that embroidered eyes are much easier to make than most new crafters expect. You thread a tapestry needle with black yarn or embroidery floss, bring it into the toy at the center of where you want the eye, then work small stitches in a circle, oval, or whatever shape you’re going for. Some makers do a simple single long stitch for a minimal dot-like eye. Others build up layers of satin stitch for something rounder and more dimensional. The creative possibilities here are genuinely endless, and it’s a great way to give your characters really expressive, one-of-a-kind faces.
And that’s just the beginning. Embroidery lets you get as elaborate as you like — a dark pupil with a colored iris, a tiny white highlight stitch that makes the eyes look alive, sleepy curved lashes, wide surprised eyes, or the classic simple oval that gives amigurumi their signature charm. Using embroidery floss instead of yarn gives you even finer control, since floss separates into individual strands. That extra precision really pays off on smaller amigurumi where space is tight and every stitch counts.

Felt Eyes: A Sewn-On Baby-Safe Alternative
Felt eyes are another popular baby-safe option, and they have a really appealing look — flat, graphic, almost cartoonish in the best way. You cut your eye shapes from wool felt and sew them securely onto the finished toy. This method is also very beginner-friendly since you don’t need any embroidery skills. You just cut out your shapes and stitch them down tightly, making sure no edges can lift away from the surface.
The whole point of felt eyes being “safe” hinges on how well you attach them. A felt circle that’s only loosely tacked down with a few stitches can absolutely be peeled off by a curious toddler. Felt isn’t as dangerous as hard plastic, but it still shouldn’t end up in a baby’s mouth. The right approach is to whip stitch or blanket stitch all the way around each felt piece, pulling each stitch snug so the felt lies completely flat with no gaps, bubbles, or loose edges anywhere.
Wool felt is the way to go here rather than the cheap synthetic stuff from the craft store. Wool felt is denser, less prone to fraying, and holds up much better over time and through washing. Synthetic felt — especially the very inexpensive kind — tends to pill and fray, which could eventually leave little fiber bits on a baby toy (not ideal). Look for 100% wool or wool-blend felt, use sharp scissors to cut clean edges from the start, and if you want an extra layer of security, a tiny dab of fabric glue under each piece before sewing doesn’t hurt. That said, stitching should always be your main method of attachment.
Yarn Eyes and Surface Crochet Techniques
If you want eyes that are truly part of the toy — not stitched on but actually crocheted into it — surface crochet and yarn eyes are a really satisfying advanced option. You work crochet stitches directly on the surface of the finished piece, building small crocheted circles or ovals that become the eyes. Because they’re made from the same material and continuous with the toy’s body, there’s simply no separate piece that could ever detach. No component, no adhesive, no seam to worry about.
The most common approach is making small magic rings and working a round or two of single crochets to create flat circles, then sewing those circles on with the yarn tails hidden inside. But the truly integrated version uses surface slip stitches — you insert your hook directly through the toy’s fabric and work stitches around a central point to build up the eye right in place. It takes some practice and good spatial awareness, but once you get the hang of it, the result is both super safe and beautifully three-dimensional.
Some baby-specific patterns take this even further by working the eyes into the head construction itself. Instead of adding eyes as a finishing step, you change yarn color at certain points during the main construction rounds, so the “eye” color becomes part of the fabric. This is sometimes called intarsia or colorwork crochet, and it produces eyes that are literally woven into the toy — no attachments, no seams, no worries. It’s unquestionably safe for even the youngest babies and gives a really polished, professional finish.
Choosing the Right Method for Your Project and Skill Level
So which technique should you actually use? It depends on a few things: the size of your finished toy, how complex the design is, your comfort level with each method, and the look you’re going for. If you’re newer to amigurumi and the idea of embroidery feels intimidating, felt eyes are probably your best starting point — the cutting and sewing process is intuitive and very forgiving. More experienced makers often gravitate toward embroidery for the control and expressiveness it offers. And if you love a technical challenge, surface crochet or colorwork eyes are genuinely rewarding to master.
Size matters practically too. Tiny amigurumi with heads only an inch or two across can be really tricky to embroider neatly — there just isn’t much room to work. For those, a single well-placed French knot in each eye position can be surprisingly effective. Small, yes, but distinct and charming in a way that works perfectly at that scale. For medium and large amigurumi, all of the techniques in this guide work beautifully, and it really comes down to which look you want for your character.
It’s also worth thinking about how different techniques suit different personalities. Simple dot eyes give a toy a sweet, innocent look that’s perfect for baby animals. More elaborate embroidered eyes with highlights and multiple colors create something more expressive and lively. Felt eyes with geometric shapes — semicircles for a sleepy look, ovals for an alert one — have a modern, graphic quality that’s really appealing. Planning your eye style before you start makes a big difference in getting the finished character to have the personality you envisioned, and it helps you confirm the technique is actually feasible at your pattern’s scale.
Finishing, Washing, and Long-Term Safety Considerations
Picking the right technique is only part of the picture. You also need to think about how the toy will hold up over time — through repeated washing, enthusiastic handling, and the general wear and tear of being a much-loved baby toy. Before handing any handmade toy over to an infant or toddler, do a thorough safety check: pull firmly on every eye, ear, limb, and attached element. If it holds up to your determined tugging, it has a good chance of holding up to theirs.
Washing is something to think about carefully, because baby toys get dirty constantly and parents need to launder them often. Embroidered eyes handle washing very well — the yarn or floss is securely anchored into the toy’s body and will survive a gentle machine cycle in a laundry bag without issue. Felt eyes are a bit more vulnerable, especially to hot water, so it’s worth mentioning to parents that they should wash felt-eyed toys in cool water on a gentle cycle and reshape them while still damp if needed. Crocheted surface eyes are as wash-stable as the toy itself, so no special instructions needed there.
One really thoughtful touch is including a small care card with any amigurumi you give as a gift. It can explain what kind of baby-safe eye technique you used, how to wash the toy, the recommended minimum age, and a reminder to check the toy periodically for signs of wear. Handmade toys made with genuine attention to safety are such a meaningful gift, and communicating that care clearly helps parents feel confident rather than anxious — which means the toy gets to be a source of joy for everyone for years to come.

Pattern Adaptation: Converting Existing Patterns to Baby-Safe Designs
If you regularly make amigurumi for young children, one of the most useful skills you can build is converting existing patterns — the ones that call for plastic safety eyes — to use baby-safe alternatives instead. The good news is that this conversion is usually really simple. Eyes are almost always the last finishing element added to an amigurumi piece, and they’re largely independent of everything else in the pattern. In most cases you just skip the step that says “insert 12mm safety eyes at marked positions” and substitute your preferred safe method.
The main thing to figure out is how large to make your alternative eyes and exactly where to place them so they look right. Patterns that use plastic eyes often give positional guidance in terms of stitch counts — something like “insert eyes between rounds 8 and 9, with 4 stitches between them.” That guidance is still totally useful when you switch to embroidery or felt; you just use that location as the center point for your stitching instead of the insertion point for a plastic eye. Comparing the size of the specified plastic eye to your stitch gauge will help you figure out how big your embroidered or felt eye should be to get a similar visual effect.
There are also lots of great community resources for this kind of adaptation. Many pattern designers have started including baby-safe eye options directly in their patterns, and crochet communities online are full of tutorials, tips, and photos of converted patterns. It’s also worth seeking out patterns that were specifically designed to be baby-safe from the start — those patterns build safety thinking into every element, not just the eyes. Whichever route you take, the extra thought you put into making a truly baby-safe amigurumi is one of the most meaningful things you can do as a crafter for the little ones who will eventually hold, cuddle, and love what you made.








What do you think?
It is nice to know your opinion. Leave a comment.