










DIY Daisy Macrame Keychain: A Beginner-Friendly Tutorial
Introduction to Macrame Keychains and Why You’ll Love Making Them
Macrame has had quite the comeback lately — and we’re not just talking about the retro wall hangings your aunt had in the 70s. These days, people are using it to make all kinds of beautiful, wearable, and actually useful things. One of the best places to start? The daisy macrame keychain. It’s small, it’s cute, and that little flower detail makes your keys feel way more personal than whatever generic ring they came on.
What makes this such a great beginner project is that it teaches you the core knots without throwing too much at you at once. You’re working with a small amount of cord, a handful of tools, and a design that’s focused enough to actually finish in an hour or two. Whether this is your very first macrame project or you’re dusting off skills you haven’t used in years, this one hits a sweet spot — enough structure to guide you, enough wiggle room to make it your own.
And honestly? These make incredible gifts. They look thoughtful and impressive, but they’re totally achievable even if you’ve never touched macrame cord before. Make a few in different color combos and you’ve got party favors, friendship gifts, or something cute to sell at a craft market. Once you finish your first one, you’ll probably already be thinking about the next.
Materials and Tools You Will Need
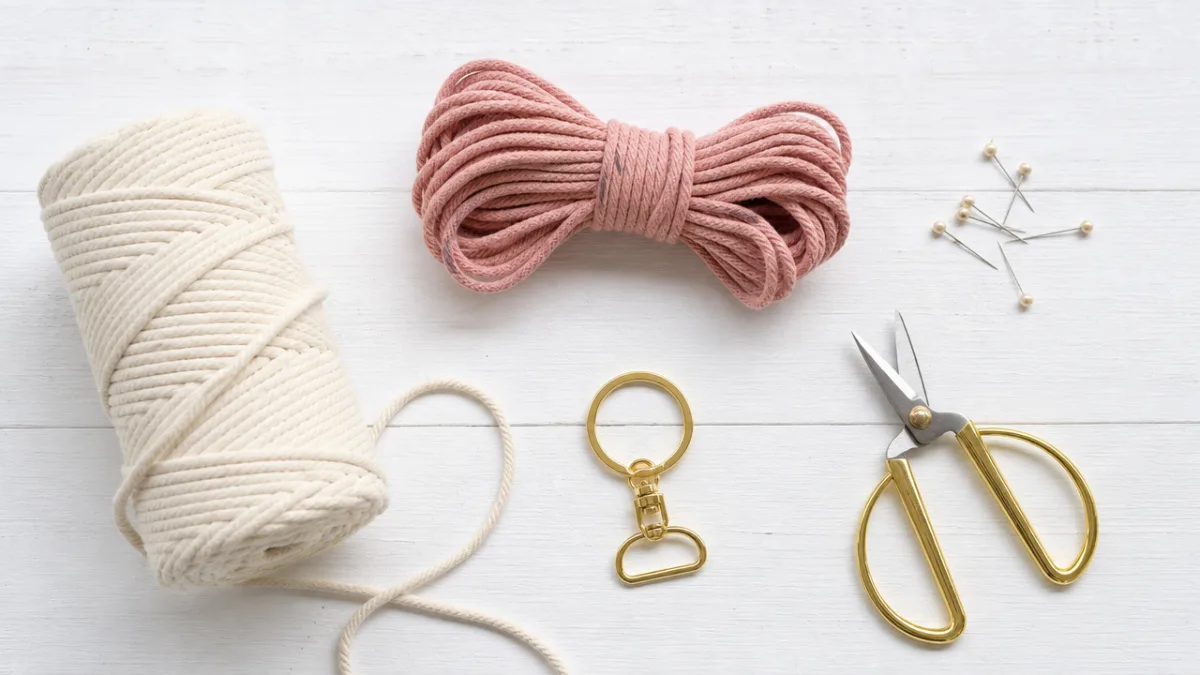
Before you start knotting, let’s get everything together. The good news is that macrame keychains don’t require much — most of what you need is inexpensive and easy to track down at a craft store or online. That said, starting with decent materials really does make a difference in how the finished piece looks and holds up over time, so it’s worth a quick sourcing session before you dive in.
For cord, go with 3mm single-strand or 3-ply twisted cotton macrame cord. Cotton is the friendliest material to learn with — it’s soft, it grips knots well, and it doesn’t slip around like synthetic alternatives can. You’ll need about 2 to 3 meters per keychain depending on how big you make it. White or cream is the classic choice for the petals, and then a contrasting color — yellow, soft green, dusty pink — works beautifully for the center to give your daisy that extra bit of realism.
Here’s everything you’ll want to have on hand before you start:
- 3mm macrame cotton cord in white or cream (roughly 2–3 meters per keychain)
- A small amount of contrasting cord for the flower center (yellow or golden tones are a natural fit)
- A keyring or lobster clasp to attach your finished piece
- Sharp scissors for clean cuts
- A macrame board or foam board to pin your work as you go
- T-pins or straight pins to hold cords in place while you knot
- A tapestry needle or bobby pin for tucking in ends
- Optional: a comb or stiff brush if you want to fray the decorative ends into a fluffy finish
One thing that really helps as a beginner: pre-cut all your cords before you start. For a standard daisy keychain, that means cutting around eight to ten cords at about 25 centimeters each for the petals, plus two or three shorter pieces in your accent color for the center cluster. It sounds like a small thing, but not having to stop and measure mid-project keeps your flow going. Bundle your unused cords with a loose overhand knot so they don’t tangle while you work.
Understanding the Basic Knots You Will Use
All of macrame comes down to a relatively small set of knots — and this project really only uses three of them: the lark’s head knot, the square knot, and the gathering knot. Getting familiar with how each one works before you start will make the whole process feel a lot more natural. Think of them like the basic vocabulary of the craft — once you know these, you can follow almost any pattern.
The lark’s head knot is how you’ll get started, and it’s about as simple as knots get. Fold a cord in half, loop the midpoint over your keyring, then pull both tail ends through that loop and pull snug. That’s it. It anchors your cord to the ring cleanly, and you’ll be doing this ten times to set up your working strands. Most people get the hang of it on their very first try, which is a nice confidence boost right at the beginning.
The square knot is the main event — you’ll use it over and over to build out your daisy petals. It’s a two-part move: a half hitch from the left cord over the center cords, then a half hitch from the right cord over the center cords. Together, they create a flat, tidy knot that stacks really nicely when you repeat it. For the daisy, you’ll work small clusters of square knots to form each petal, arranged so they radiate outward from the center like an actual flower.
The gathering knot — sometimes called a wrapping knot — is what creates that round center button on your daisy. You hold a bundle of cords together and wrap a separate working cord tightly around them several times, then thread the tail back through the coil to lock it in. The result is a neat little cylinder that pulls all the petals together and anchors them in place. It’s worth practicing this one on a scrap piece of cord first — once your hands know what tight and even feels like, it’s much easier to replicate on the real thing.
Step-by-Step Instructions for Crafting Your Daisy Keychain
Alright, you’ve got your materials, you’ve practiced your knots — now let’s actually make the thing. Start by attaching ten cords to your keyring using lark’s head knots, which gives you twenty working strands. That’s the sweet spot for a daisy with ten petals. Spread the cords evenly around the ring, then pin the keyring to your macrame board so it stays put while you work. Seriously, don’t skip the board — having a stable surface makes a noticeable difference in how even your knots turn out.
For each petal, pull two adjacent cords away from the bundle and tie four to six square knots, keeping your tension steady and consistent the whole way through. Once you’ve finished the knots for that petal, bring the cord cluster back in toward the center and pin it temporarily. Then move on to the next pair and repeat. Work your way all the way around the keyring until all ten petals are formed. Take your time here — nudging the length and tightness of each petal as you go makes a real difference in how balanced the flower looks when you step back and see it from above.
With all the petals shaped and pinned, gather all the cord ends together at the center. Now’s when your accent color comes in. Take your yellow or golden cord and create a gathering knot around the whole bundle — wrap firmly five to seven times, then secure the tail under the coil. This knot becomes the center button of your daisy and is what keeps all those petals fanned out in their positions. When you unpin everything, the petals should spring outward naturally into a satisfying dimensional flower shape.
Now you just need to deal with the cord tails hanging below the gathering knot. You can trim them down to a short fringe of about two to three centimeters for a bit of extra movement and that handmade charm, or tuck them neatly into the back of the center knot with your tapestry needle for a cleaner look. If you want a fluffier, more boho finish, grab your comb and gently brush out the fibers into a soft little plume. Any of these options works — it just comes down to the vibe you’re going for.

Customization Ideas and Creative Variations
Once you’ve got the basic pattern down, the fun really begins. The daisy keychain is genuinely one of those designs that you can take in so many directions — same foundational technique, totally different results depending on the choices you make. Color, scale, texture, embellishments — there’s a lot to play with here.
Color is the quickest way to change the whole personality of your daisy. White petals with a yellow center is the classic, but lavender petals with a deep purple gathering center give it a romantic, vintage feel. Undyed natural jute with rust or terracotta accents goes full boho. For something bolder and more modern, try all-black cord with a metallic gold bead threaded onto the gathering cord before you wrap it. You can also mix dyed and undyed cord within the same petal cluster to get an ombre effect that looks way more intentional than difficult.
Structure is another thing worth experimenting with. Adding a row of alternating square knots between the keyring and the base of the petals creates a little woven stem that elongates the whole thing elegantly. Threading wooden or ceramic beads onto individual petal cords before knotting adds texture and visual interest. You can also play with cord thickness — thinner cord makes the petals look delicate and wispy, while thicker cord gives you a chunkier, more tactile bloom. A miniature version in 1mm cord becomes almost jewelry-like, while 5mm cord turns it into a bold statement piece.
And once you’re comfortable with the daisy keychain, it’s surprisingly easy to scale those same skills up. The exact same knots translate into bag charms, zipper pulls, or even small wall hangings with clusters of daisies in different sizes. A lot of crafters start right here with this tutorial and find themselves a few weeks later making wall art and plant hangers using the same foundational techniques. It really does snowball in the best way.
Tips for Success and Common Beginner Mistakes to Avoid
Every new craft has its learning curve, and macrame is no different. But knowing the most common trouble spots ahead of time means you can sidestep a lot of the frustration that usually comes with the first attempt. The most important thing to keep in mind going in: uneven or imperfect results aren’t failure — they’re just feedback. Every daisy you make will be a little better than the last.
The number one beginner mistake is inconsistent tension. When the force behind your knots varies, the finished piece ends up looking uneven and the petals can curl or droop in ways you didn’t intend. The fix is to always pull your knots in the same direction with the same amount of pressure — and to pin your work to a board as you go rather than holding it freehand. Working on a board keeps everything stable, frees up both your hands to manipulate the cords, and makes it much easier to keep things uniform from one knot to the next.
The other classic mistake is cutting cords too short. Running out of cord mid-knot is genuinely one of the most annoying things that can happen, so err on the side of generosity when you cut. A good rule of thumb is to cut at least three to four times the intended finished length of your design. If your petals will be about four centimeters long, cut your working cords to at least fifteen or twenty centimeters — you want enough tail to work comfortably without constantly straining to reach the end.
A few more things to keep in mind as you work through your first daisy:
- Work somewhere well-lit so you can see exactly what your knots are doing and catch anything off early.
- Keep a small spray bottle of water nearby — lightly misting cotton cord makes it softer and easier to tighten knots evenly.
- Rest your hands if they start to feel tense or fatigued, because tight hands make for tight, uneven knots.
- Take photos at each major step so you have something to reference if you lose your place mid-project.
- Don’t skip the practice round — five minutes tying sample knots on scrap cord before you start is always worth it.
And finally — the little irregularities in your hand-knotted daisy are not flaws. They’re what makes it yours. No machine can replicate the mark of someone who sat down, took the time to learn something new, and made it by hand. Your first one won’t be perfect, and that’s completely fine. The one after it will be better, and the one after that better still. That’s just how macrame works — and honestly, that steady, satisfying progress is a big part of why people fall in love with it.








What do you think?
It is nice to know your opinion. Leave a comment.