










Creative DIY Pallet Projects for Your Bathroom: Transform Reclaimed Wood into Stunning Décor
Wooden pallets have become one of the most versatile and beloved materials in the DIY community, and for good reason. These humble shipping platforms, once destined for landfills or industrial recycling, can be transformed into beautiful, functional pieces that bring warmth and character to any room in your home. The bathroom, often overlooked when it comes to creative interior projects, is actually one of the best spaces to experiment with pallet wood crafts. The contrast between rustic reclaimed timber and the clean, polished surfaces typical of bathrooms creates a striking aesthetic that feels both cozy and contemporary.
What makes pallet projects particularly appealing is their accessibility. Pallets are often available for free or at very low cost from hardware stores, garden centers, warehouses, and shipping companies. With a little patience and some basic woodworking tools, even beginners can create pieces that look professionally crafted. The imperfections in pallet wood — the knots, the grain variations, the weathered textures — are not flaws to be hidden but features to be celebrated. They give every project a one-of-a-kind character that no store-bought item can replicate.
This guide walks you through five inspiring and practical DIY pallet projects specifically designed for the bathroom. Whether you want to add storage, create ambiance, or simply give your space a rustic makeover, these ideas will help you make the most of reclaimed wood while keeping costs low and creativity high. From floating shelves to toilet paper holders, each project is achievable over a weekend with tools you likely already own.
Getting Started: Selecting and Preparing Pallet Wood
Before you pick up a hammer or a saw, the most important step in any pallet project is choosing the right wood. Not all pallets are created equal, and safety should be your primary concern — especially for items that will be used in a bathroom environment with exposure to moisture and humidity. Always look for pallets stamped with the letters “HT,” which stands for heat-treated. This means the wood was sanitized using high temperatures rather than chemicals, making it safe for indoor use. Avoid any pallet marked “MB,” as this indicates methyl bromide treatment, a pesticide you absolutely do not want in your home.
Once you have sourced safe, clean pallets, the preparation process begins. Start by inspecting each board carefully for nails, staples, splinters, and signs of mold or heavy staining. Use a pry bar and hammer to dismantle the pallet without splitting the boards — a flat bar gently worked between the planks and the stringer beam works best. Sand each board thoroughly, starting with a coarser grit like 80 and finishing with a finer grit around 120 to 150. This process smooths out rough surfaces and opens up the grain, preparing the wood to accept stain, paint, or sealant more evenly.
Because bathrooms are high-humidity environments, sealing your pallet wood properly is not optional — it is essential. After sanding, apply a wood conditioner if you plan to stain, which helps the color absorb more evenly. Follow with at least two coats of a water-resistant polyurethane or a dedicated wood sealant. For pieces that will be near water sources like the sink or shower, consider a marine-grade varnish for maximum protection. This extra step will dramatically extend the life of your creations and prevent warping, swelling, and mold growth over time.
Project One: Rustic Floating Bathroom Shelves
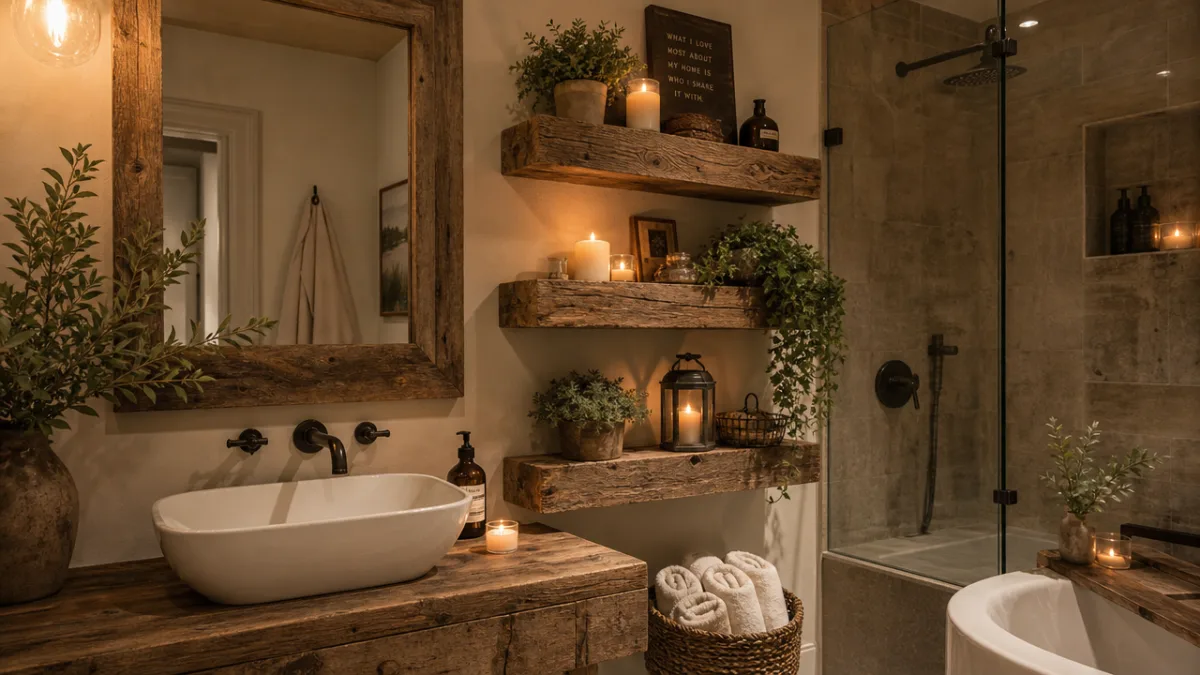
Floating shelves are perhaps the most practical and visually impactful project you can undertake for a bathroom. They provide much-needed storage for toiletries, candles, small plants, and decorative items, while adding an architectural element to otherwise bare walls. Pallet wood shelves have an especially appealing quality because the planks often come with a naturally distressed finish that pairs beautifully with subway tile, white walls, or matte black fixtures — some of the most popular design choices in modern bathrooms today.
To build a set of floating pallet shelves, you will need three or four well-sanded pallet planks cut to your desired shelf length, invisible shelf brackets or traditional L-brackets, wood screws, a level, a drill, and your choice of stain or paint. Begin by locating the wall studs using a stud finder, as you will need to anchor your brackets into solid framing to ensure the shelves can hold weight safely. Mark your bracket positions with a pencil and drill pilot holes before securing the brackets with screws. Once the brackets are firmly in place, slide or set your shelf planks onto them and secure with additional screws from underneath.
The styling possibilities for your finished shelves are nearly endless. Consider arranging a combination of practical and decorative items: rolled white towels, a small succulent or air plant, glass jars filled with cotton balls and bath salts, and a scented candle or two. This layered approach creates visual interest while keeping everyday essentials within easy reach. If you want to add a personal touch, use a wood-burning tool or stencil to inscribe a word like “Relax” or “Breathe” along the front edge of the shelf. The result is a custom piece that feels curated and intentional rather than simply functional.
Project Two: DIY Pallet Wood Bath Caddy
A bath caddy that rests across your bathtub is one of those luxury items that transforms an ordinary soak into a spa-like experience. Commercial versions in bamboo or teak can be surprisingly expensive, but a homemade pallet wood caddy can be built for next to nothing and customized to perfectly fit the width of your tub. This project is ideal for beginners because it requires only basic cuts and simple joinery — no advanced woodworking skills needed. The finished piece is both beautiful and deeply practical.
To build your caddy, measure the interior width of your bathtub and add approximately four inches to each side so the caddy rests securely on the tub edges. Cut two long pieces of pallet plank to this total measurement. These will form the main body of the caddy. Then cut three or four shorter cross-pieces to connect them, spacing them evenly to create a slatted surface. Drill pilot holes and use waterproof wood glue along with stainless steel screws to join everything together. Stainless steel is important here because regular screws will rust quickly in a wet bathroom environment.
The real joy of building your own caddy is adding personalized features. Consider drilling a hole in the center of one of the main planks to hold a wine glass upside down — a favorite feature for those who enjoy a relaxing bath with a drink. You can also cut a rectangular slot to cradle a book or tablet, or attach small metal hooks to the underside for hanging a loofah or washcloth. After assembly, apply at least three coats of marine-grade varnish, letting each coat dry fully before applying the next. The result will be a waterproof, durable, and uniquely personal bath accessory.
Project Three: Pallet Wood Toilet Paper Holder and Storage Unit
The toilet paper holder is one of the most mundane fixtures in any bathroom, but it presents a surprisingly delightful opportunity for DIY creativity. A custom pallet wood toilet paper holder can be built in an afternoon and instantly upgrades the look of your powder room or main bathroom. Beyond its basic function, you can expand the concept into a small freestanding storage unit that holds multiple rolls, a small basket, or even a stack of magazines — turning a utilitarian corner into a stylish vignette.
The simplest version involves cutting a small rectangle of pallet plank to serve as a backplate, then mounting a short dowel rod horizontally through two wooden pieces attached at either end of the backplate. The dowel acts as the spindle for the toilet paper roll. Sand everything smooth, stain or paint to your preference, and mount to the wall with sturdy screws. The whole project can be completed in two to three hours and costs almost nothing if you have spare dowel rod in your workshop. The result looks far more bespoke than anything you would find at a big-box home improvement store.
If you want to go further, build a small freestanding unit using a larger piece of pallet as the back panel, then attach two or three short horizontal shelves. The bottom shelf can hold a small woven basket for extra toilet paper rolls or hand towels. The middle shelf might display a candle or small succulent, while the top shelf holds a framed quote or decorative tile. This kind of multi-functional piece makes the most of vertical space in a typically cramped bathroom area and demonstrates how thinking creatively about everyday items can produce genuinely lovely home furnishings.
Project Four: Reclaimed Wood Mirror Frame
A mirror is almost always the focal point of a bathroom, and framing one with pallet wood is one of the most transformative projects you can undertake. Whether you start with a frameless mirror you already own or purchase an inexpensive basic mirror from a discount store, adding a custom pallet wood frame elevates the entire piece into something that looks like it belongs in a high-end boutique hotel. The combination of weathered or intentionally aged wood with a reflective mirror surface is visually stunning and works across a wide range of interior styles, from farmhouse to industrial to Scandinavian minimalist.
Begin by measuring your mirror carefully and cutting pallet planks to create a frame with mitered corners or simple butt joints — mitered corners look more polished but require a miter saw, while butt joints are simpler and can look equally good with the right finish. Cut the planks so that the frame overlaps the mirror edge by at least three quarters of an inch on all sides to create a solid border. Sand your pieces thoroughly and apply your chosen finish before assembly. Use construction adhesive and small finishing nails to join the frame corners, then attach mirror mounting clips to the back to secure the mirror within the frame.
The finishing details are where you can really let your personal style shine. Consider these options for customizing your mirror frame:
- Whitewash the wood for a coastal, beachy feel by diluting white paint with water and brushing it on, then wiping back immediately with a cloth.
- Apply a dark walnut stain followed by a light sanding for an aged, antique appearance that pairs beautifully with brass hardware.
- Leave the wood in its natural, lightly sanded state and seal with a clear matte varnish for a truly organic, raw look.
- Add small decorative elements like metal corner brackets or short lengths of rope to the frame for an added artisan touch.
- Paint the wood in a bold matte color — deep navy, forest green, or charcoal — for a modern statement piece that anchors the whole room.
Once hung, your custom mirror frame will draw the eye and set the tone for the entire bathroom. Because the mirror is typically centered above the vanity and viewed constantly during daily routines, this project delivers exceptional visual impact relative to the time and cost invested. It is also a wonderful entry point for anyone new to woodworking, as the techniques involved are straightforward and the results are immediately gratifying.
Project Five: Pallet Wood Vanity and Sink Surround
For those ready to take on a more ambitious project, building a pallet wood vanity surround or vanity cabinet is an extraordinary way to completely transform your bathroom. This is admittedly a more complex undertaking than the previous projects, requiring more careful planning, more materials, and potentially some basic plumbing knowledge if you are working around an existing sink. However, the results are absolutely spectacular — a custom pallet wood vanity can become the single most distinctive and talked-about feature in your entire home.
The most approachable version of this project involves building a decorative surround or skirt around an existing pedestal sink or freestanding vanity unit. By constructing a simple box frame from pallet planks and attaching it around the base of the sink, you can conceal plumbing pipes while adding storage space and visual warmth. The front panel can be designed with horizontal or vertical slats, or even a herringbone pattern if you are feeling adventurous. A small hinged door cut into the panel allows easy access to the pipes underneath while keeping the storage area neatly enclosed.
If you want to go all the way and build a full vanity cabinet, the process involves constructing a sturdy carcass from thicker pallet lumber, then adding a countertop (which could also be made from a thick slab of pallet wood sanded and sealed to a smooth finish), and finally installing a vessel sink on top. Vessel sinks — those that sit above the counter surface rather than being set into it — pair particularly well with rustic wood surrounds because they have a sculptural quality that complements the organic nature of the wood. Pair your finished vanity with vintage-style faucets in brushed bronze or matte black for a cohesive aesthetic.
Here is a basic materials checklist for a pallet wood vanity surround project:
- Eight to twelve clean, heat-treated pallet planks of similar thickness
- Pocket hole jig and pocket screws for strong, hidden joinery
- Circular saw or miter saw for accurate cuts
- Wood glue rated for interior use
- Sandpaper in multiple grits (60, 80, 120, 220)
- Marine-grade varnish or polyurethane for waterproofing
- Piano hinge and magnetic cabinet catch for any door panels
- Stud finder and appropriate wall anchors for secure mounting
Completing a vanity project takes commitment, but the payoff is immense. Not only do you end up with a completely unique piece of bathroom furniture that reflects your personal taste and craftsmanship, but you also develop skills and confidence that open the door to even more ambitious future projects. Many people who complete their first major pallet build find themselves completely hooked on the process — the combination of creativity, problem-solving, physical work, and the deeply satisfying moment when a pile of reclaimed lumber becomes something beautiful and functional is genuinely addictive.
Tips, Tools, and Final Thoughts on Bathroom Pallet Projects
Before you begin any of the projects described above, it is worth taking a moment to assemble the right set of basic tools. You do not need a fully equipped workshop to succeed with pallet DIY, but a few key items will make every project significantly easier and safer. A good orbital sander will save hours of hand-sanding and produce a more consistent finish. A circular saw or jigsaw allows you to make accurate cuts without needing a stationary table saw. A drill with a variety of bits is indispensable for creating pilot holes and driving screws. And a measuring tape, combination square, and pencil are the unsung heroes of accurate, professional-looking results.
Safety deserves special emphasis when working with reclaimed wood. Always wear safety glasses when cutting or sanding, as splinters and sawdust can cause serious eye injury. Use a dust mask rated for fine particles — pallet wood often harbors old paint or surface treatments that you do not want to inhale. Wear gloves when handling rough pallet boards to protect your hands from splinters and any residual contaminants on the wood surface. Work in a well-ventilated area, especially when applying stains, paints, or sealants, as these products release fumes that can be harmful in enclosed spaces.
One of the most encouraging aspects of working with pallet wood is that mistakes are rarely catastrophic. Because the material is so inexpensive and accessible, there is very little pressure to be perfect on the first attempt. If a cut goes wrong or a board splits, you simply reach for another plank. This forgiving nature makes pallet projects ideal for beginners who want to develop skills without the anxiety of potentially ruining expensive materials. Each imperfect project teaches you something valuable, and your craftsmanship will improve naturally and rapidly with practice.
The environmental dimension of pallet DIY is also worth celebrating. By repurposing discarded industrial materials, you are diverting wood from waste streams and reducing the demand for newly harvested timber. In a small but meaningful way, every pallet project is an act of environmental stewardship. This adds a layer of satisfaction to the creative process — knowing that the beautiful shelf or mirror frame you built not only enhances your home but also reflects a thoughtful relationship with resources and sustainability. In a world where conscious consumption is increasingly important, making something from nothing is a genuinely radical and rewarding act.
Whether you start with a simple floating shelf or dive straight into a full vanity build, the journey of transforming rough pallet wood into polished bathroom pieces is deeply rewarding. The bathroom, so often treated as purely functional, has enormous potential as a space for beauty, calm, and personal expression. With reclaimed wood as your medium and your own creativity as your guide, you can create a bathroom that feels like a true retreat — warm, unique, and entirely your own.








What do you think?
It is nice to know your opinion. Leave a comment.