










20 Craft Room Organization Ideas for Creative Spaces
Why Craft Room Organization Transforms Your Creative Life
A well-organized craft room is about so much more than looks — it’s actually the foundation that good creative work is built on. When your supplies are easy to find, your workspace is clear, and every tool has its own spot, your brain gets to focus on the actual creating instead of battling the mess around you. A lot of crafters will tell you that disorganization is one of the biggest reasons they don’t sit down and make things more often, because just navigating a cluttered space eats up creative energy before a single project even gets started.
Think about the last time you sat down to work on something and spent the first twenty minutes hunting for a specific pair of scissors, a particular shade of ribbon, or that one stamp set you were absolutely sure you had. That lost time and growing frustration is a real creativity killer. Good organization wipes out those moments entirely and replaces them with a smooth, easy workflow that lets you go from inspiration to actually making something with as little friction as possible. The right system pays off every single time you sit down to create.
And beyond just being practical, a thoughtfully organized craft space changes how you feel about your hobby or your work. A room that feels intentional and personal becomes a real sanctuary — somewhere you actually want to be. When your supplies are nicely arranged and your tools are right where you need them, just walking into your craft room becomes its own little pleasure. Good organization turns a functional space into an inspiring one, and that difference matters a lot when it comes to staying motivated and creative over the long haul.
Storage Solutions That Maximize Every Square Foot
One of the first things crafters run into is figuring out how to make the most of whatever space they’ve got — whether that’s a whole dedicated room, a bedroom corner, or a converted closet. Vertical storage is probably the single most powerful tool you have for making a small footprint work. Floor-to-ceiling shelving lets you use wall space that would otherwise just sit there doing nothing. Open shelving is especially great in craft rooms because it keeps everything visible and within reach, turning your collection of fabrics, papers, and materials into a colorful, inspiring display rather than a pile of stuff you can’t find anything in.
Pegboards are another storage solution that crafters swear by, and once you try one you’ll understand why. A big pegboard on the wall gives you an endlessly customizable system for hanging tools, scissors, rulers, spools of thread, and little baskets of supplies. You can rearrange it whenever your needs change, and everything is visible at a glance. With the right hooks, bins, and small shelves made for pegboard systems, a single large panel can hold a surprising amount of stuff in a pretty small wall footprint — and your main work surface stays completely clear.
Rolling carts and mobile storage are worth a special mention for how flexible they are. A rolling cart loaded up with your most-used supplies can follow you wherever you’re working in the room — the cutting table, the sewing machine station, the crafting desk. When you’re done, it tucks neatly under a counter or into a corner. The multi-tiered rolling carts you’ll find at home organization stores pack a lot of storage into a compact, mobile package, and they’re honestly one of the most budget-friendly organizational investments out there for crafters at any level.

Categorizing and Labeling Your Craft Supplies
No matter how gorgeous your storage system looks, it’ll only actually work if your supplies are organized logically and clearly labeled. The most effective approach is to group things by both type and how often you use them. The supplies you reach for every single session — your main tools, adhesives, and go-to papers — should have prime spots at eye level and within arm’s reach of your main work surface. Seasonal stuff, specialty materials, and things you only pull out occasionally can live on higher shelves, in deeper drawers, or in labeled boxes tucked away in a closet.
Labeling is the step that separates a space that stays organized from one that slowly falls apart again. Clear, consistent labels mean you — and anyone else who might use the space — can find things and put them back without any guessing. Label makers give you tidy, durable labels that stick well to bins, baskets, and shelf edges. If you want something with more personality, handwritten labels on kraft paper tags tied with twine are charming and work just as well. The key is consistency: pick a labeling approach and use it everywhere, so every single container in the room tells you what’s inside at a glance.
As your collection grows, think about breaking your categories down even further into subcategories. Instead of one big bin labeled “paper,” you might have separate containers for cardstock, patterned paper, vellum, and kraft paper. Instead of one drawer of “tools,” you might split them into cutting tools, measuring tools, adhesive tools, and embossing tools. This might feel like overkill at first, but experienced crafters will tell you that finer categories make a huge difference in how quickly you find what you’re looking for — and make tidying up after a project session so much more intuitive.
Recommended Labeling Tools and Systems
- Electronic label makers with multiple font and size options for professional, durable results on bins and shelves
- Chalkboard labels that let you update categories as your collection and organizational needs change over time
- Clear adhesive pockets mounted on the front of opaque bins, so you can slip in an index card or photo showing the contents without having to open everything up
- Color-coded dot stickers to create a quick visual system for different supply categories or project types across multiple storage areas
- Printed photo labels showing a picture of the contents, which is especially handy for supplies with similar packaging or names that don’t really tell you what’s inside
Organizing by Project Type and Creative Discipline
If you work across multiple creative disciplines — maybe you sew, scrapbook, paint, and make jewelry — one of the best organizational strategies you can try is creating dedicated zones in your craft room for each one. Instead of mixing all your supplies together and sorting purely by type, group everything related to one kind of project in the same area. Your sewing zone might have your fabric storage, machine, thread, notions, and patterns all within a few feet of each other. Your painting area might have all your brushes, paints, mediums, and canvases together. This zone-based setup makes setting up and cleaning up after a project dramatically faster.
Within each zone, you can layer in a second level of organization based on the specific project or technique. If you scrapbook, you might organize your paper and embellishments by color family, theme, or collection. If you knit or crochet, your yarn might be sorted by weight, fiber type, or color. The right secondary system is really personal and depends on how your brain naturally looks for things. Pay attention to how you actually hunt for supplies when you’re in the middle of a project — whatever category you reach for first is the one that should drive your primary organization structure.
For crafters with long-term or ongoing projects, dedicated project boxes can be a total game-changer. Instead of leaving an in-progress project spread across your work surface for days, a designated project box lets you gather all the materials, notes, and partially finished pieces for one project and keep them together in a labeled container. When you sit down to work on it, everything you need is right there. When something else comes up, the whole project tidies away in seconds without losing your place or misplacing anything.
Zone-Based Craft Room Layout Ideas
- Establish a primary work surface at the center of your layout, with your most-used zone immediately surrounding it so you’re not constantly getting up during active crafting sessions.
- Place the cutting station next to both the fabric storage and the main work surface to cut down on back-and-forth when you’re transitioning between measuring, cutting, and assembling.
- Create a dedicated “inspiration zone” with a bulletin board, magazine storage, and mood board materials where you can brainstorm and plan without cluttering the space where you actually make things.
- Designate a finishing and packaging area stocked with gift wrap, tissue paper, bags, and tagging supplies — especially important if you sell or regularly give away your work.
- Include a small cleanup station with a trash bin, wet wipes, a brush-cleaning area for painters, and whatever other tidying supplies your crafts call for, so end-of-session cleanup happens almost automatically.
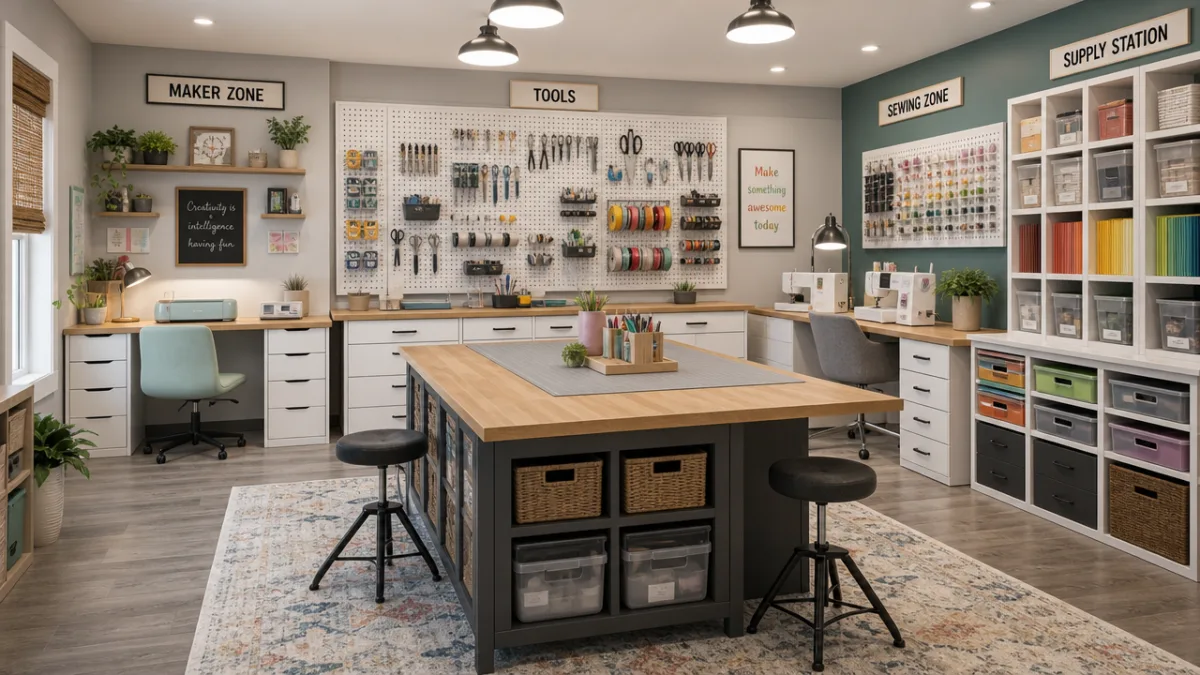
Furniture and Workspace Layout Essentials
The furniture you choose for your craft room has a huge impact on both how well it functions and how it feels to be in. A large work surface is almost universally the most important piece of furniture in any craft room. Whether you go with a purpose-built craft table, a repurposed farmhouse dining table, or two matching desks pushed together, prioritizing surface area gives you room to spread out, cut fabric, lay out designs, and work on multiple parts of a project at once without constantly shuffling things around. If you have the space, an L-shaped or U-shaped desk configuration is a great way to maximize usable area while keeping everything within arm’s reach.
Seating tends to be an afterthought in craft room planning, but it really deserves some attention — especially if you spend long stretches of time at your workspace. An adjustable office chair with good lumbar support is invaluable for any seated work at a desk or sewing machine. At a cutting table, you’ll probably prefer to stand, which means a counter-height table around 36 inches is much more comfortable for extended use than a standard dining table. Some crafters set up a mix of seating heights throughout the room to suit different tasks, using a stool at the cutting counter and a proper chair at the detail work desk.
Lighting is one of those things that’s easy to overlook during planning but makes an enormous difference for craft work. Natural light is always best — position your main work surfaces near windows and use light, reflective colors on walls and furniture to help that light bounce around the space. For artificial lighting, overhead ambient light should be supplemented with task lighting aimed directly at your work surface to eliminate shadows. Daylight-spectrum LED bulbs are particularly important if you work with color, since standard warm-toned bulbs can throw off your color matching in ways you might not notice until you’re in natural light. Under-cabinet LED strips are an inexpensive and effective way to add targeted task lighting just about anywhere in the room.
Budget-Friendly Organization Hacks and DIY Solutions
A beautifully organized craft room doesn’t have to cost a lot. Some of the most effective and visually appealing organizational solutions cost almost nothing or can be made from things you probably already have at home. Repurposing household items is a cornerstone of budget craft room organization: glass jars become pencil holders and brush storage, shoeboxes covered in decorative paper become pull-out drawers, and tension rods inside cabinet doors create handy ribbon storage or dividers for cutting tools. The thrift store, dollar store, and even your own recycling bin are surprisingly great sources of organizational raw materials.
IKEA’s product lines have become practically synonymous with craft room organization in the crafting world, and for good reason. Their modular shelving systems, drawer units, and storage boxes let you build highly customized setups at prices that won’t make you wince. The KALLAX shelving unit in particular has been embraced by crafters everywhere as an ideal storage backbone, with its square cubbies fitting a wide range of insert bins, boxes, and baskets perfectly. Trolleys, magazine files, and clip-on accessories from the same range let you put together a sophisticated, cohesive storage system without shelling out for specialty craft storage products.
DIY solutions can also add a really personal, creative dimension to your craft room. Building your own pegboard frame, sewing custom storage pouches, painting and repurposing old furniture, or making your own labeled canisters and bins lets you tailor the look of your space to your own style in a way that off-the-shelf products rarely manage. There’s something genuinely satisfying about using your creative skills to build the space where those skills live — a craft room put together with handmade and personalized touches feels uniquely yours in a way a room full of identical store-bought containers never quite does, and that sense of ownership deepens your connection to the space and everything you make in it.

Maintaining Your Organized Craft Space Over Time
The hardest part of craft room organization isn’t getting it set up — it’s keeping it that way. Crafters are, by nature, people who acquire new supplies, try new techniques, and collect materials for future projects. Without a real maintenance strategy, even the most beautifully organized room will slowly drift back toward chaos. Building small habits into your creative routine is the best defense against this. The single most impactful one is a quick end-of-session tidy: before you leave the craft room, put every tool and supply back where it belongs. That five or ten minutes of tidying keeps the room in working order almost indefinitely.
Regular decluttering sessions are just as important for keeping things organized in the long run. Try scheduling a dedicated declutter every three to six months to go through your supplies, let go of things you no longer use, and check whether your current system still fits how you actually work. Creative practices change over time — a system that was perfect two years ago might not suit your workflow today. Staying flexible and being willing to adjust your setup as your needs evolve is what makes the difference between a craft room that works for you and one that quietly works against you.
Finally, getting into a “one in, one out” mindset around craft supplies can really slow down the accumulation that leads to disorganization in the first place. When you buy a new set of markers, check whether any old ones have dried up and can be tossed. When a new paper collection joins your stash, flip through the older pads and pull anything that no longer excites you to donate or repurpose. This kind of conscious relationship with your supplies keeps everything at a manageable volume, ensures that what’s in your craft room is stuff you actually want and will use, and protects the clarity and function of your system for the long term. A thoughtful, well-maintained craft room is honestly one of the best things you can do for your creative self.








What do you think?
It is nice to know your opinion. Leave a comment.