










Simple DIY Drip Irrigation System for Your Garden: A Complete Guide
Why Drip Irrigation Is a Game-Changer for Home Gardeners
If you’ve ever found yourself hauling hoses around the yard on a hot summer morning — or stared at a surprisingly high water bill while your plants still looked droopy — a drip irrigation system might be exactly what your garden’s been missing. Instead of spraying water everywhere like overhead sprinklers do, drip irrigation delivers moisture slowly and right to the root zone of each plant. That means way less evaporation, barely any runoff, and water that actually goes where it’s needed instead of soaking down your pathways or feeding every weed in sight.
What’s great about going the DIY route is that it’s not just about saving water — though that’s a real perk. When you build the system yourself, you actually start to understand how water moves through your specific garden: which plants are thirstier, which spots dry out fastest, and how to tweak things as your garden changes from one season to the next. Most store-bought kits are designed to work for everyone, which usually means they work perfectly for no one. A system you put together yourself can be dialed in exactly for your raised beds, your containers, your sprawling tomato rows — without spending a fortune.
The USDA has found that drip irrigation can cut water usage by 30 to 50 percent compared to traditional overhead watering. If you’re dealing with water restrictions, sandy soil that drains in minutes, or clay that turns into a puddle, those savings mean healthier plants and a much lighter impact on local water resources. And honestly, getting started is a lot less intimidating than it sounds — you need basic tools, a free weekend afternoon, and a willingness to figure things out as you go.
There’s also a plant health side to this that often gets overlooked. Drip irrigation keeps foliage dry, which is a big deal for preventing fungal diseases like powdery mildew and blight. Those problems thrive when leaves stay wet for long stretches — something overhead watering practically guarantees. Tomatoes, squash, roses, and plenty of other garden staples do so much better when their leaves stay dry while their roots get consistent, steady moisture delivered exactly where it counts.
Tools and Materials You Will Need Before You Begin
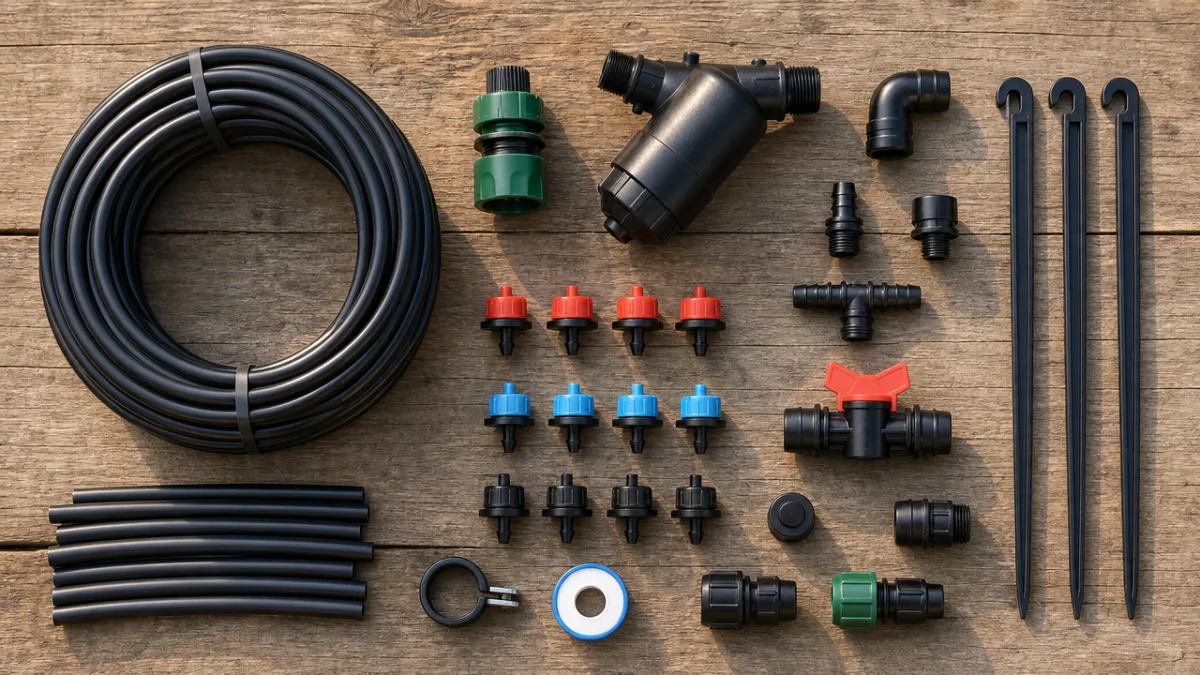
Here’s some good news: the materials list for a basic drip system is short, pretty affordable, and you can find almost everything at your local hardware store or garden center. The core of the whole setup is a length of half-inch polyethylene mainline tubing — think of it as the main highway carrying water from your spigot through the garden. From there, you branch off with quarter-inch emitter tubing that winds its way to individual plants. Grabbing everything before you start means fewer store runs and helps you actually picture how the system will come together before you cut anything.
Here is a basic list of what you will typically need for a small to medium home garden setup:
- Half-inch polyethylene mainline tubing (measure your garden length and add 20 percent extra)
- Quarter-inch micro-tubing for branching to individual plants
- Drip emitters in various flow rates (typically 0.5, 1, and 2 gallons per hour)
- A hole punch tool designed for polyethylene tubing
- Barbed connectors, tees, elbows, and end caps
- A backflow preventer to protect your home water supply
- A pressure regulator set to around 25 to 30 PSI
- A filter screen to prevent debris from clogging emitters
- Hose-end timer or automatic controller (optional but highly recommended)
- Stakes or clips to secure tubing along the ground
When you’re shopping for emitters, flow rate matters more than you might think. A tomato plant at peak summer heat might need a 2-gallon-per-hour emitter, while rosemary or thyme — tough, drought-tolerant herbs — can get by on half a gallon per hour. Getting a variety pack early on gives you the flexibility to adjust as you see how different plants respond. Seasoned gardeners usually keep a little stash of spare emitters, plugs, and connectors on hand throughout the season so they can make quick tweaks without throwing off the whole watering schedule.
One component beginners often skip is the pressure regulator, usually because they figure their home water pressure is probably fine. It isn’t. Most household water pressure runs between 40 and 80 PSI — way too high for the fittings and emitters in a drip system. Without a regulator, you’re looking at blown connectors, leaks at every joint, and a system that falls apart way sooner than it should. A quality pressure regulator costs just a few extra dollars and makes the difference between a system that works right from day one and one that’s constantly giving you headaches.
Step-by-Step Guide to Installing Your Drip System
Before you cut a single piece of tubing, grab a piece of paper and sketch out your garden. Mark where your outdoor spigot is, draw the path your mainline will follow, and note where each plant or planting zone sits. It sounds almost too simple, but this step saves a lot of frustration — there’s nothing quite like being on your knees in the garden realizing a section of tubing is three feet too short. Your sketch doesn’t need to be pretty or to scale. It just needs to help you think the layout through before you start making permanent cuts.
Once you’ve got a plan, start by attaching the backflow preventer directly to your outdoor spigot, then add the filter, then the pressure regulator. These three pieces make up the head assembly — they protect both your home plumbing and your drip system from damage, so don’t skip them. From there, connect your mainline tubing to the pressure regulator output and run it along the main path through your garden, staking it down every few feet so it sits flat. Keep the mainline out of high-traffic areas where it’s likely to get kicked, and try to run it along garden bed edges where it’s easy to access and looks reasonably tidy.
With the mainline down, use the hole punch to make an opening wherever you want to branch off to a plant. Push a barbed connector firmly into each hole — you’ll feel and hear a little snap when it seats right. Then attach your quarter-inch micro-tubing to each connector, run it toward the base of the plant, and stake it down as you go. At the end of each micro-tube, press in the right emitter for that plant’s needs. Cap the far end of your mainline with an end cap or figure-eight closer, turn the water on slowly, and then walk the whole system looking for leaks, misaligned emitters, or spots that aren’t getting water.
After that first test run, let the system go through a full cycle and then check back at each plant to make sure the soil at the root zone is actually getting moist. During a first installation, it’s pretty common to find an emitter pointed slightly off target, or a connector that wasn’t seated fully and is leaking at the joint instead of delivering water to the plant. Catching and fixing those small issues in the first week sets you up for smooth, reliable watering all season long — without having to babysit the system constantly.
Customizing Your System for Raised Beds, Containers, and In-Ground Gardens
One of the best things about a DIY drip system is how well it adapts to completely different growing setups. Raised beds, for example, tend to drain faster than in-ground soil because the growing medium is usually lighter and looser — so they often do better with slightly higher emitter flow rates or longer run times to make sure moisture actually reaches the bottom of the bed. A popular approach is to run a loop of soaker hose or drip line around the perimeter of the bed with an extra line down the center, which spreads moisture more evenly across the whole surface rather than creating isolated wet patches around individual emitters.
Containers are their own challenge because they can dry out shockingly fast in warm weather — sometimes needing water twice a day during a heat wave. For pots, a single quarter-inch stake emitter pushed into the soil near the root zone usually does the trick. Adjustable emitters are especially handy here since you can dial the flow up or down as the weather shifts without swapping out hardware. It also helps to group containers with similar water needs together on one shared emitter line — fewer connections to manage and a much simpler setup overall.
In-ground gardens with a mix of trees, shrubs, perennials, and annuals need a bit more planning because a young vegetable seedling and a mature fruit tree have wildly different water requirements that can’t both be met on the same line running on the same schedule. The answer is hydrozones — grouping plants with similar water needs together and running separate mainlines or using a multi-zone timer to control each area independently. It’s the same principle professional landscape irrigators use, and it translates surprisingly well to backyard gardens once you start thinking about your plants by water need rather than just physical location.
If your garden sits on a slope, things get a little more interesting. Water pressure and emitter performance can vary quite a bit between the top and bottom of a grade, with lower areas typically receiving more water just due to gravity. Pressure-compensating emitters solve this neatly — they maintain a consistent flow rate regardless of pressure changes along the line. They cost a bit more than standard emitters, but they take the guesswork out of trying to compensate for elevation differences by mixing different flow rates along the same line.

Setting Up a Timer for Fully Automated Watering
Adding a timer is what really takes your drip system to the next level. Instead of a convenient way to water manually, it becomes a system that runs on its own while you’re at work, on vacation, or just wrapped up in other things. Basic hose-end timers that screw right onto your outdoor spigot run anywhere from fifteen to thirty dollars, and they let you set specific start times and durations for each day of the week. No special wiring, no professional installation, no ongoing fees — just program it and let it go.
When you’re setting up your schedule, start on the shorter side and see how your plants and soil respond over the first week before you extend the run time. A really common beginner mistake is plugging in a recommended schedule without factoring in your local climate, soil type, how densely you’ve planted, or what time of year it is. In a hot, dry area with sandy soil, daily watering might be necessary. In a cooler climate with clay-heavy ground, every two to three days might be plenty to avoid waterlogged roots. The timer is a tool, not a hands-off solution — checking soil moisture regularly at the start of the season helps you find the rhythm that actually works for your garden.
If you want to get more sophisticated, smart irrigation controllers that connect to your home WiFi are becoming genuinely affordable and are worth considering for larger or more complex setups. They can automatically skip a cycle after rain, scale back run times during a cool stretch, and even send a notification to your phone if a pressure drop hints at a leak somewhere in the system. The upfront cost is higher than a basic mechanical timer, but the water savings and convenience tend to pay off over time — especially if you’re managing multiple irrigation zones.
Maintaining Your Drip System Through the Growing Season and Beyond
A drip system isn’t something you install once and never think about again. Like any garden tool, it needs some regular attention to catch small problems before they turn into bigger ones. At the start of each watering season, flush your mainline before connecting any emitters — just run water through the open end for a minute to clear out sediment, insect nests, or anything else that found its way in over winter. It takes almost no time and goes a long way toward preventing the frustrating clogs that can quietly starve plants of water before you even notice anything is wrong.
Throughout the growing season, walk your drip lines at least once every two weeks and look for these common maintenance issues:
- Clogged emitters that are delivering little or no water — often fixable by soaking the emitter in white vinegar for an hour to dissolve mineral deposits
- Disconnected fittings or pulled-out emitters caused by foot traffic, gardening tools, or animal activity
- Kinked tubing that restricts water flow to an entire section of the system
- Emitters that have shifted away from plant root zones as plants grew or soil settled
- New weed growth taking advantage of consistently moist soil near emitter outlets
When the growing season wraps up, proper winterization is a must if you live somewhere that freezes. Water sitting in polyethylene tubing can freeze, expand, and crack fittings or split the tubing — meaning a system that worked perfectly all season greets you with leaks come spring. Pull the emitters and bring them inside, drain or blow out all the tubing, and disconnect from the spigot to protect your home plumbing. Store the flexible tubing loosely coiled in a garage or shed so it doesn’t kink and stays easy to work with when you’re ready to set it up again next year.
Season by season, you’ll get a better feel for your garden’s water needs and find yourself making more confident, precise adjustments to emitter placement, flow rates, and timing. What starts as a weekend project has a way of turning into one of the more satisfying parts of gardening — knowing your plants are getting exactly the right amount of water in exactly the right place, that your water bill reflects a system actually doing its job, and that your garden is thriving because of something you built yourself with simple materials and a clear plan. It’s hard to think of a garden investment that pays off as consistently as a well-built drip irrigation system.








What do you think?
It is nice to know your opinion. Leave a comment.