










12 Crochet Bow Patterns: Adorable & Easy Projects for Every Skill Level
Introduction to Crochet Bows: A Timeless Handmade Accent
Crochet bows have taken the crafting world by storm, and it is easy to see why. These delightful little creations add a charming, handmade touch to everything from hair accessories and clothing embellishments to home décor and gift wrapping. Whether you are a seasoned crocheter with years of experience or someone who has just picked up their first hook, crochet bows are one of those wonderfully versatile projects that reward makers of every skill level with satisfying, beautiful results in a relatively short amount of time.
What makes crochet bows so appealing is their incredible adaptability. A single basic bow pattern can be transformed into something completely different simply by changing your yarn weight, hook size, or color palette. A chunky bow worked in bulky yarn becomes a bold statement piece perfect for a winter hat or a wreath decoration, while a delicate bow crocheted in fine cotton thread turns into a sophisticated embellishment for a baby headband or a lace collar. The possibilities are truly endless, and that flexibility is what keeps crocheters coming back to bow patterns again and again.
Beyond their visual appeal, crochet bows also make fantastic stash-busting projects. Most bow patterns require only a small amount of yarn, making them ideal for using up leftover skeins from larger projects. They work up quickly, often in under an hour, which means you can produce a whole collection of coordinating bows in an afternoon. They also make wonderful handmade gifts, adding a personal and thoughtful touch to presents, handmade garments, and accessories. In this guide, we will walk you through twelve beautiful crochet bow patterns and everything you need to know to make them successfully.
Essential Supplies and Tools for Crocheting Bows
Before diving into your first crochet bow, it helps to gather the right supplies so your crafting session goes smoothly from start to finish. The good news is that crochet bows require very minimal equipment compared to larger projects. At the most basic level, you need a crochet hook in an appropriate size for your chosen yarn, yarn in your preferred fiber and weight, a yarn needle for weaving in ends, and a pair of scissors. These four items are genuinely all you need to create most of the bow patterns described in this article, making them incredibly accessible projects for beginners on a budget.
When it comes to yarn selection, the fiber and weight you choose will dramatically affect the final look and feel of your bow. Cotton yarn is a popular choice for bows because it holds its shape well after blocking, produces crisp stitch definition, and comes in a wonderful array of vibrant colors. Acrylic yarn is another excellent option, particularly for beginners, as it is affordable, widely available, machine washable, and forgiving when it comes to tension inconsistencies. For a more luxurious finish, consider wool or wool blends, which have a lovely drape and can be blocked into precise shapes for a polished professional look.
Hook size is another important consideration that newer crocheters sometimes overlook. Always check your yarn label for the recommended hook size, but keep in mind that bow patterns often benefit from going down one hook size from the recommendation. Working with a slightly smaller hook creates a tighter fabric with less stretch, which helps your bow hold its shape and structure beautifully over time. For most worsted-weight yarns, a 4.0mm or 4.5mm hook works wonderfully. For lighter-weight yarns such as sport or DK, a 3.5mm hook is typically a good starting point. Experiment with swatching before committing to a full project.
- Crochet hooks: A range of sizes from 2.5mm for fine thread work up to 6mm for chunky statement bows will cover most patterns you encounter.
- Yarn needle: A blunt-tipped tapestry needle is essential for weaving in ends neatly and for the wrapping technique used to finish most bow centers.
- Stitch markers: Helpful for keeping track of rounds and sections, especially in more complex multi-loop bow designs.
- Scissors: A small, sharp pair dedicated to your craft supplies will make clean cuts every time.
- Blocking tools: Foam mats, T-pins, and a spray bottle filled with water allow you to shape and set your finished bows for a professional result.

Classic Single-Loop Bow Patterns for Beginners
The classic single-loop bow is the perfect starting point for anyone new to crocheting bows. This foundational pattern produces a symmetrical, traditional bow shape that resembles the kind of bow you might tie from ribbon, making it immediately recognizable and endlessly useful. The basic construction involves crocheting two rectangular panels, joining them in the center, and wrapping a small band around the middle to cinch everything into that iconic bow silhouette. Most beginners are delighted to discover that they can complete their first single-loop bow in well under an hour, even accounting for weaving in ends.
One of the most popular variations of the single-loop bow is the classic granny-stitch bow, which incorporates the beloved granny square construction into a bow format. Rather than working in simple rows of single crochet, this version uses clusters of double crochet stitches separated by chain spaces to create an open, lacy texture that gives the bow a vintage, cottage-core aesthetic. This style of bow looks particularly beautiful in variegated yarn, where the color changes highlight the textured stitch pattern in an eye-catching way. Attach one to a market bag, a hat brim, or even a potted plant for an instant dose of handmade charm.
Another beginner-friendly single-loop option is the puffy bow pattern, which uses half double crochet stitches worked into the back loop only throughout the entire piece. This technique creates a subtly ribbed texture and gives the finished bow a slight three-dimensional puffiness that makes it look more substantial and sculpted than a flat bow. The puffy bow is especially popular for baby hair accessories because the soft texture is gentle against delicate skin. It also photographs beautifully, with the ridged texture catching light in a way that adds visual interest even in simple, solid-color versions of the pattern.
Double-Loop and Layered Bow Patterns for Intermediate Crocheters
Once you have mastered the single-loop bow, the natural next step is to explore double-loop and layered bow patterns that add dimension, visual complexity, and a more dramatic, couture-inspired appearance. Double-loop bows feature two sets of loops stacked on top of one another, with the smaller set sitting in front of the larger set to create a sense of depth and fullness. This style is particularly popular in the children’s accessories market, where oversized, statement-making bows on headbands and hair clips have become a beloved fashion staple. Working a double-loop bow requires only marginally more time and skill than a single-loop version, making it a very achievable next project.
Layered bow patterns take the concept further by incorporating three or even four layers of loops in graduating sizes, creating a bow that looks almost like a fabric flower or a dahlia in its complexity. These patterns typically instruct you to make each layer separately and then assemble them by stacking and securing them together before adding the center wrap. While this assembly step adds a little time to the process, it also gives you tremendous creative flexibility. You can mix colors between layers, alternate textures by using different stitch patterns for each layer, or even combine different fiber types for a mixed-media look that is genuinely unique.
A particularly stunning example of the layered approach is the star bow pattern, which is created by working five or six elongated single-crochet panels radiating outward from a central chain ring. When cinched in the center, these panels fold naturally into a multi-pointed bow shape that has an almost architectural quality. Star bows look striking worked in metallic or sparkle yarn for holiday decorations, or in soft pastels for spring and Easter-themed projects. They also make beautiful package toppers when worked in larger sizes using chunky yarn, turning a simple wrapped gift into something truly memorable and worthy of display.

Specialty and Novelty Crochet Bow Patterns
Beyond the traditional bow shapes, there is a whole world of specialty and novelty crochet bow patterns that incorporate additional design elements to create something truly unique and eye-catching. One beloved example is the sailor bow, which mimics the crisp, structured look of the ribbon bows found on nautical-themed fashion. The sailor bow is typically worked in a single color of smooth cotton yarn and features a flat, wide silhouette with precisely defined loops and a narrow, neatly wrapped center band. The result is a bow that looks almost like it could have been cut from grosgrain ribbon, making it a sophisticated accent for adult accessories and home décor alike.
Another specialty pattern that has developed a devoted following in the crochet community is the peek-a-boo bow, which features a small opening or cutout in the center panel through which a contrasting ribbon, a button, or a decorative brad can be threaded or attached. This design element adds an interactive, mixed-media quality to the bow and allows for tremendous personalization. A peek-a-boo bow worked in white cotton and threaded with a narrow velvet ribbon becomes an elegant bridal accessory, while the same pattern worked in bright acrylic yarn with a novelty button center transforms into a playful embellishment for a child’s cardigan or tote bag.
For those who love combining crochet with other crafts, the appliqué bow pattern opens up a world of creative possibilities. These bows are designed specifically to be stitched onto knitted or crocheted fabric as decorative appliqués, and they often feature a flatter profile and reinforced center construction to ensure they lie smoothly against the base fabric without puckering or curling. Appliqué bows can be found in a wide range of styles, from simple flat bows in basic stitches to elaborate textured versions incorporating popcorn stitches, bobbles, or surface slip stitch embellishment. Working a collection of appliqué bows in coordinating colors and attaching them to a simple crocheted blanket is a beautiful way to create a custom, heirloom-quality baby gift.
- Sailor Bow: A crisp, structured bow worked in smooth cotton that mimics the look of grosgrain ribbon, ideal for sophisticated accessories and coastal-themed décor.
- Peek-a-Boo Bow: Features a decorative opening or cutout in the center panel, perfect for threading ribbon or showcasing a statement button.
- Appliqué Bow: Designed to be stitched flat onto knitted or crocheted fabric, available in simple to highly textured versions.
- Bow Tie Bow: Worked to replicate the shape of a classic men’s bow tie, charming on children’s clothing and novelty accessories.
- Oversized Statement Bow: Worked in bulky or super-bulky yarn, these large-scale bows make bold fashion and home décor statements with minimal time investment.
Creative Ways to Use Your Finished Crochet Bows
Completing a beautiful crochet bow is only the beginning of the creative journey, because deciding how to use or display your finished creation opens up an almost limitless range of possibilities. Hair accessories are perhaps the most popular application for crochet bows, and for good reason. A crochet bow attached to a French barrette clip, a headband blank, or an alligator clip creates a completely handmade hair accessory that can be color-coordinated perfectly with any outfit in a wardrobe. These make particularly wonderful gifts for children and babies, as parents appreciate the ability to request custom color combinations that match their little one’s existing clothing collection.
Home décor is another area where crochet bows shine brightly as a design element. Large bows made from chunky yarn make gorgeous, textural additions to wreaths for every season of the year. A bow in rich burgundy and gold tones adds warmth to an autumn wreath, while a crisp white bow brings a classic elegance to a winter or Christmas wreath. Smaller bows can be strung together on a length of twine to create a charming garland for a mantle, a nursery, or a party backdrop. Bows can also be attached to pillow covers, curtain tiebacks, and throw blanket edges to add a soft, decorative accent to any room.
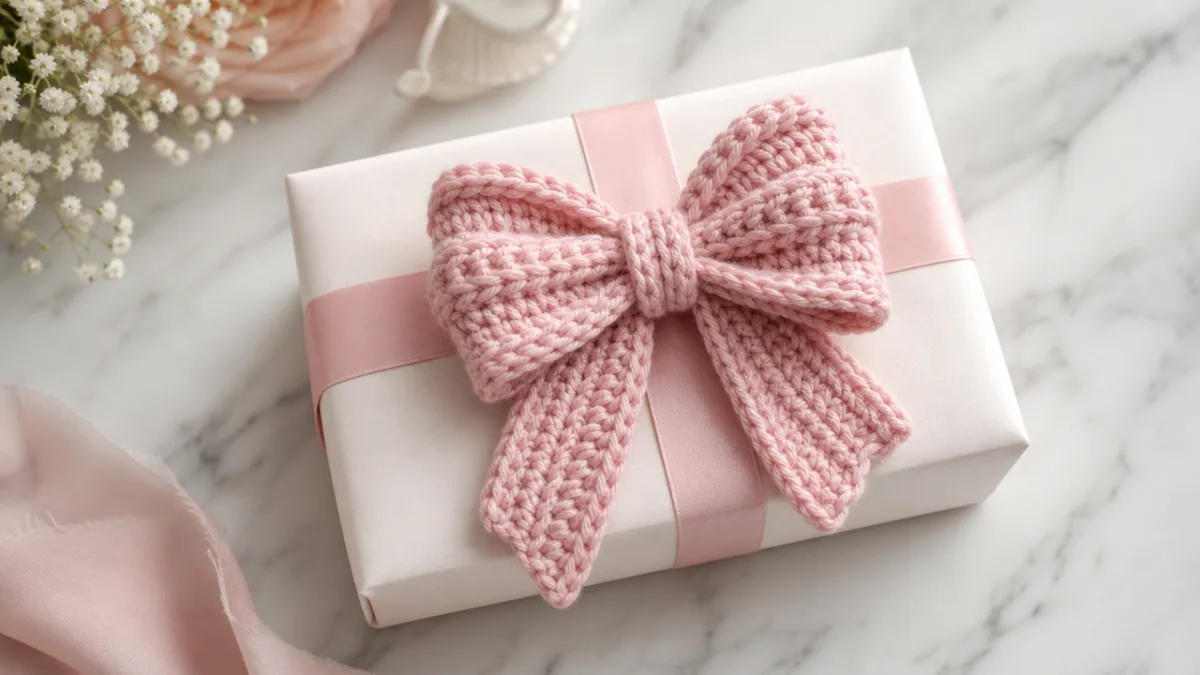
Gift wrapping and packaging represent yet another creative avenue for your crochet bow collection. A handmade crochet bow placed on top of a wrapped gift immediately elevates the presentation and signals that the giver has invested genuine thought and effort into the occasion. Unlike a mass-produced stick-on bow, a crochet bow can be kept and treasured long after the gift inside has been used. Many recipients save these bows to use as hair accessories, to attach to their own handmade projects, or simply to display as small works of fiber art. Working a crochet bow in the recipient’s favorite colors or incorporating their initials in a contrasting color adds an even more personal touch that truly makes the gift memorable.
Tips for Perfect Crochet Bows Every Time
Achieving consistently beautiful, well-shaped crochet bows requires attention to a few key techniques that make a significant difference in the finished result. Tension consistency is perhaps the most important factor, as uneven tension leads to bows that look lopsided, lumpy, or misshapen. If you find that your tension tends to vary throughout a project, try consciously pausing at the end of each row to ensure your final stitch is neither too tight nor too loose before turning your work. Practicing on small swatches before starting a bow you intend to use or gift is always time well spent, particularly if you are working with a new yarn or hook combination.
The center wrap technique deserves special attention because it is the step that most dramatically affects the overall appearance of the finished bow. Most bow patterns call for cutting a separate length of yarn and wrapping it tightly around the center of the bow multiple times before securing it with a knot on the back side. The tightness of this wrap determines how dramatically the bow loops flare outward and how defined the center cinch appears. Wrapping too loosely results in a bow that looks flat and undefined, while wrapping too tightly can distort the proportions of the loops. Practice finding the sweet spot with scrap yarn before working the final wrap on your finished bow.
Blocking is the secret weapon that separates truly polished crochet bows from homemade-looking ones, and it is a step that many beginners skip to their detriment. To block a crochet bow, simply dampen it lightly with a spray bottle of water, shape it carefully with your fingers to achieve perfect symmetry, and pin it to a foam blocking mat using T-pins to hold the shape while it dries completely. This process relaxes the fibers, evens out any tension irregularities, and sets the bow in its intended shape so it maintains that beautiful silhouette indefinitely. Even bows worked in acrylic yarn benefit from wet blocking, though acrylic can also be steam blocked using a garment steamer for an equally effective result with even more dramatic shape retention.
Storing and caring for your finished crochet bows properly will ensure they stay beautiful for years to come. Bows used as hair accessories should be kept in a small zip pouch or jewelry box when not in use to prevent them from being crushed or stretched out of shape. Bows used in home décor applications are best kept away from direct sunlight, which can fade colors over time, particularly in natural fiber yarns. Hand washing in cool water with a gentle detergent is recommended for most fiber types, followed by laying the bow flat to dry after reshaping it by hand. Taking a few extra minutes to care for your handmade pieces properly ensures that the time and effort you invested in creating them is rewarded with lasting beauty and enjoyment.








What do you think?
It is nice to know your opinion. Leave a comment.