










Clever Cardboard Crafts DIY For Your Home
The Surprising Versatility of Cardboard as a Craft Material
Cardboard is one of the most underestimated materials in the world of DIY home crafts. Every week, most households discard an impressive number of cardboard boxes from deliveries, cereal packages, and other everyday products without giving them a second thought. Yet in the hands of a creative maker, these humble sheets of layered paper pulp can be transformed into stunning home décor pieces, functional organizers, and artistic installations that genuinely surprise guests and elevate interior spaces.
What makes cardboard so remarkable as a crafting medium is its unique combination of accessibility, workability, and structural potential. It can be cut with basic scissors or a craft knife, layered to create thickness and rigidity, painted in any color imaginable, and coated with materials like Mod Podge, gesso, or acrylic sealant to mimic the appearance of wood, stone, or metal. The learning curve is gentle enough for complete beginners but the ceiling of complexity is high enough to keep experienced crafters challenged and engaged for years.
Beyond its creative appeal, choosing cardboard as your primary crafting material carries genuine environmental benefits. Reusing cardboard that would otherwise head to the recycling bin reduces waste and gives new purpose to something already produced. This makes cardboard crafting not just a hobby but a small, meaningful act of sustainability. In an era where conscious consumption matters more than ever, building beautiful things from discarded materials is both artistically satisfying and responsible.
Understanding Different Types of Cardboard
Not all cardboard is created equal, and knowing the differences will significantly improve the quality of your finished projects. Corrugated cardboard, the kind used in shipping boxes, consists of a wavy inner flute sandwiched between two flat liner sheets. This construction gives it excellent strength and makes it ideal for structural projects like shelving units, storage boxes, and furniture prototypes. Its thickness and rigidity mean it holds its shape well even after painting and sealing.
Flat chipboard or greyboard, on the other hand, is the dense, smooth cardboard found in cereal boxes, shoe boxes, and packaging inserts. This variety is thinner and more uniform in texture, making it perfect for detailed decorative work, creating molds, and building items that require a smoother finished surface. Many crafters use chipboard as a base for mixed-media artwork, journal covers, and intricate wall art because it accepts glue, paint, and other media so readily.
Kraft cardboard, often seen in brown paper grocery bags and natural-toned packaging, offers yet another texture and weight option. Its slightly rougher surface takes paint beautifully and has a warm, organic aesthetic that suits rustic or Scandinavian-inspired home décor styles. By collecting and sorting different cardboard types as they pass through your home, you quickly build up a versatile stash that gives you the right material for any project you want to undertake.
Stunning Wall Art and Decorative Panels from Cardboard
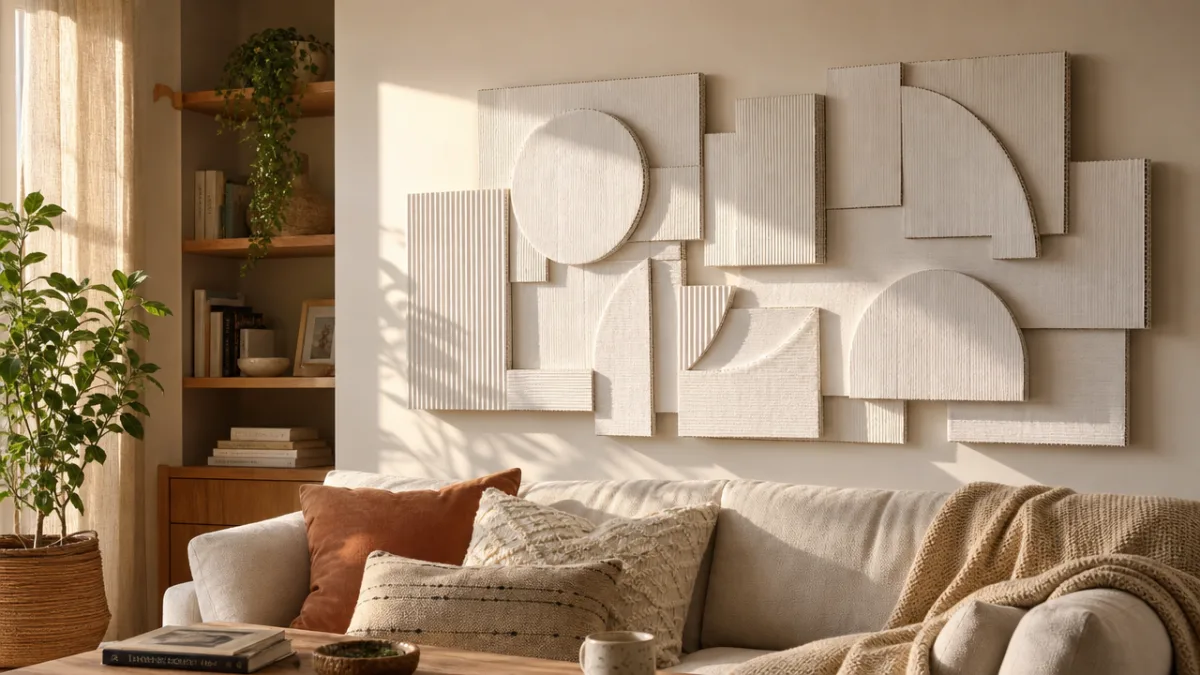
One of the most dramatic ways to use cardboard in home décor is by creating large-scale wall art and decorative panels. Because cardboard is lightweight, you can construct pieces of considerable size without worrying about the structural demands that would come with heavier materials. A well-designed cardboard wall panel can become an absolute focal point in a living room, bedroom, or hallway, drawing the eye and inspiring conversation from every visitor who sees it.
Geometric wall art is particularly popular and surprisingly achievable with cardboard. By cutting shapes like hexagons, triangles, diamonds, and chevrons from chipboard or corrugated sheets and arranging them in intricate repeating patterns, you can build installations that rival expensive store-bought pieces. Painting each element in a coordinated palette before assembling them on a backing board adds depth and polish. Some crafters apply metallic gold or copper paint to select pieces for a glamorous touch that catches light beautifully throughout the day.
Three-dimensional relief art is another spectacular application. By layering pieces of cardboard cut in graduated sizes and gluing them together, you can build up sculptural forms that cast real shadows and create visual depth on an otherwise flat wall. Flowers, mandalas, architectural arches, and abstract geometric forms all translate extraordinarily well into this format. Once sealed and painted in a single unified color like crisp white or warm terracotta, these relief panels look far more sophisticated and expensive than their humble origin material would suggest.
DIY Cardboard Mirrors and Frames
Frame-making is one of the most practical and rewarding cardboard crafts for home use. A thick, ornate picture frame built from layered chipboard and decorated with textured details can become a genuinely beautiful piece. By cutting multiple rings or rectangular borders in decreasing sizes and layering them with slightly offset positioning, you create an illusion of carved depth that mimics far more expensive wooden or plaster moldings. Adding rope, twine, or corrugated cardboard strips cut into decorative patterns gives further visual interest.
Mirror frames made from cardboard are particularly impactful because the reflective surface of even an inexpensive mirror elevates the entire piece. A sunburst mirror, for instance, requires nothing more than a round mirror insert, a large circular cardboard backing, and carefully cut strips of corrugated cardboard fanned out around the perimeter to suggest rays of light. Painted gold or bronze and hung in an entryway or above a mantel, the result is genuinely striking and would be assumed by most people to have cost a great deal more than its actual materials.
Beyond their decorative appeal, DIY frames allow for complete customization. You can design frames specifically to match your existing furniture, color scheme, or the style of the artwork or photograph they will display. Rustic frames with exposed corrugated texture suit farmhouse aesthetics, while smooth-painted chipboard frames with clean lines complement modern minimalist interiors. This level of tailored design would cost considerably more if purchased commercially, making the time invested in crafting your own frames an excellent return on creative effort.
Functional Cardboard Storage and Organization Solutions
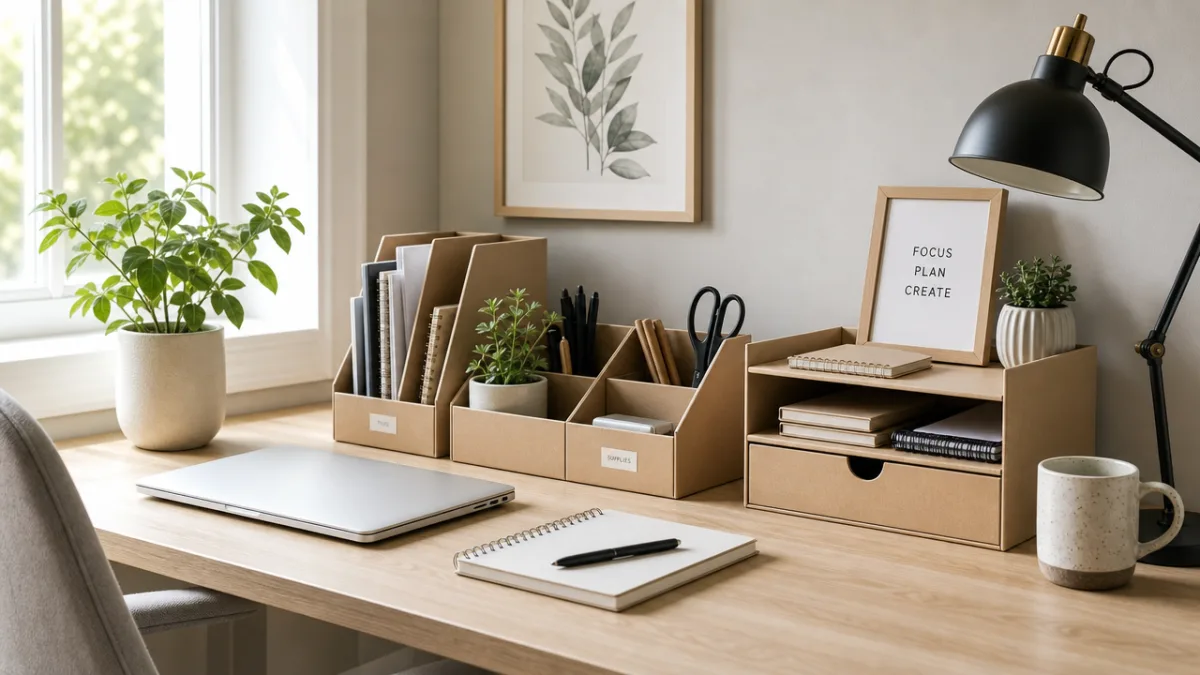
Storage and organization represent one of cardboard’s most practical contributions to the home. The same structural qualities that make corrugated cardboard useful for shipping heavy products make it an excellent building material for drawers, dividers, shelving inserts, and box organizers. With a craft knife, a metal ruler, strong PVA glue, and a bit of patience, you can construct bespoke storage solutions precisely sized for any space in your home, from a cluttered kitchen drawer to an overflowing wardrobe.
Drawer organizers are among the simplest and most immediately useful cardboard projects. By measuring the interior of a drawer and cutting strips of cardboard to fit as dividers, you create customized compartments for cutlery, cosmetics, craft supplies, office materials, or any other collection of small items that tends to slide into disarray. Unlike purchased organizers, which rarely fit drawers perfectly, a handmade cardboard version is built exactly to your specifications. Covering the strips with decorative paper or lining the compartments with fabric scraps elevates the look considerably.
Modular shelving inserts and desktop organizers made from cardboard can also be remarkably durable when properly constructed and sealed. A honeycomb-style desk organizer built from layers of corrugated cardboard glued together in a grid pattern, then painted or covered in washi tape, holds pens, scissors, rulers, and other supplies with confidence. The key to longevity in these functional pieces is using multiple layers of strong glue and applying a good sealant like Mod Podge or acrylic varnish once the structure is complete, which adds rigidity and makes the surface wipeable.
Cardboard Shelving and Furniture Projects
For more ambitious makers, cardboard can even serve as the primary material for small furniture pieces and shelving units. Stacking and gluing many layers of corrugated cardboard together creates a material with surprising load-bearing capacity, sometimes called “cardboard plywood” by crafters who work with it regularly. A small side table, a set of honeycomb wall shelves, or a bedside caddy built this way can support decorative objects, books, and even small lamps without difficulty, provided the construction is careful and thorough.
Children’s furniture and play furniture is another area where cardboard truly excels. A cardboard play kitchen, a child-sized table and chairs, a doll’s house, or a toy storage unit can all be built at a fraction of the cost of purchased equivalents. Children are usually delighted to be involved in the building and painting process, making these projects a wonderful weekend activity that results in something genuinely useful for the household. Because children outgrow furniture quickly, the temporary nature of cardboard is actually an advantage rather than a limitation.
When building any functional cardboard furniture or storage, planning is essential. Sketching your design on paper first, accounting for the thickness of the cardboard layers in your measurements, and dry-fitting pieces before applying glue will save considerable frustration. It is also worth reinforcing joints with brown packing tape before final assembly, as this adds significant structural strength at stress points. With careful construction, cardboard furniture can last years rather than weeks, defying the expectations of anyone unfamiliar with the material’s true potential.
Decorative Lighting and Lampshade Projects
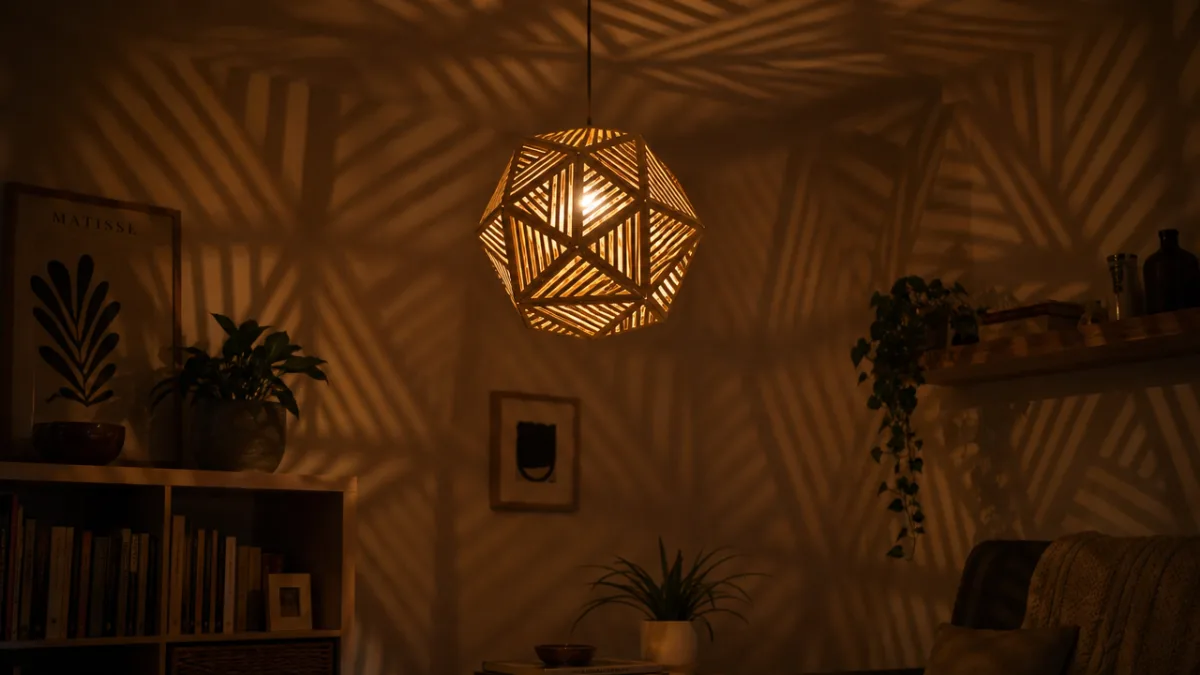
Lighting is one of the most transformative elements in interior design, and cardboard offers a surprisingly beautiful medium for creating custom lampshades and decorative light installations. The way light interacts with cardboard, particularly when perforated or cut into intricate lace-like patterns, produces a magical effect that no standard store-bought lamp can replicate. When a light source glows through carefully cut geometric openings in a cardboard shade, it casts intricate shadows across walls and ceilings that shift subtly as the light changes throughout the day and evening.
A basic pendant lampshade can be made by cutting a large sheet of chipboard into a template, scoring fold lines, and assembling it into a geometric form like a hexagonal prism, a tapered cone, or a faceted lantern shape. Securing the edges with strong tape or glue and then cutting decorative openings with a craft knife creates the perforated effect. Using a low-wattage LED bulb inside ensures the shade never gets warm enough to be a fire risk, which is an important safety consideration when working with any paper-based material near a light source.
Table lamp bases can also be constructed from cardboard, particularly when using the thick layered method discussed earlier. A cylindrical or rectangular base built from stacked and glued corrugated rings, then sanded smooth, painted, and sealed, can be genuinely beautiful as well as structurally sound. Combined with a simple pendant cord kit purchased from a hardware store, the result is a fully functional custom lamp that looks like it belongs in a designer home. Friends and family who see it are invariably astonished to learn it was made entirely from cardboard.
Candle Holders and Decorative Lanterns
Smaller decorative lighting projects like candle holders and lanterns are ideal entry points for anyone new to cardboard crafting. A simple lantern made from a chipboard sheet cut into a rectangular tube, with geometric patterns cut along its sides and a small battery-operated tea light placed inside, creates a warm and charming atmosphere on a shelf, mantelpiece, or dining table. These make lovely gifts as well as beautiful additions to your own home, and a set of them in coordinating sizes creates a cohesive vignette that feels carefully curated.
Moroccan-style decorative lanterns are a particularly popular variation that makes excellent use of cardboard’s cutting properties. By cutting intricate star, diamond, and arabesque patterns into the sides of a structured cardboard form and painting the exterior in rich colors like deep teal, burgundy, or gold, you create something that genuinely evokes the ornate lanterns found in artisan markets. This style pairs beautifully with textiles, plants, and ceramic accessories to create a globally inspired living space full of warmth and character.
For the holiday season, cardboard lighting crafts take on special significance. Advent calendars with small illuminated compartments, star-shaped hanging lanterns, and decorative nativity scene silhouettes all benefit from the versatility of cardboard as a medium. Creating a cohesive set of handmade holiday decorations from cardboard not only saves money but results in unique pieces with genuine personal meaning that mass-produced decorations simply cannot offer, and that can be carefully stored and brought out to enjoy year after year.
Tips, Techniques, and Essential Tools for Cardboard Crafting
Achieving beautiful results with cardboard crafting depends as much on technique and tools as on creativity and design. The right approach to cutting, joining, and finishing cardboard makes the difference between a project that looks polished and professional and one that appears rough and amateur. Fortunately, the essential tools are neither expensive nor difficult to find, and the techniques themselves are straightforward enough to master with a modest amount of practice on test pieces before committing to a finished project.
Cutting cleanly is the single most important skill in cardboard crafting. For straight lines, always use a metal ruler rather than a plastic one, as craft knife blades will catch on plastic edges and veer off course. For intricate curves and detailed cutout patterns, small pointed scissors or a precision craft knife with a fresh blade give the cleanest results. Blunt blades tear rather than cut, so replacing them frequently is essential, particularly when working with thick corrugated cardboard that dulls edges quickly. A self-healing cutting mat protects your work surface and provides a stable, slightly resistant base that improves cut quality.
Surface finishing is equally important to achieving a result that transcends the material’s humble origins. The key steps in preparing a cardboard surface for paint include sealing any open corrugated edges with strips of paper tape or a brush coat of diluted PVA glue, applying a base coat of gesso to create a smooth, even painting surface, and sanding lightly between coats for particularly smooth finishes. Once painted, sealing the entire piece with Mod Podge, clear acrylic spray, or polyurethane varnish protects the surface, adds durability, and gives the piece a finished look that holds up well over time.
Building a Cardboard Crafting Practice at Home
Developing a sustainable cardboard crafting practice means building good habits around collecting and storing materials. Keeping a dedicated storage area, even just a large flat bin or a corner of a closet, where you sort and flatten cardboard by type as it arrives in your home ensures you always have materials on hand when inspiration strikes. Labeling sections for corrugated, chipboard, and kraft cardboard makes it easy to find the right weight and texture for any project without rummaging through a disorganized pile.
Building a small reference library of techniques is also invaluable. Many makers keep a scrapbook or digital folder of projects they want to attempt, organized by complexity so they always have something appropriate to attempt whether they have an hour or a whole weekend available. Practicing new techniques on scrap pieces before applying them to a real project saves both material and frustration. The cardboard crafting community online, particularly on platforms like Pinterest, YouTube, and Instagram, is generous with tutorials, tips, and inspiration, making it easy to continually develop new skills.
Finally, embracing the iterative nature of crafting is essential to enjoying the process. Not every project will turn out exactly as planned, and that is entirely normal and acceptable. Cardboard’s low cost means that a failed attempt wastes very little beyond time, and even unsuccessful experiments usually teach techniques or reveal design considerations that improve future work. The most important habit any cardboard crafter can develop is simply to keep making things, because skill and confidence grow steadily with every project attempted, and the creative rewards of this endlessly versatile material are genuinely without limit.








What do you think?
It is nice to know your opinion. Leave a comment.