










How to Plant Calla Lily Bulbs for Beginners
Introduction to Calla Lilies
If you’re looking for a flower that makes a real statement in the garden, calla lilies are hard to beat. Those dramatic trumpet-shaped blooms and deep green, arrow-shaped leaves have made them a favorite for centuries — you’ll find them everywhere from wedding bouquets to grand estate gardens. The good news is that whether you’re picking up a trowel for the first time or getting back into gardening after a long break, calla lilies are genuinely forgiving plants that are well within anyone’s reach.
Despite looking like something you’d only find in a fancy florist’s window, calla lilies are surprisingly adaptable and will do well in a wide range of climates as long as you give them what they need. They grow from rhizomes — often just called bulbs in everyday conversation — which are underground structures that store all the energy the plant needs to push out those beautiful flowers. Getting to know how rhizomes work is actually the most important first step, because so much of what happens above ground is decided before anything even breaks the soil.
This guide is written with complete beginners in mind. There’s no confusing jargon here, just clear, practical advice on every step of the process — from picking out rhizomes at the garden center to caring for your plants all the way through the season. By the time you’ve finished reading, you’ll feel genuinely ready to grow calla lilies in your garden or in containers, and to actually enjoy the experience.
Choosing the Right Calla Lily Rhizomes
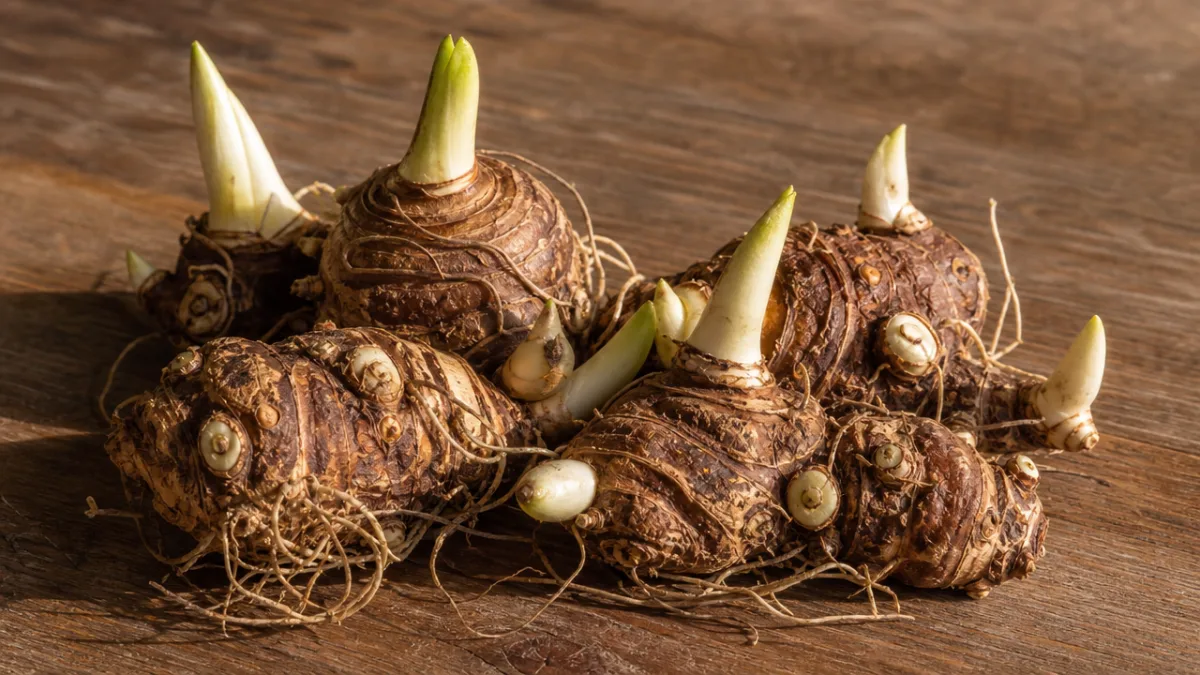
Out of everything involved in growing calla lilies, choosing good rhizomes might be the single most important decision you make. A healthy rhizome gives your plant a real head start, while a poor one can mean disappointment right from the beginning. When you’re at the garden center or browsing online, look for rhizomes that feel firm and solid — no soft spots, no mold, no shriveled or sunken sections. A good one will be plump, roughly round or oval, and you should be able to spot small bumps or eyes on the surface, which are exactly where the new shoots will come from.
One thing that surprises a lot of first-time growers is just how much variety there is beyond the classic white bloom. Modern calla lily varieties come in deep purple, bright yellow, soft pink, fiery orange, rich burgundy, and even shades so dark they’re nearly black. It’s genuinely fun to browse the options. Think about the colors already in your garden, and whether you’re growing them mainly for cutting, for a patio container, or as a big showstopper planting in a bed. Most beginner-friendly varieties are labeled clearly with their mature height, bloom time, and what conditions they prefer, so you don’t have to guess.
If your budget allows, it’s worth paying a little more for larger, higher-grade rhizomes. They tend to produce more flowering stems and put on a better show right in their first season. Smaller ones aren’t necessarily bad — they may just need an extra season to really hit their stride. Try to buy rhizomes in early spring and plant them soon after, rather than letting them sit around drying out. If you do need to store them briefly before planting, tuck them into a paper bag with a bit of peat moss and keep them somewhere cool, dry, and dark.
Preparing the Planting Site and Soil
Calla lilies do best in full sun to partial shade, and the right balance really depends on where you live. In areas with hot summers, a spot with morning sun and some afternoon shade will keep your plants from getting heat-stressed and help the soil hold onto moisture. In cooler climates, a full-sun position will encourage stronger growth and more blooms. It’s worth spending a few minutes watching how light moves through your garden across the day before you decide where to plant — even a small shift in location can make a noticeable difference.
Soil quality matters a lot with calla lilies. They like rich, well-draining soil that stays moist without ever getting waterlogged. Heavy clay soils are a real problem because they hold too much water and can cause rhizomes to rot, especially after rain. On the other end of the scale, very sandy soils drain too fast and can leave plants thirsty and struggling. What you’re aiming for is loamy soil — that balanced mix of sand, silt, and clay — with plenty of organic matter worked in, like compost, aged manure, or leaf mold. If your garden soil isn’t naturally like that, digging in a good few inches of compost before planting will get you a long way.
It’s also worth checking your soil’s pH before you plant. Calla lilies prefer slightly acidic to neutral conditions, somewhere between 5.5 and 6.5. A basic soil test kit from the garden center will give you a reading in just a few minutes. If your soil comes back too alkaline, you can bring the pH down by mixing in elemental sulfur or acidic compost. If it’s too acidic, a light dusting of garden lime will bring it back into range. Taking a bit of time to get the soil right before you plant is genuinely one of the best things you can do for your plants all season long.
How to Plant Calla Lily Rhizomes Step by Step
Getting your timing right is key. In most temperate climates, you’ll want to wait until after the last frost date has passed and the soil has warmed up to at least 60°F before planting rhizomes outdoors. Planting into cold, wet soil is one of the most common mistakes beginners make — rhizomes planted too early can rot in the ground before they ever get the chance to sprout. If you’re eager to get going before the weather cooperates, you can start rhizomes in pots indoors four to six weeks before your planned outdoor planting date, then move them outside once conditions improve.
The actual planting process is pretty simple and only requires basic tools. Here’s how to do it:
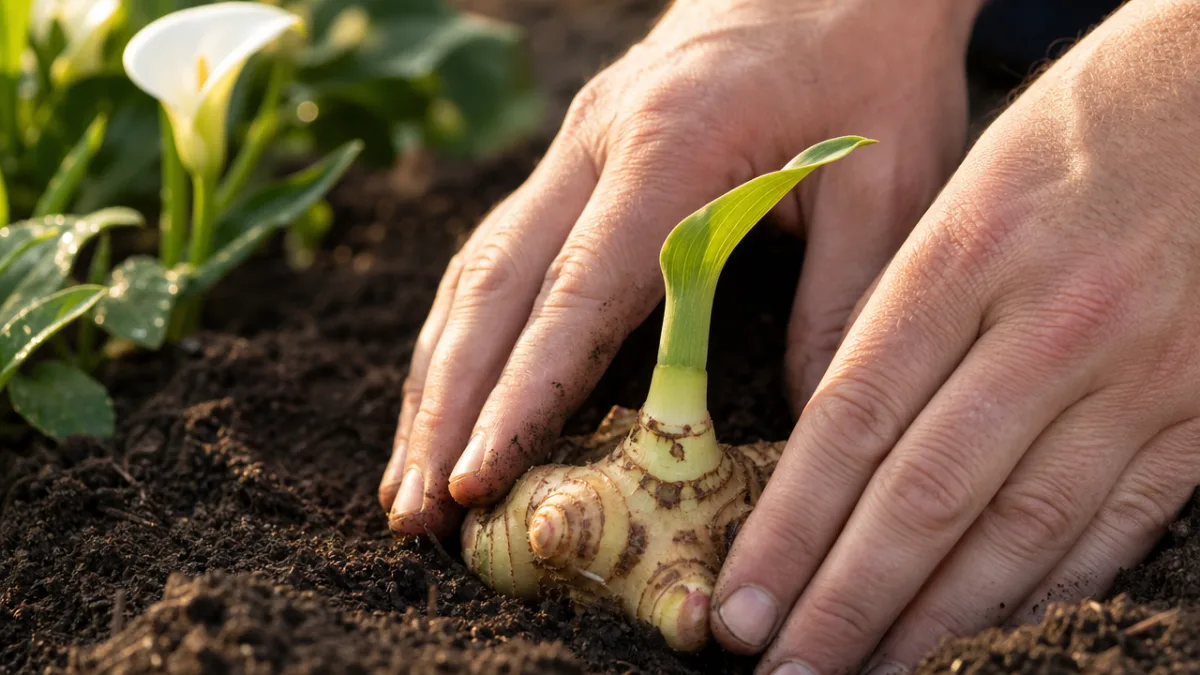
- Dig a hole about 3 to 4 inches deep using a trowel or hand digger.
- Set the rhizome in the hole with the knobby side facing up — that’s where the shoots will emerge.
- Space rhizomes at least 12 inches apart to give roots room to spread and allow air to move between plants.
- Gently fill the hole back in, pressing lightly to close up any large air pockets without packing the soil down too hard.
- Water the area thoroughly right after planting to settle the soil and get things going.
- Spread a 2-inch layer of mulch over the planting area to help hold moisture and even out soil temperature.
For containers, choose a pot that’s at least 12 inches wide and 12 inches deep, and make sure it has drainage holes in the bottom. Fill it with a good-quality potting mix that has some perlite mixed in for drainage. One large rhizome per 12-inch pot works well, or you can space several evenly in a bigger container. Growing in pots has a real practical advantage: you can move things around to chase the sun or bring them inside if a cold snap sneaks up on you, which makes containers a great option if your climate is unpredictable or you’re working with limited space.
Watering, Fertilizing, and Ongoing Care
Watering calla lilies well takes a little practice, because they want consistent moisture but really can’t stand sitting in waterlogged soil. Right after planting, keep things moderate — let the top inch of soil dry out slightly between waterings so the rhizome doesn’t rot before it gets established. Once you start seeing shoots pushing up through the soil, you can water more regularly, aiming to keep the soil evenly moist throughout the growing season. During hot or dry stretches, that might mean watering every day or two, especially for container plants, which dry out noticeably faster than those in the ground.
Getting your fertilizing right will make a real difference in how many blooms you get and how impressive they look. Once shoots are actively growing, start feeding with a balanced fertilizer — something like a 10-10-10 formula with equal parts nitrogen, phosphorus, and potassium works well at this stage. As the plants start heading toward flowering, switch to a fertilizer with lower nitrogen and higher phosphorus to encourage blooms rather than just a lot of leafy growth. A liquid fertilizer applied every two to three weeks during the growing season tends to work better than slow-release granules for calla lilies, since it gets nutrients to the roots in a form the plant can use right away.
A few other small habits will keep your plants looking great all season. Snip off spent blooms at the base of the stem to keep the plant focused on producing new flowers rather than putting energy into setting seed. Keep an eye out for aphids, spider mites, and thrips — if any of them show up in significant numbers, a spray of insecticidal soap or neem oil will usually sort things out. Slugs and snails can also go after the lush foliage, especially when it’s damp, but iron phosphate-based slug bait is effective and safe to use around kids and pets.
Overwintering and Storing Calla Lily Rhizomes
If you live somewhere that gets freezing winters, you’ll need to dig up your calla lily rhizomes and bring them inside until spring. This is called overwintering, and while it might sound intimidating, it’s really not that complicated once you’ve done it once. Done right, your rhizomes can be saved and replanted year after year — and they actually tend to get bigger and put on better displays each time. The main thing to get right is the timing of when you dig, and keeping the stored rhizomes in conditions that are neither too dry nor too moist.
After the first frost kills back the foliage in autumn, give it a few extra days before you dig. That short wait lets the plant pull energy back down into the rhizome, which is worth doing. Then use a garden fork or spade to loosen the soil starting from outside the plant’s root zone and working inward, so you don’t accidentally slice through any rhizomes. Lift the whole clump out, shake off the loose soil, and let the rhizomes air dry somewhere warm and well-ventilated for a week or two. Once they’re fully dry, trim off any dead foliage, give them a light dusting of fungicide powder to guard against mold, and pack them loosely in paper bags or cardboard boxes with dry peat moss, vermiculite, or shredded newspaper.
Keep the packed rhizomes somewhere cool, dark, and frost-free — ideally between 45 and 55°F. A basement, an unheated garage, or a spare bedroom can all work depending on your home. Check in on them every few weeks over winter and pull out any that are showing signs of rot or mold before it has a chance to spread. By the time spring rolls around and the soil starts warming up again, your rhizomes will be ready to go, and all that careful storage will pay off with another season of beautiful blooms.
Troubleshooting Common Problems for Beginners
Even careful, attentive gardeners run into problems sometimes, and calla lilies are no different. The key is knowing what to look for and how to respond before a small issue becomes a bigger one. Yellowing leaves are probably the most common complaint, and there are a few different things that can cause them — overwatering, underwatering, a nutrient deficiency, or root rot are all possibilities. Before you jump to a solution, take a good look at the whole plant and think through what’s been happening with its care. Reaching for fertilizer when the real problem is waterlogged soil, for example, won’t help and might make things worse.
Not getting any blooms is another thing that frustrates beginners, and the reassuring thing is that it almost always comes down to something fixable. Too much shade, over-fertilizing with a nitrogen-heavy product that pushes leafy growth at the expense of flowers, planting rhizomes that were too small to bloom yet, or temperature stress during bud formation are the usual culprits. Going back through the growing conditions described in this guide will usually point you toward the answer. Often, just moving the plant somewhere sunnier or switching up the fertilizer formula is enough to unlock a beautiful flush of flowers within a few weeks or by the following season.
Root rot from fungal disease is probably the most serious thing you can encounter with calla lilies, and it’s one where prevention is much more effective than trying to treat it after the fact. The best defenses are good drainage, not overwatering, and spacing plants far enough apart for air to circulate freely. If you suspect root rot, carefully dig up the affected plant, cut away any soft or discolored roots, dust the healthy remaining tissue with fungicide, and replant in fresh, well-draining soil in a new spot. Caught early enough, plants can often bounce back and still give you a decent show of flowers.
Above all, try to remember that gardening is something you get better at over time, not something you’re supposed to get perfect right away. Every challenge is genuinely teaching you something about plants, soil, and how the natural world works. Calla lilies are resilient, generous plants, and they’ll reward you with flowers that are genuinely stunning. As you grow through each season, you’ll start to develop a feel for what your plants need almost instinctively, and the whole process will start to feel less like following instructions and more like second nature. Enjoy every step of it — from that first bare rhizome all the way to that first breathtaking bloom.








What do you think?
It is nice to know your opinion. Leave a comment.