










Crate Shelves: Cheap and Easy to Make for Any Room in Your Home
Why Crate Shelves Are the Ultimate Budget-Friendly Storage Solution
If you’re looking for a home organization project that’s actually affordable and doesn’t look like every other shelf on the block, crate shelves might be exactly what you need. DIYers have been repurposing wooden crates for decades, and honestly, it’s not hard to see why. You can find them at craft stores, hardware shops, and thrift stores for just a few dollars apiece — which means you can cover an entire wall with shelving for a fraction of what you’d spend on anything store-bought.
And beyond the savings, there’s something about crate shelves that just feels warm and lived-in — the natural wood grain, the open-box shape, that slightly rustic texture. They work with farmhouse, bohemian, industrial, and Scandinavian styles alike, and because you can paint, stain, or stencil them however you like, no two sets ever look exactly the same. That’s a big deal when most flat-pack furniture looks identical in every home.
There’s also something genuinely satisfying about building them yourself. You don’t need advanced carpentry skills or a workshop full of tools — crate shelves are one of those rare projects that’s beginner-friendly without feeling like a compromise. Whether you’ve tackled plenty of DIY projects before or this is your first time picking up a drill, you’ll end up with something functional, good-looking, and a little bit impressive.
Choosing the Right Crates for Your Project
Not all wooden crates are built the same, and picking the right ones upfront will save you a lot of headaches later. The most common starting point is the unfinished pine crate you’ll find at places like Michaels or Hobby Lobby — usually around 12 by 18 inches, lightweight, easy to sand and paint, and cheap enough to buy several at once. The trade-off is that they’re on the thinner side, so they’re better suited for books, plants, and decorative objects than anything particularly heavy.
If you want something with more heft, keep an eye out for wooden wine crates or old produce crates at antique markets, grocery stores, or online. These are typically made from thicker wood and often come with interesting stamped branding or a natural patina that gives them instant character — no extra work required. Reclaimed pallet wood is another option, though it takes a bit more prep: you’ll want to sand thoroughly, pull any stray nails, and make sure the wood is safe to bring indoors.
One thing that really matters if you’re planning to stack or mount several crates together: consistency in size. Before you buy a whole stack, bring a tape measure and check that the dimensions match across all of them. Even small differences in height or depth can throw off the finished look in a way that’s surprisingly hard to fix once everything’s up. If you’re intentionally mixing sizes for an eclectic look, sketch out the layout beforehand so you know exactly how the pieces will fit together.
Tools and Materials You Will Need
One of the best things about this project is how little you actually need to pull it off. For a basic wall-mounted setup, you’re looking at the crates themselves, sandpaper in medium and fine grits, wood stain or paint, a paintbrush or foam roller, wood screws, a drill, wall anchors suited to your wall type, and a level. That’s genuinely it for a straightforward build, and you can pick up everything at a home improvement store for far less than a comparable store-bought shelving unit would cost.
If you want to connect multiple crates into one freestanding unit instead of mounting them individually, add wood glue, some clamps, and maybe a few L-brackets for extra support. A pocket hole jig is also worth considering — it’s inexpensive, creates really clean and secure joints, and you’ll end up using it on a dozen other projects down the road. And if you’d rather not hand-sand your way through a pile of crates, a power sander with 120- and 220-grit discs will save your arms and a lot of time.
Here is a quick checklist of everything you might need depending on your specific project:
- Wooden crates in your desired quantity and size
- Medium-grit sandpaper (100–120 grit) and fine-grit sandpaper (220 grit)
- Wood stain, chalk paint, or latex paint in your chosen color
- Paintbrush, foam roller, or staining cloth
- Wood screws (1.5-inch to 2-inch depending on crate thickness)
- Drill and appropriate drill bits
- Wall anchors or toggle bolts for drywall mounting
- Carpenter’s level and pencil for marking
- Measuring tape and speed square
- Wood glue and clamps (if connecting crates together)
- Polyurethane or wax sealant for finishing
Step-by-Step Instructions for Building Crate Shelves
Preparing and Finishing the Wood
Before anything else, give each crate a good once-over and start sanding. Run your hand along all the surfaces and edges — corners and slats especially tend to be rough — and start with the medium-grit paper to knock down any splinters, rough patches, or leftover grime from manufacturing. Always sand with the grain, not against it, or you’ll end up with fine scratches that create more work later. Once everything feels smooth, do a final pass with the fine-grit paper to get the surface ready to take stain or paint evenly.
After sanding, wipe everything down with a slightly damp cloth to clear away the dust, then let the wood dry fully before you touch any finish. For stain, apply it with a cloth or foam brush using long strokes that follow the grain, give it a few minutes to soak in, then wipe off the excess. If you want a deeper color, a second coat after the first has dried does the trick. If you’d rather paint, chalk paint is a great option for this kind of project — it sticks to raw wood without primer and gives you a lovely matte finish that suits the natural, rustic feel of the crates really well.
Don’t skip the sealant — it’s a step a lot of beginners leave out, but it makes a real difference in how well the shelves hold up over time. A light coat of clear matte polyurethane or furniture wax protects everything from scuffs, moisture, and the general wear that comes with daily use. This is especially worth doing if the shelves are going in a kitchen or bathroom. Two thin coats with a gentle sand in between using 220-grit paper will leave you with a finish that looks polished and actually lasts.
Mounting the Crates to the Wall
Before you pick up the drill, lay everything out on the floor first. Arrange the crates exactly how you want them on the wall, measure the total width and height of the configuration, and use a stud finder to locate your wall studs in that area, marking them lightly with a pencil. Try to anchor into studs whenever you can — they hold dramatically better than drywall alone, especially for shelves that are going to carry any real weight.
The cleanest mounting method is to drive screws through the back panel of each crate directly into the wall. Pre-drill pilot holes at points that line up with your studs, hold the crate at the right height (double-check with your level), and drive the screws in. If you can’t hit a stud, use heavy-duty toggle bolts or snap-style drywall anchors rated for at least twice the load you expect. Aim for at least two anchor points per crate — three if the crate is large or you plan to put heavier things on it.
When you’re mounting multiple crates in a grid or stacked arrangement, start from the bottom and work up, moving from one side across. Mount your first crate, level it carefully, and use it as your reference point for everything else. Keeping a consistent gap between crates — somewhere between a half inch and an inch — makes the whole thing look intentional rather than accidental. Small scraps of wood or cardboard work perfectly as spacers to maintain that gap while you work your way across; just pull them out once everything is secured.
Creative Arrangement Ideas and Styling Tips
Different Layout Configurations
One of the best things about crate shelves is how flexible they are — you can arrange them in so many different ways depending on your wall space and what you actually need to store. The simplest version is a single horizontal row mounted side by side at eye level, which is perfect for hallways, above a desk, or along a bathroom wall. Stack two or three vertically and you’ve got a tall, narrow unit that tucks in nicely beside a door or between pieces of furniture. Go bigger — say, three across and three tall — and the whole thing can become a real focal point in the room.
For something a little more interesting, try mixing orientations within the same arrangement. Turning a crate on its side changes the proportions of the opening completely, giving you a taller, shallower space that’s great for artwork, framed photos, or tall vases. When you combine different orientations in one installation, it stops looking like a row of boxes and starts looking like something custom-built — the asymmetry adds just enough visual energy to keep things from feeling flat.
Corners are worth thinking about too. They’re notoriously tricky to furnish with standard shelving, but crates handle them surprisingly well. Mount two crates at a 90-degree angle in an inside corner with their openings facing out, and you’ve got useful corner shelving without much fuss at all. Stagger them at different heights and you get a cascading staircase effect that’s both practical and genuinely eye-catching. It’s a great way to turn a dead corner into one of the more interesting spots in the room.
Styling Your Finished Crate Shelves
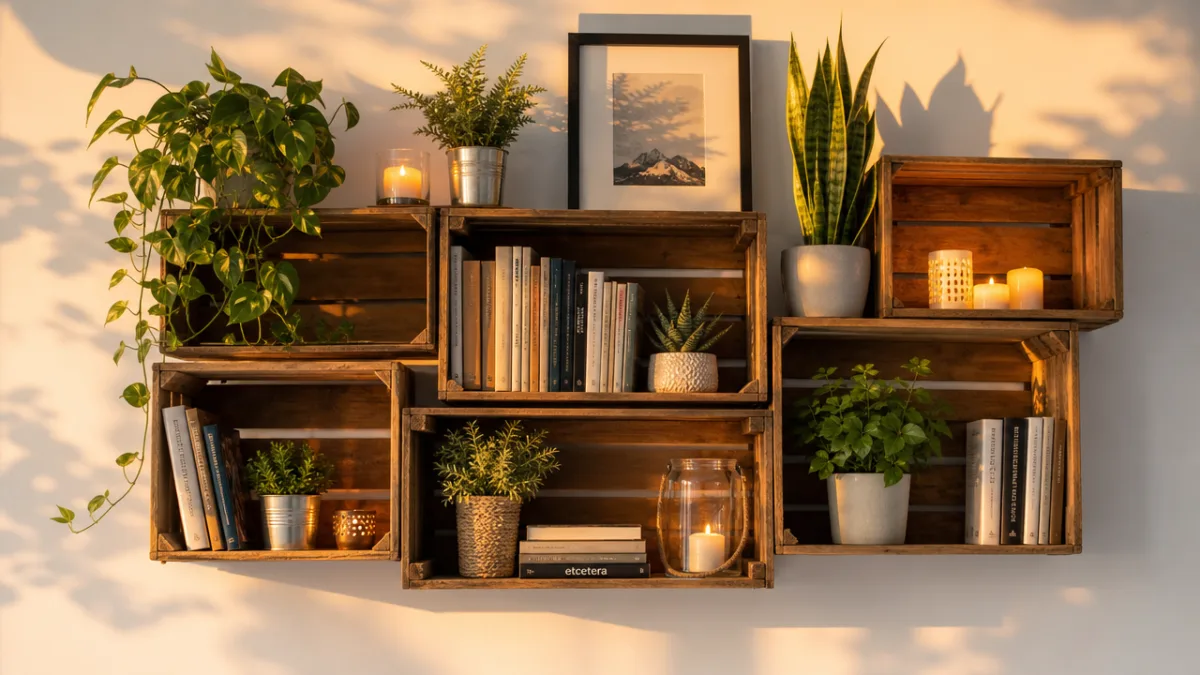
Getting the shelves up is only half the battle — how you style them is what takes the whole thing from “storage solution” to actual design feature. The key is varying height, texture, and visual weight across the display. A trailing plant next to a stack of books next to a small framed print next to a candle — that kind of mix keeps the eye moving across the arrangement rather than stopping cold on any one thing.
Plants work especially well with crate shelves because trailing varieties like pothos, string of pearls, or ivy spill beautifully over the open edges. Succulents and air plants are also happy here since the open structure gives them good airflow. If you want the shelves to do some actual storage work alongside looking nice, tuck small baskets or fabric-lined boxes inside to hold things like remotes, chargers, or craft supplies — they keep everything tidy without wrecking the overall look.
And if you really want to make the shelves shine, add some lighting. Battery-powered LED strips or fairy lights tucked inside the crates or along their back edges cast a warm, soft glow that makes everything look more intentional — especially in the evening. It works particularly well in living rooms and bedrooms where you want layered, ambient light rather than a harsh overhead fixture. The right combination of natural wood, a few well-chosen objects, and warm light can make a simple DIY project look genuinely magazine-worthy.
Variations, Customizations, and Advanced Ideas
Once you’ve got the basic version down, there’s a lot of room to take the idea further. A popular next step is adding a back panel to each crate using thin plywood or beadboard, painted in a contrasting color. It gives the items on the shelf a backdrop to stand out against and adds another layer of visual interest to the whole setup. Wallpaper scraps applied to the inside back panel are another clever touch — a little pattern goes a long way without overwhelming the room.
Adding small hooks or a rail to the bottom edge of a crate turns it into a two-in-one storage solution that stores things below while displaying things on top. This is especially handy in kitchens, where S-hooks can hold mugs, utensils, or dish towels beneath a row of crates holding cookbooks, spice jars, and small appliances. In a craft room or workshop, pegboard-style hooks on the inside face of a crate can keep scissors, tape, and other tools organized and within reach.
If you have young kids, crate shelves mounted low on the wall at their height make a fantastic combination of toy storage and book display. It gives them easy access to their own stuff and actually encourages them to put things away — especially if you use chalkboard paint on a small panel along the front edge so each crate can be labeled. And it doesn’t have to look like a playroom compromise; crate shelves painted in soft, muted tones look genuinely sweet in a nursery or kids’ room.
Finally, don’t rule out taking the project outside. Sealed with exterior-grade polyurethane and mounted on a covered porch, patio, or garden wall, crate shelves make great outdoor plant displays, tool organizers, or herb gardens. Drill drainage holes in the bottom, fill with soil, and you can grow herbs, succulents, or annuals directly in the shelf itself. It’s a living wall installation that looks lush and intentional — and it uses the exact same crates and skills as the indoor version. That versatility is really what’s kept the humble wooden crate such a DIY staple for so long.








What do you think?
It is nice to know your opinion. Leave a comment.